Platinum Walkthrough
This is our The Midnight Walk platinum walkthrough: the full story route for all six chapters, step by step (every puzzle answer, how to get past each monster, every trophy moment), with all 76 collectibles (19 clay figurines, 25 shellphones, 17 gramophone discs and 15 story pages) exactly where you reach them, on our own screenshots, plus the two one-off trophies and both endings.
Roadmap
- Play the story with this page open and pick up every collectible as it comes. Get Mind Over Body in Chapter 2 and Face Your Fears in Chapter 4.
- At the end choose Burn (Burn Out), then Resume from the main menu and choose Stop (Fade Away).
- Missed something? Housy's cupboards show what's missing per chapter: replay that chapter from chapter select. Then Story → Visit Housy and idle for 10 minutes for Home Is Where The Heart Is.
Nothing is missable. Most collectibles sit behind round hatches you pull open (figurines, discs and story pages); shellphones are usually lying in the open beside the path.
Chapter 1: The Tale of the Burnt One 11 collectibles · 4 figurines · 3 discs · 3 shellphones · 1 story pages
Wake up at the end of the world, find your matchstick and relight Potboy. Light candles to open paths, close your eyes (L1) to move the eye-doors, and hide in wardrobes from the first monster.
Waking up
- Walk forward and take the two eyes from the first little creature (press interact to put them in), then the ears from the second one just outside the cave.
- Play with headphones if you can: several puzzles are about sound, and Chapter 4 leans on it heavily.
- At the wardrobes you get the close-your-eyes tutorial (hold L1). With your eyes shut you hear where things are: the key for the blue spiral door you just passed is in the bottom drawer of the far-right wardrobe. Every second with your eyes closed counts towards Shadow Work (60 in total), so it usually pops by itself over the first two chapters. 🏆 Shadow Work
- Open the spiral door. At the matchbox, take a match, strike it on the side strip and light the campfire. The chapter title appears; light every candle you pass along the path.
- 🐚 Shellphone 1/25Just before the first door that opens after you light three candles, step onto the wooden walkway on the left.
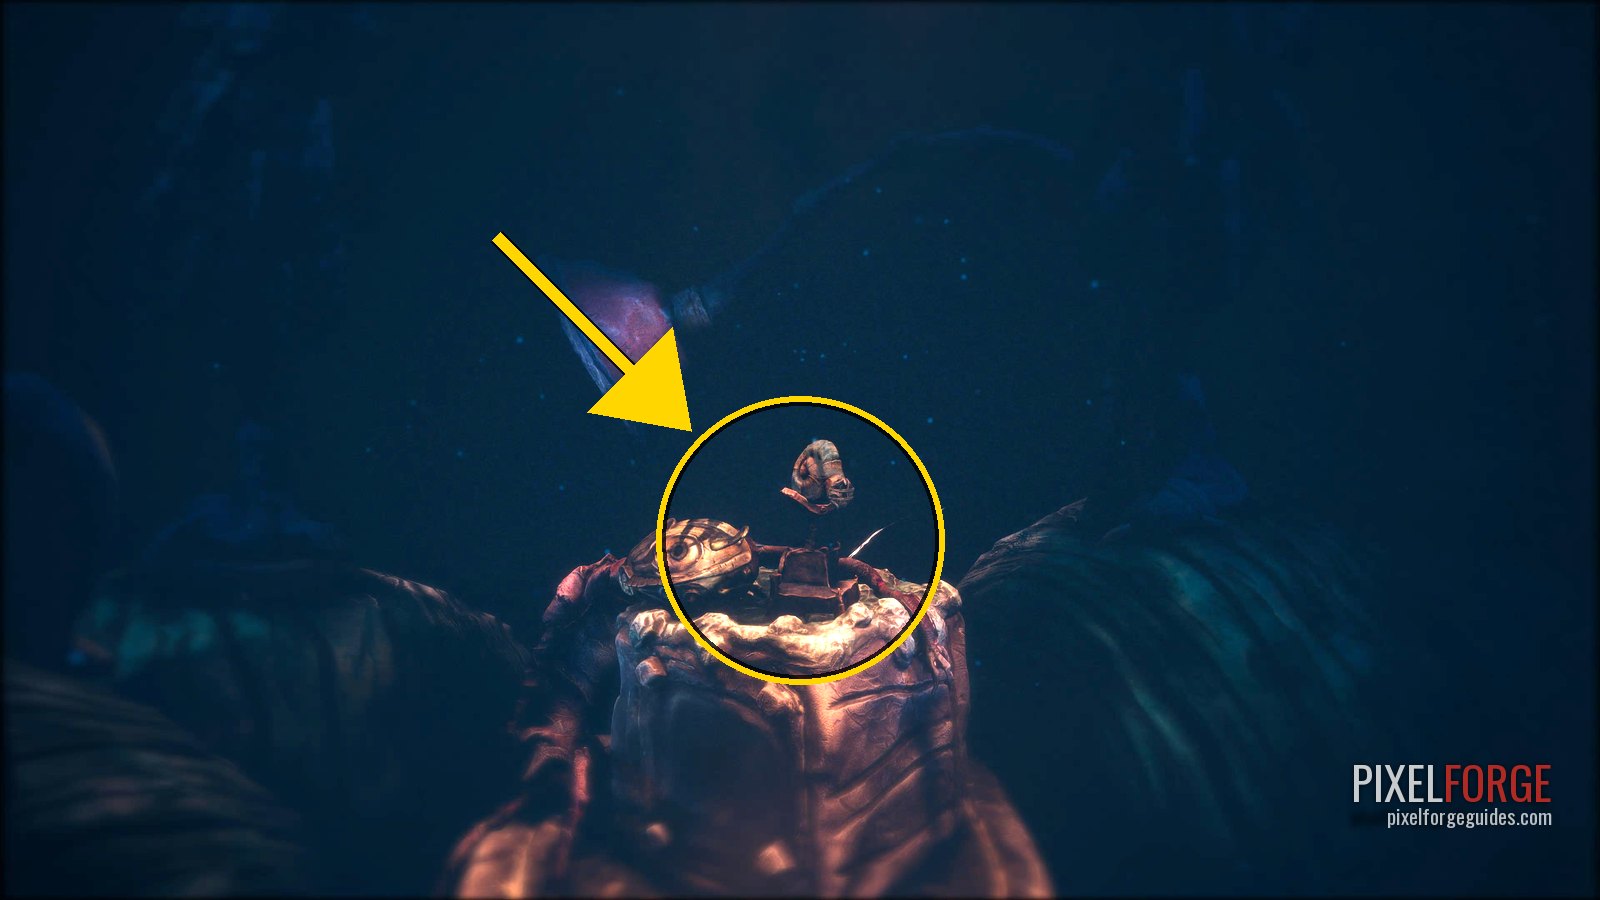
Shellphone 1/25 · Chapter 1 - The door ahead shows three glowing lights: one per candle you still need. Light all three to open it.
- 🗿 Clay Figurine 1/19 · The RagdollIn the cave the three candles open: a round hatch on the stone blocks, right in your path.
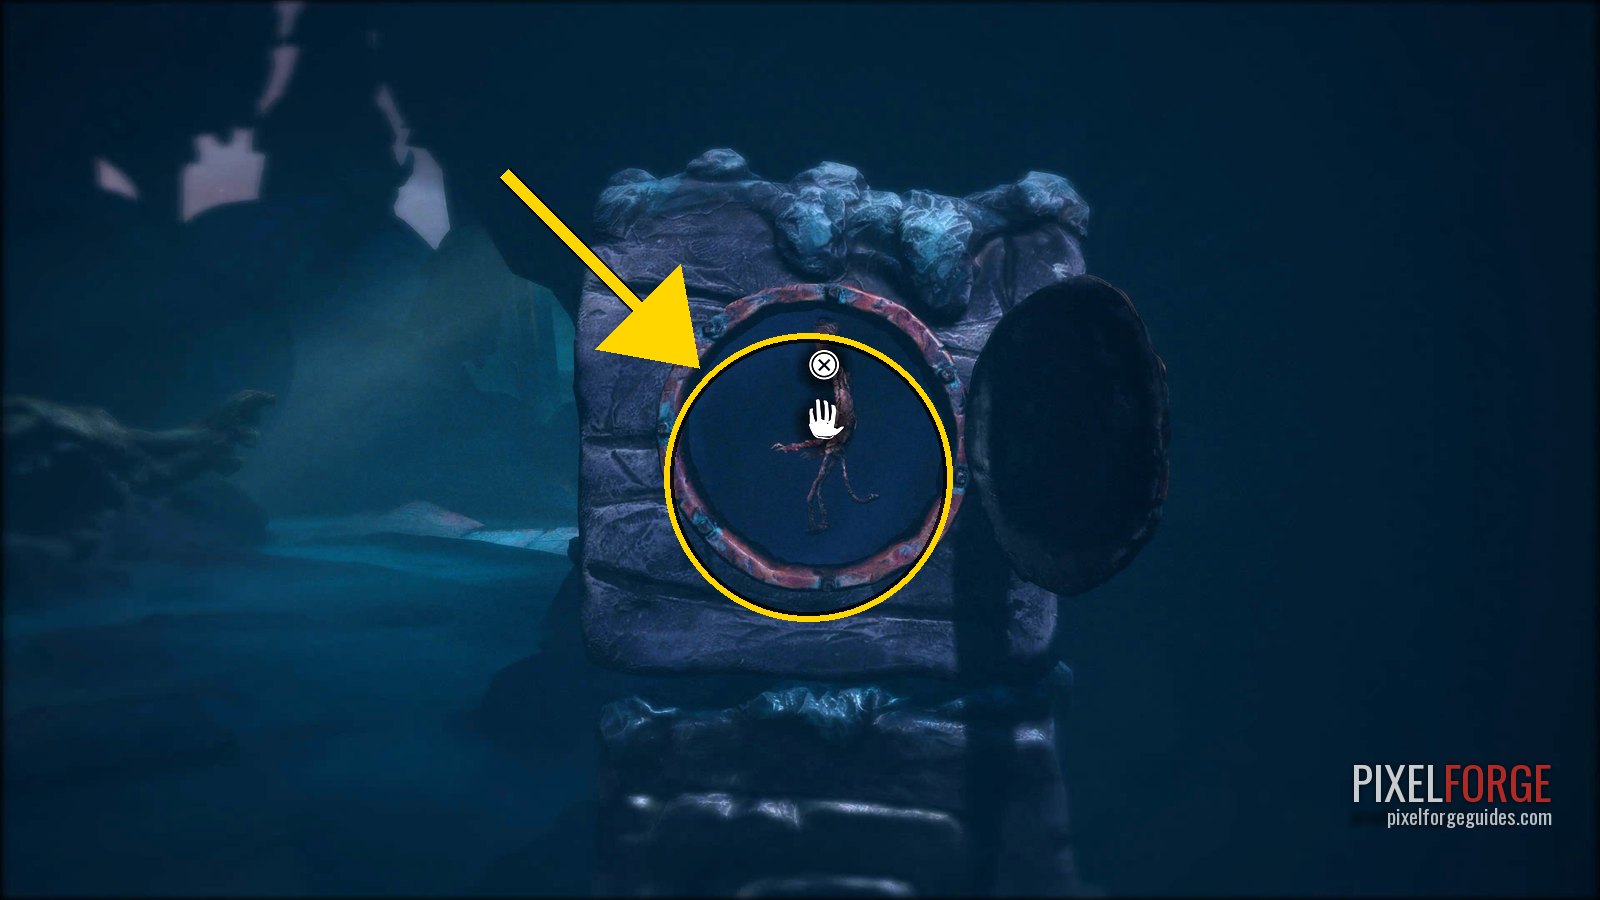
Clay Figurine 1/19 · The Ragdoll · Chapter 1
The first Crawler
- Leaving the cave, a Crawler appears. They kill in one hit. Crouch (R3) and go round to the left at the fork. If it spots you, sprint back into the cave and crouch into the little alcove on the right: they can't reach you there.
- Coffins with a fire symbol on the front are checkpoints.
- At the end of the crawlspace is a glowing blue eye. Look at it and hold L1 until you hear a sting and a splat: the eye pops and the way opens. This is how every eye-door and eye-statue works.
- Go through the cave, drop down and sprint forward until you're outside, away from the Crawler.
- 🗿 Clay Figurine 2/19 · The DaughterAfter the cave where you stare at the eye and then close your eyes, you reach a matchbox. Walk down the slope to its left: the hatch is beside a candle.
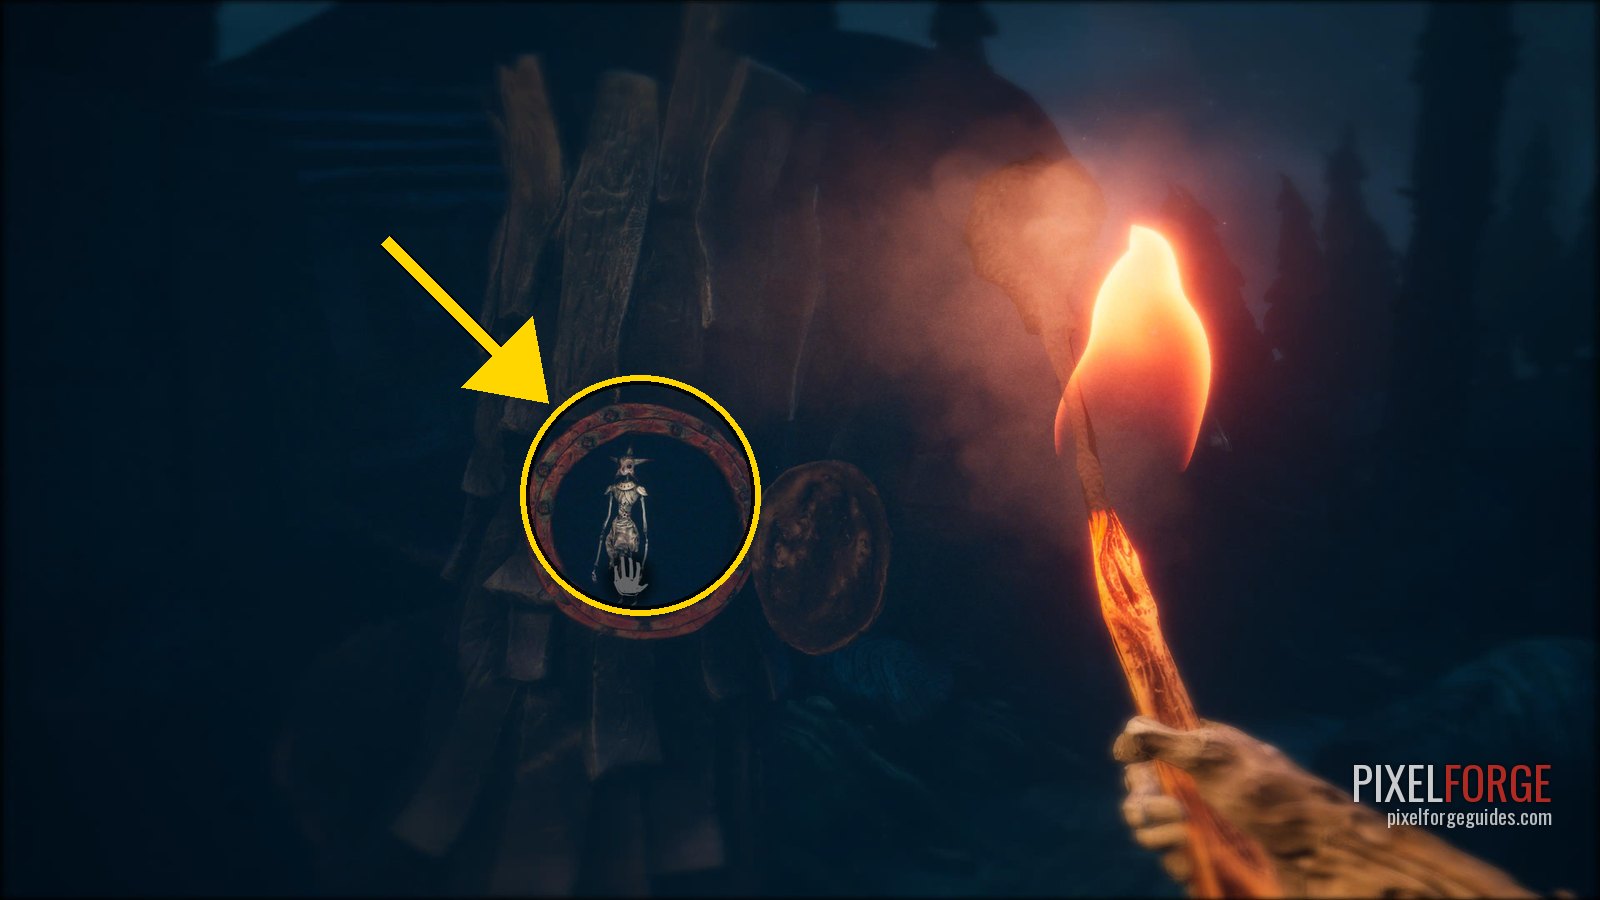
Clay Figurine 2/19 · The Daughter · Chapter 1 - 🗿 Clay Figurine 3/19 · The SoothsayersYou drop down into a wood and the music changes. Turn right as soon as you land: the hatch is on a tree.
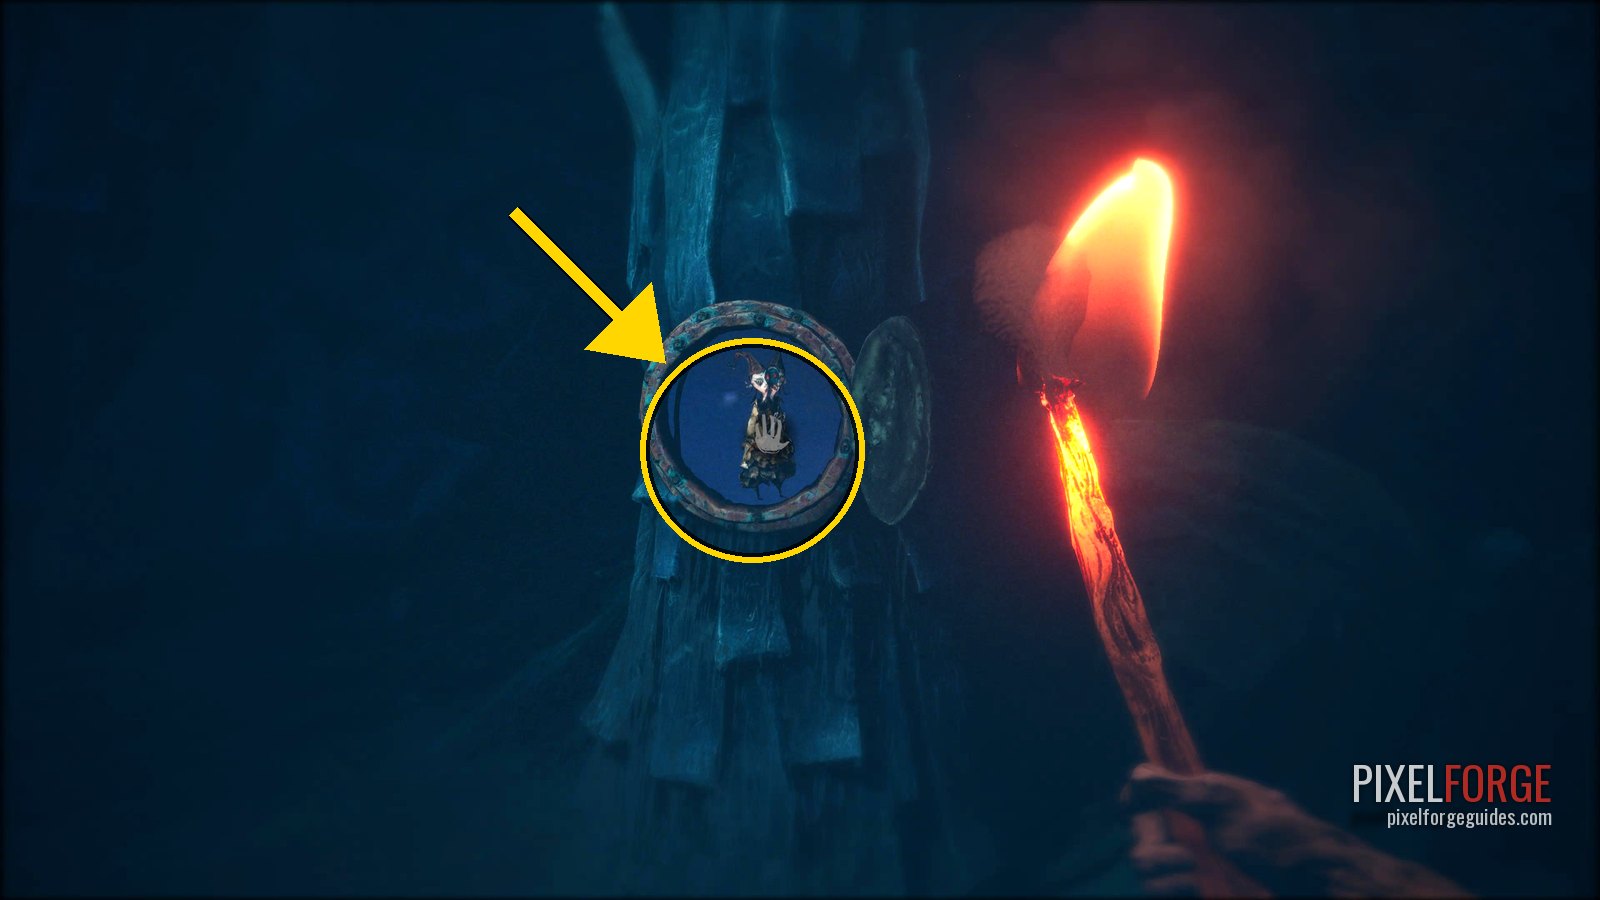
Clay Figurine 3/19 · The Soothsayers · Chapter 1 - 📜 Story Page 1/15Same wood, on the other side: a hatch on the tree just to your left after the drop.
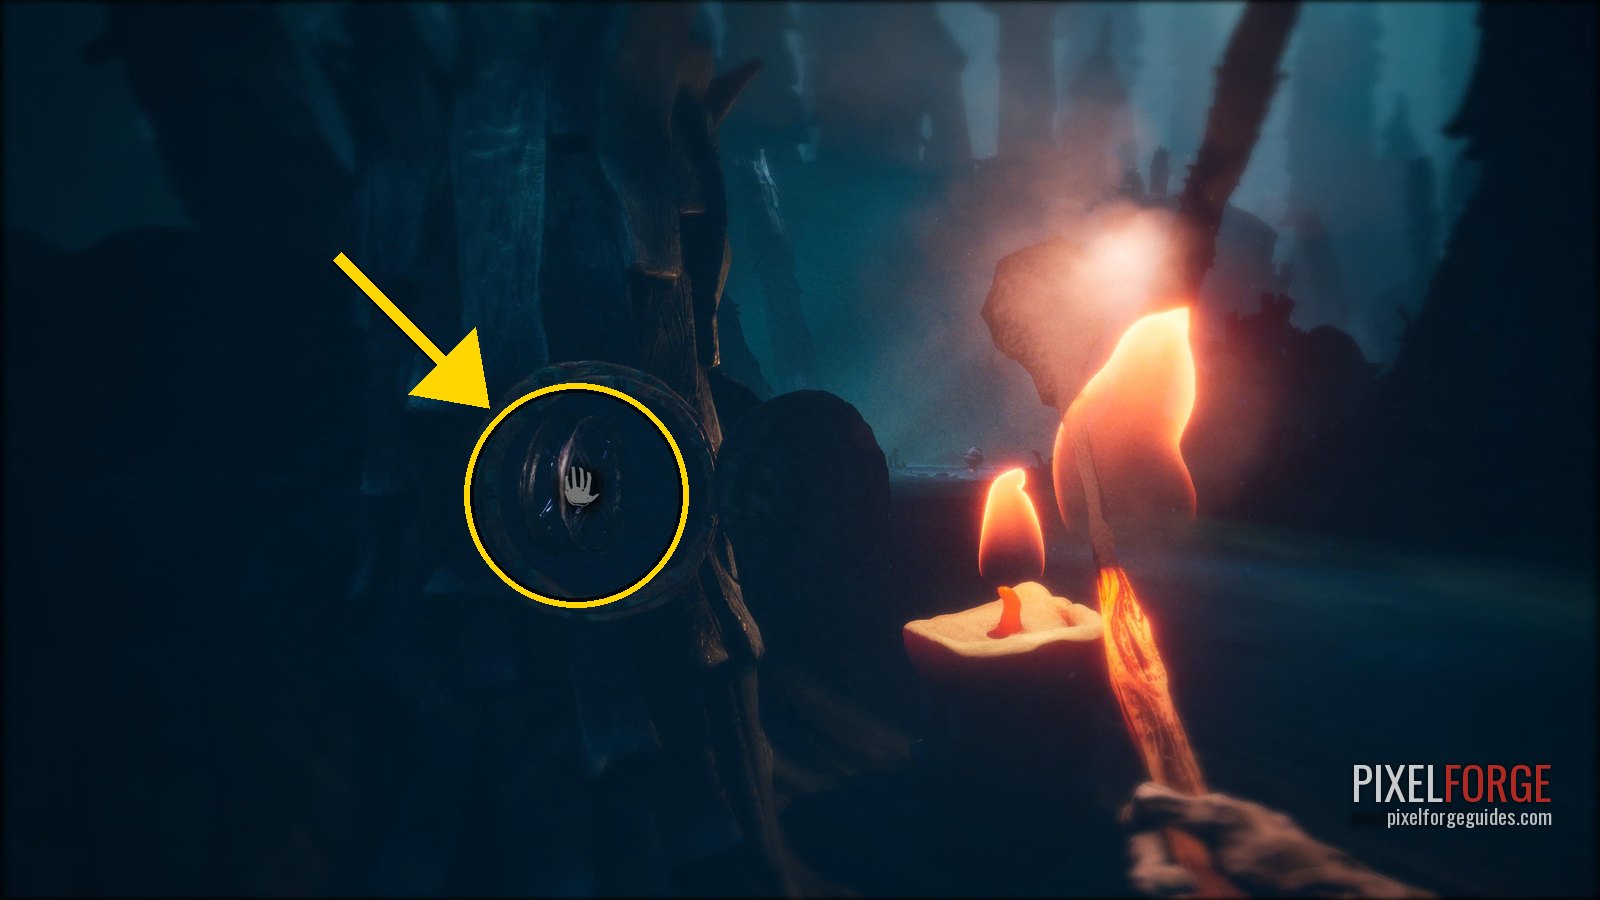
Story Page 1/15 · Chapter 1
Potboy
- In the pool of light, a little pot creature lies on the ground. Light a match and touch it to his head. That's Potboy: he's terrified and runs off. Follow him along the path.
- 💿 Gramophone Disc 1/17 · The Soulfisher's SecretOnce Potboy is lit you chase him up a hill to feed him coal. Halfway up, before the coal, a hatch on your left.
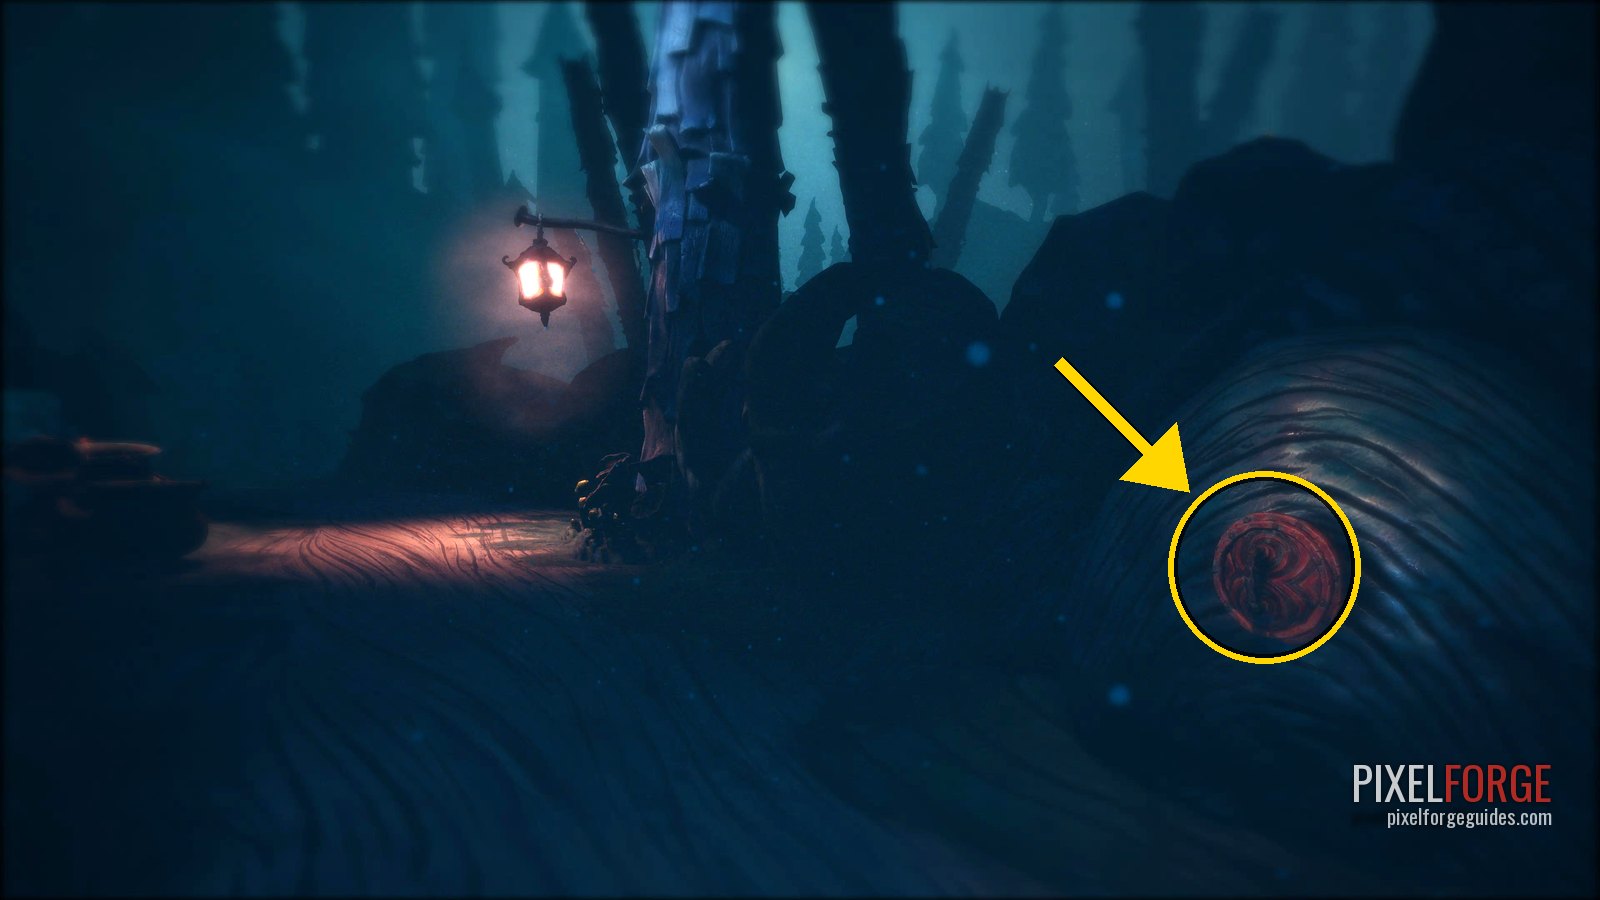
Gramophone Disc 1/17 · The Soulfisher's Secret · Chapter 1 - Pick up the glowing coal by the paper note, knock on Potboy's lid (interact) and feed him. He wants a second piece: bring another. From now on he follows you and you can send him places with Square. 🏆 Fire Walk
- Follow him to the wall of darkness you couldn't cross before and send him through: he knocks the bridge down so you can pass.
- 🐚 Shellphone 2/25Right after you send Potboy through the pipe to drop the bridge over the gap, it's on the right of the path.
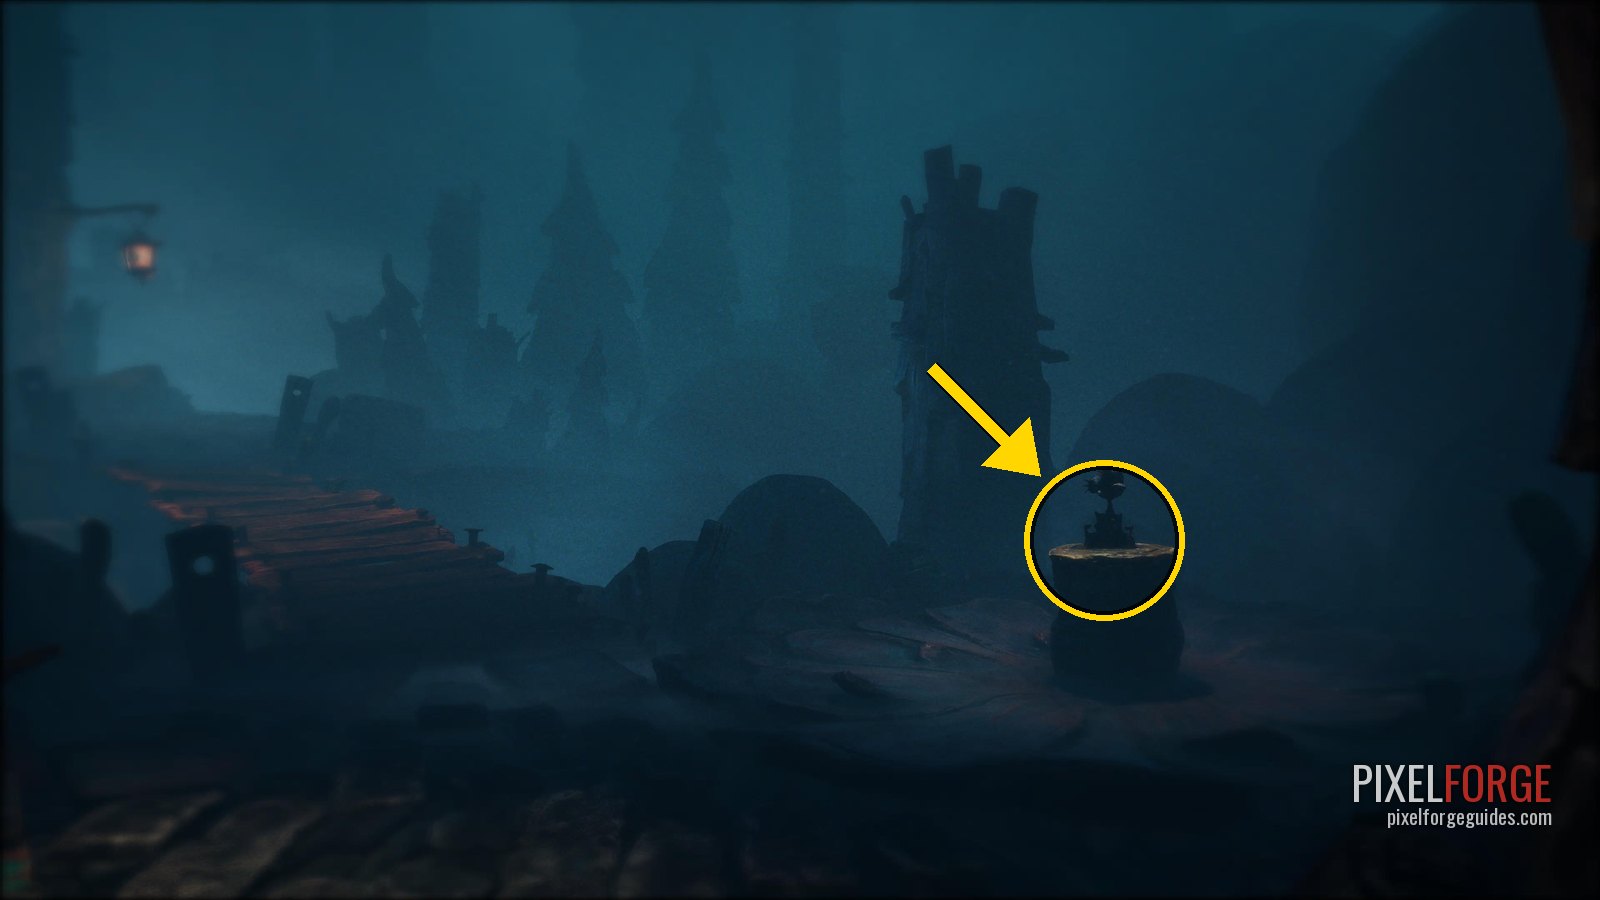
Shellphone 2/25 · Chapter 1 - 💿 Gramophone Disc 2/17 · Mitt Happyplace När Världen Står I BrandIn the area where you and Potboy each stand on a switch: a hatch beside the right-hand switch.
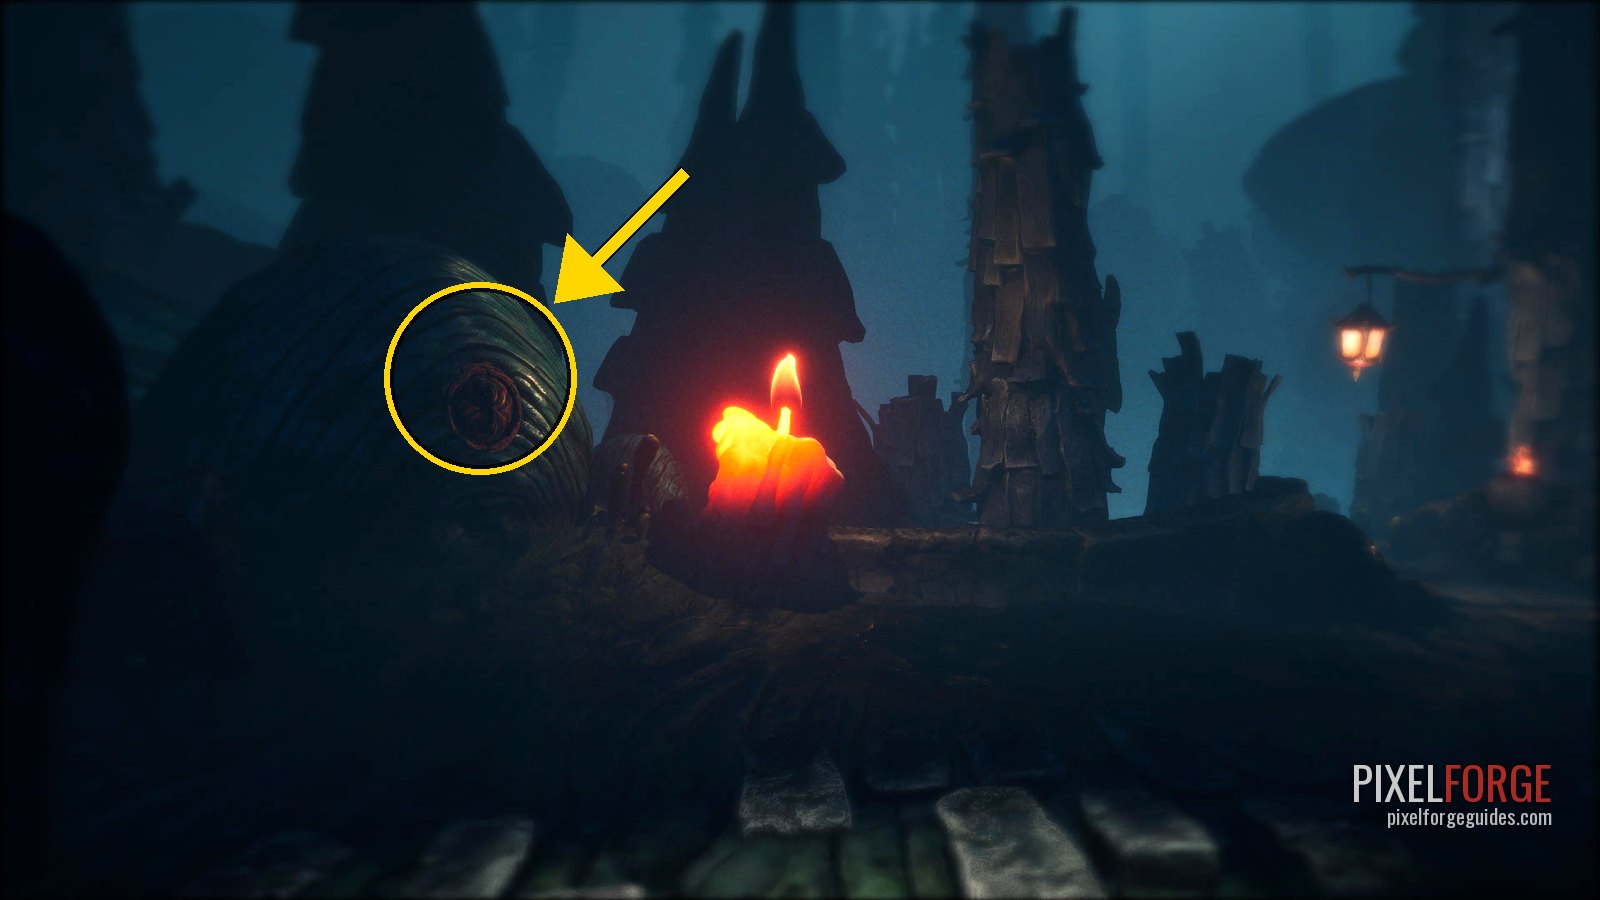
Gramophone Disc 2/17 · Mitt Happyplace När Världen Står I Brand · Chapter 1 - Send Potboy onto one of the two switches and stand on the other yourself to open the way.
- Have Potboy light all the candles here, then close your eyes at the blue eye. A Crawler is waiting behind it: walk straight into the wardrobe and wait until it leaves. Then send Potboy to light the candle by the Crawler's spot and go up the stairs (light the two candles there too).
- 🗿 Clay Figurine 4/19 · BodyTo the right of the door that opens with four candles, by the first wardrobe you can hide in.
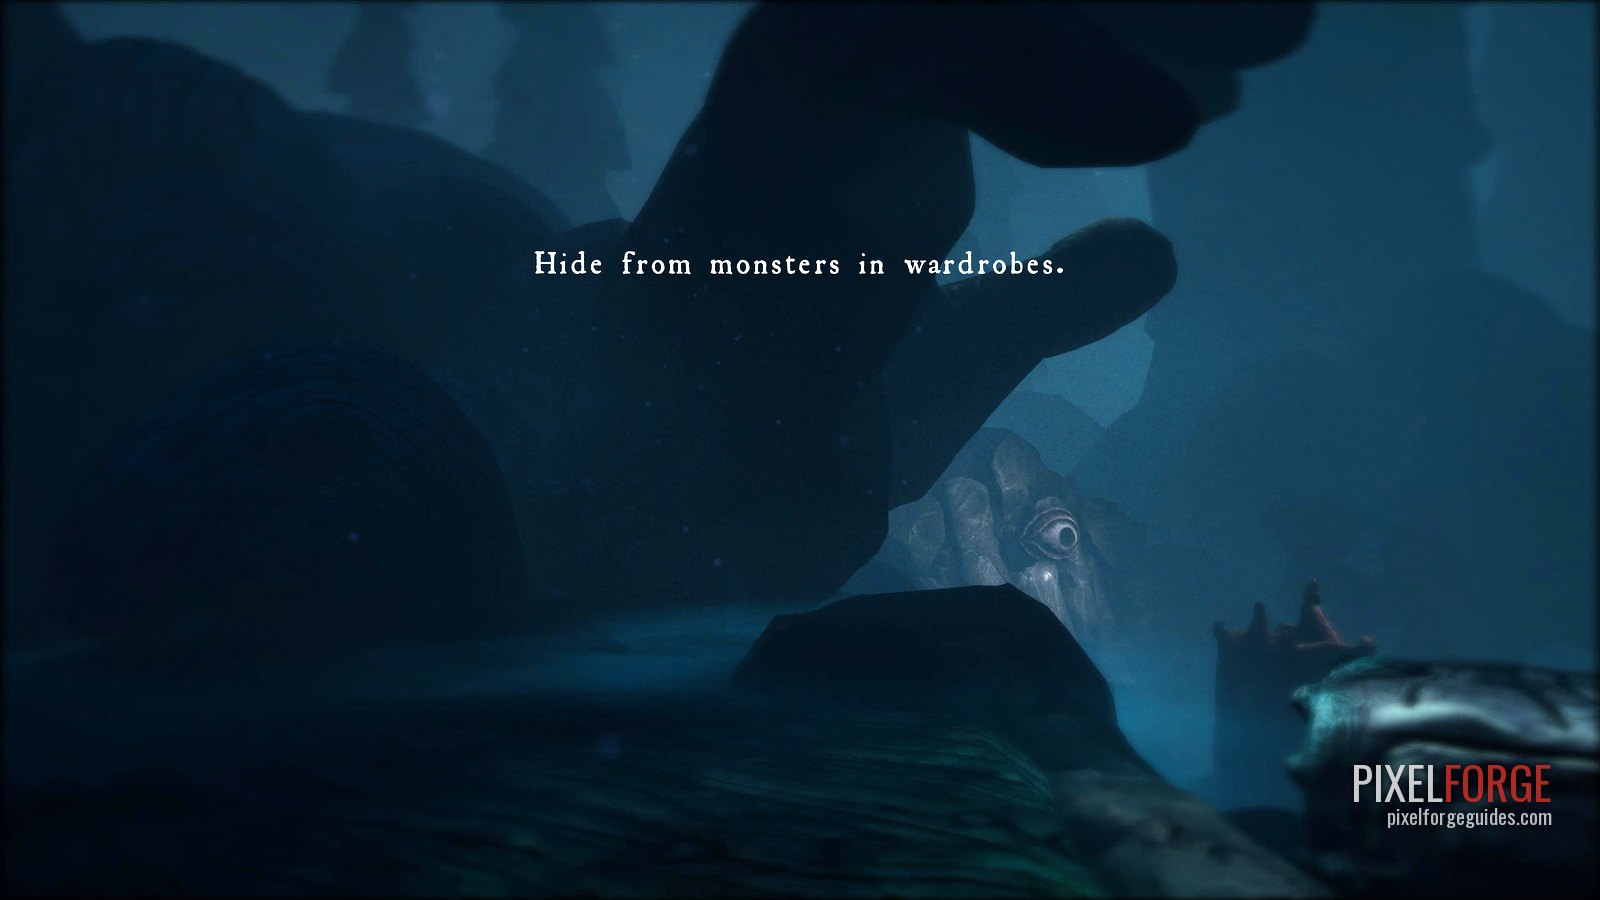
Clay Figurine 4/19 · Body · Chapter 1 - Inside the cave, light the two candles on the main path and go up past the wardrobe to the door. Turn round, face the chamber and close your eyes at the blue eye: the hanging rock disappears. Send Potboy through the pipes to the next platform to light the last candle, and go through the door.
- 🐚 Shellphone 3/25After the cave door that needs three candles, on the left of the path.
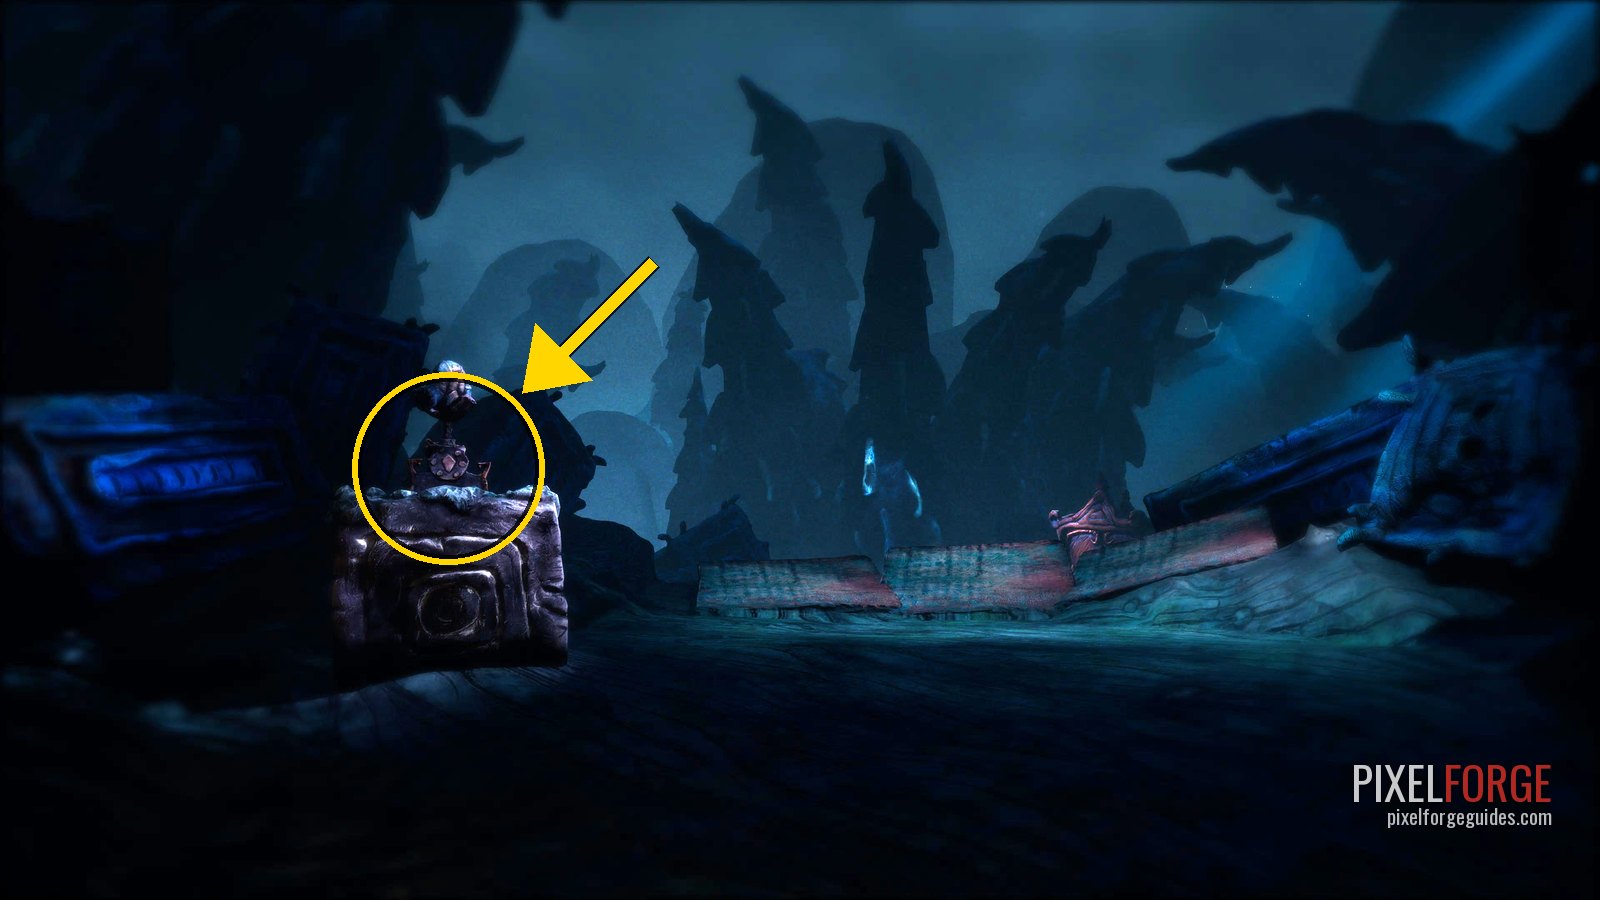
Shellphone 3/25 · Chapter 1
The light-eating Crawler
- Drop down and follow the path to another wardrobe. There's a candle on the left and a paper note: Crawlers eat fire. Stand by the wardrobe, light the candle, get in and let the Crawler come to the flame and move past. Then come out and go right, away from it.
- 💿 Gramophone Disc 3/17 · KöketWhere you lure the monster with the candle flame: a hatch on the left of the path, next to the wardrobe.

Gramophone Disc 3/17 · Köket · Chapter 1 - Don't leave this area without the disc: you can't come back.
- Drop through the next gap. After the short scene the bridge gives way: relight Potboy with a match. Walk on, past the Soothsayer if you want to talk, and the chapter ends as you reach the bridge. 🏆 The Tale Of The Burnt One
Chapter 2: The Tale of the Loathsome Molgrim 19 collectibles · 3 figurines · 3 discs · 9 shellphones · 4 story pages
The swamp and the village of the Headmaster: the egg creatures, the flying contraptions, three fragments for the cauldron and finally the Molgrim. The biggest shellphone chapter (9).
Housy
- Walk down the main path to Housy, the walking house. It's your hub: the projector by the fire plays the story pages you've found, the shelves hold the dolls, and the gramophone plays your discs. Ten minutes inside unlocks Home Is Where The Heart Is; it's easiest at the end from the main menu (Story → Visit Housy).
- Back outside, at the wall with a blue eye, close your eyes to clear the way for Housy.
- 📜 Story Page 2/15Just after Potboy's house, the first blue eye-door you open: the hatch is to its left.
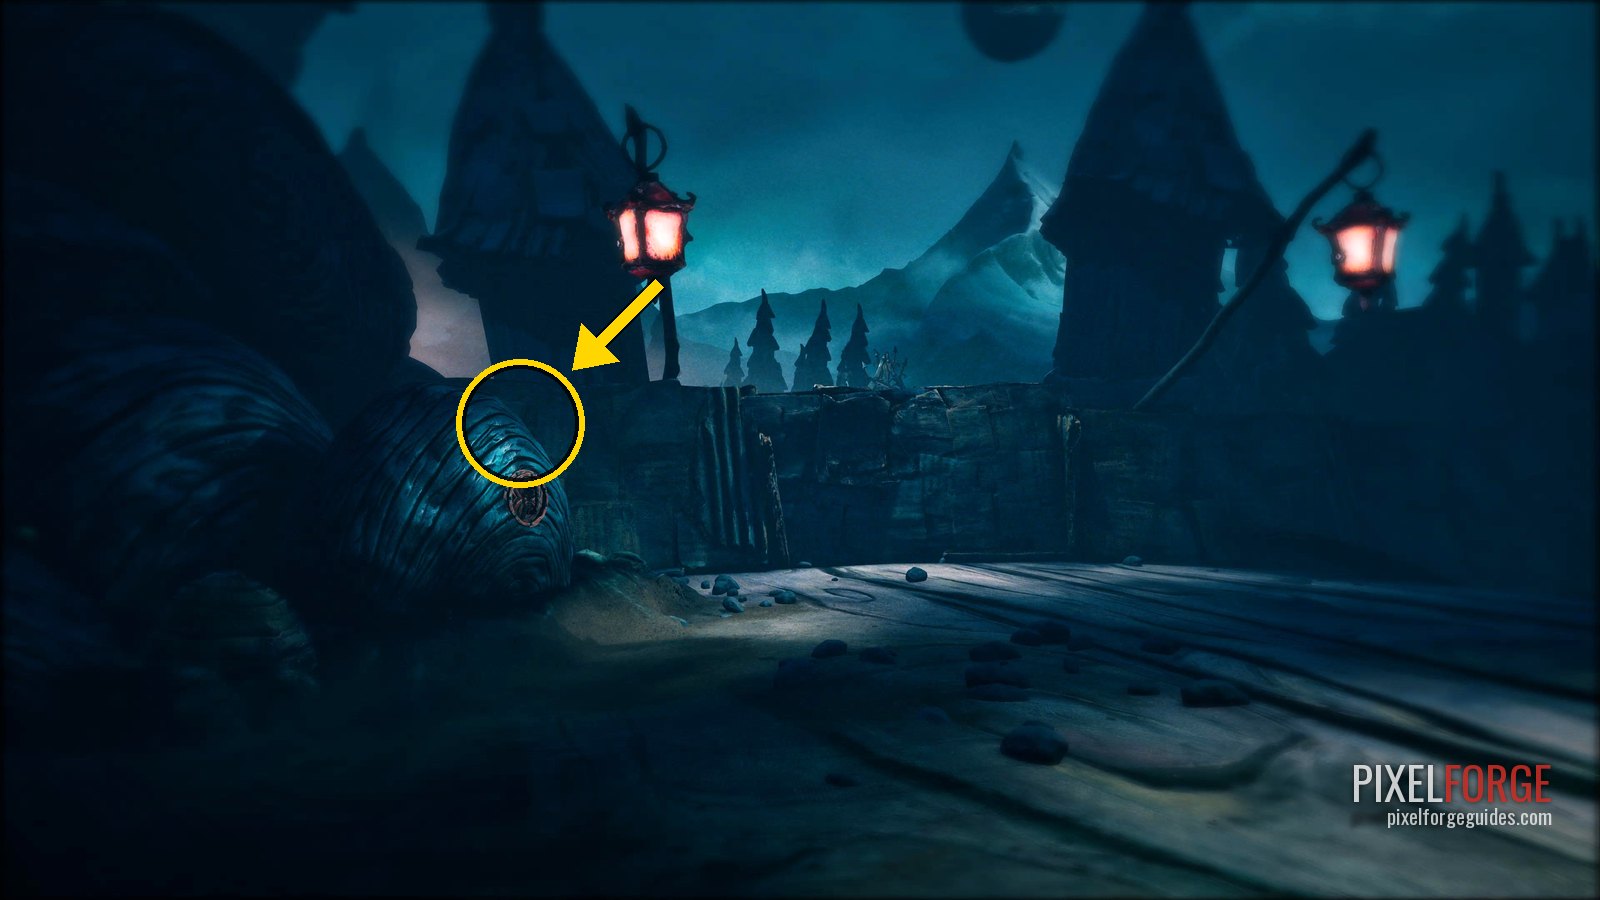
Story Page 2/15 · Chapter 2 - Turn left at the drawbridge.
- 🐚 Shellphone 4/25On the main path, right after you turn left.
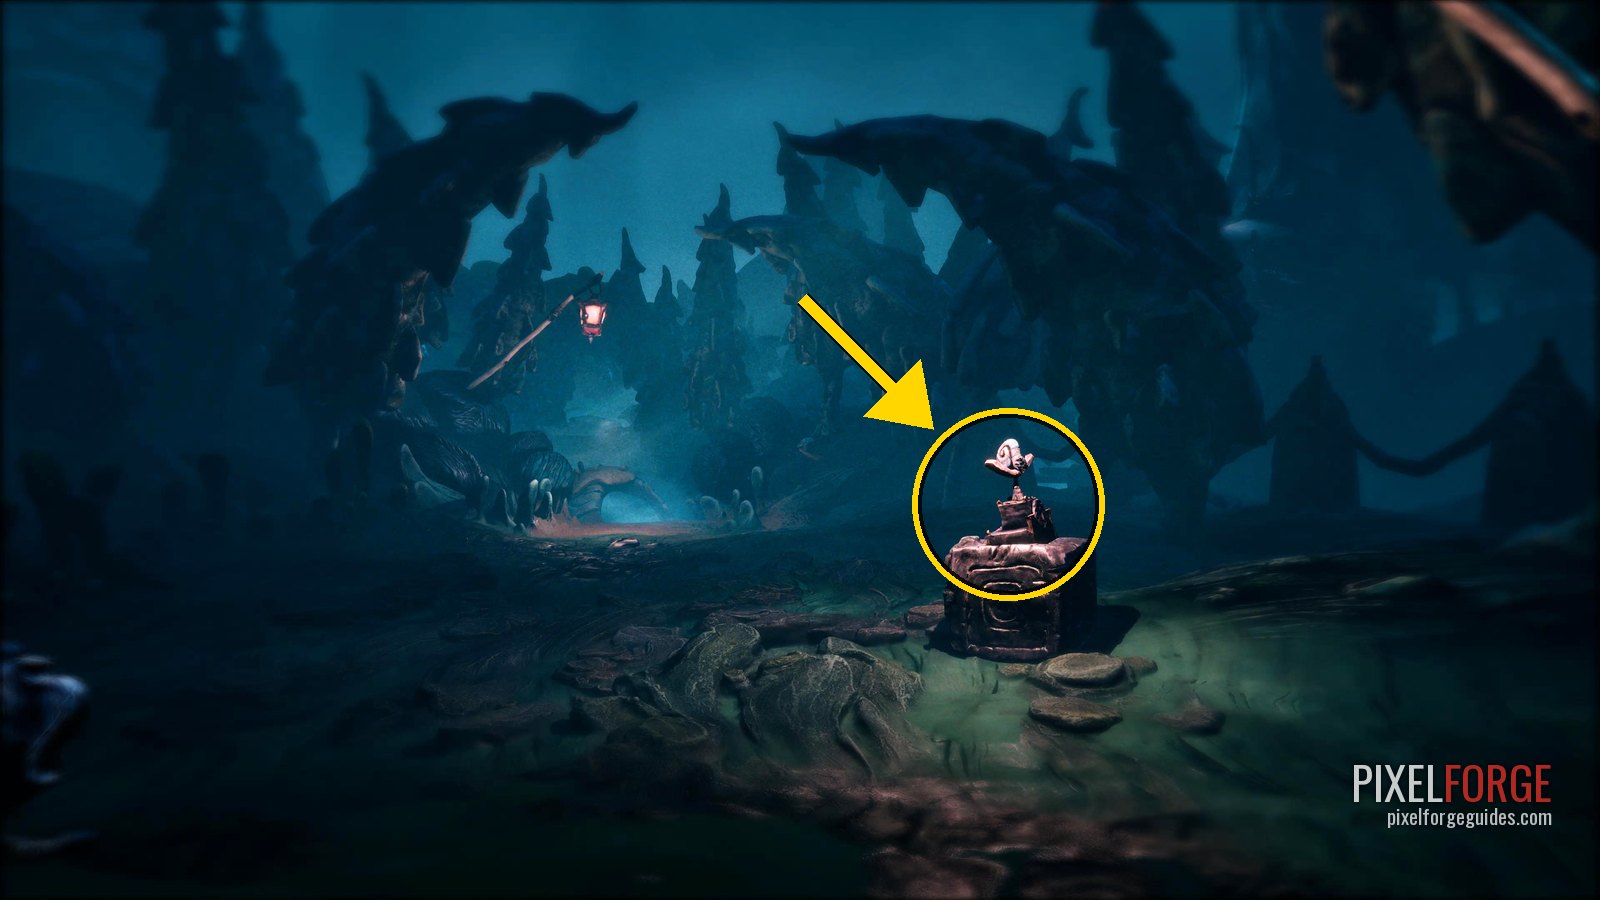
Shellphone 4/25 · Chapter 2
Hide and seek with Crawlers
- Hide in the wardrobe from the first Crawler, then bolt past. At the bright corals, crouch through the gap for the hiding tutorial: crouch right up against small cover; when the screen darkens and you hear a soft sound, you're hidden.
- By the Crawler's starting spot there's another wardrobe: hide and wait until it walks off to your right. If it sees you, run to the end of the section and hide in the alcove until it leaves.
- 🐚 Shellphone 5/25At the first monster, where the game teaches you to hide: past that wardrobe, crawl through the small hole on the right. It's on the other side.
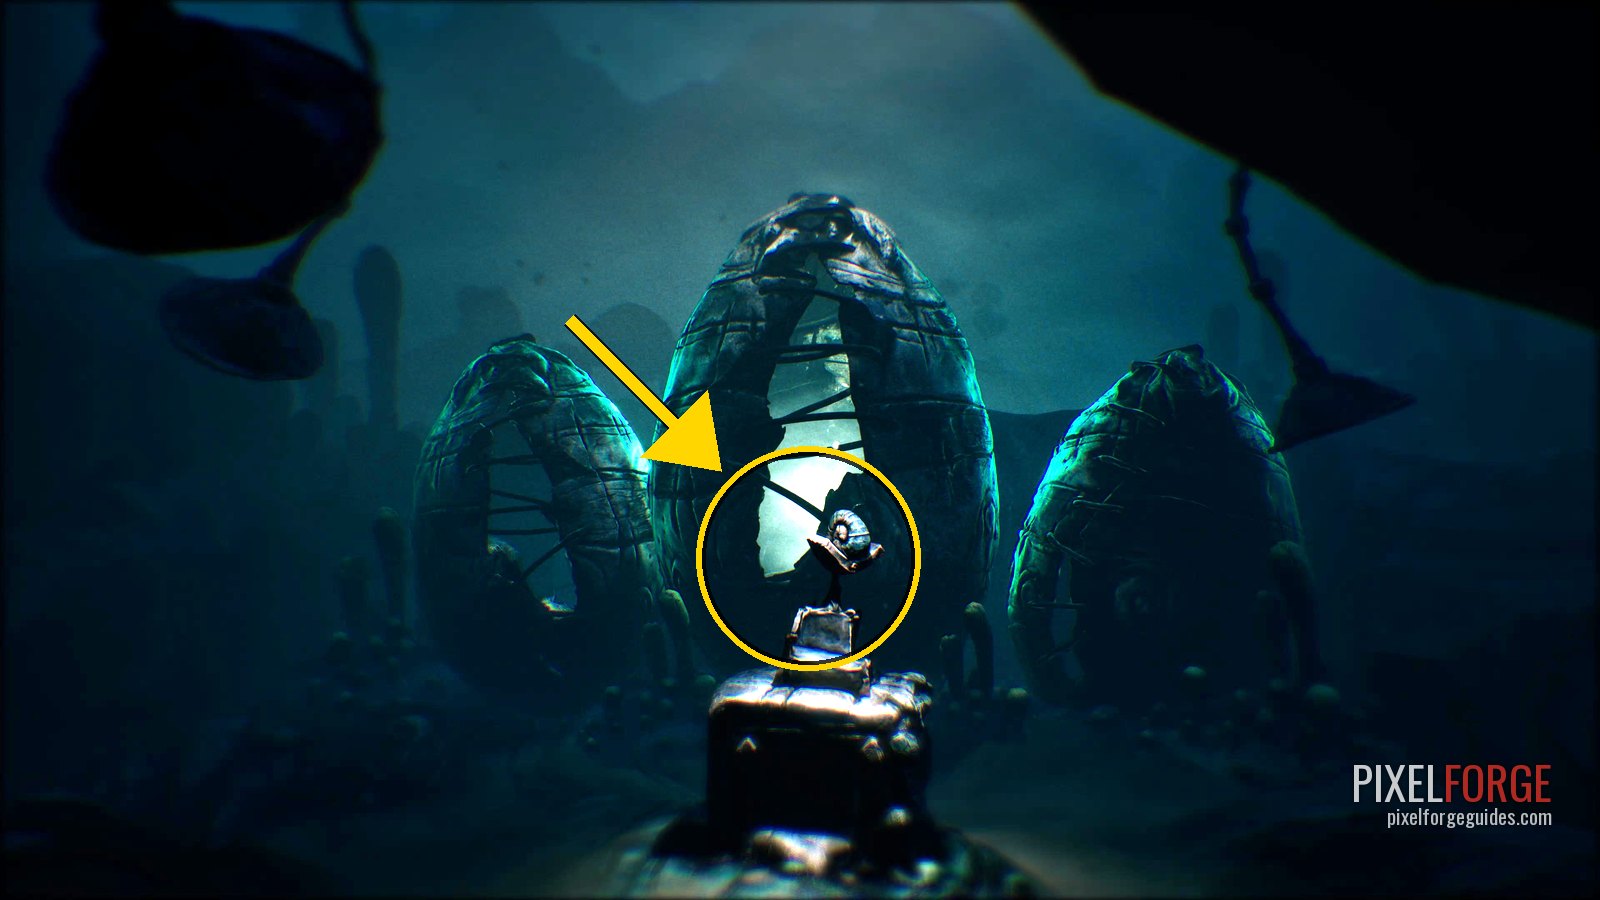
Shellphone 5/25 · Chapter 2 - A Crawler patrols a garden with two switches. Don't go into the garden: continue forward and left to a candle, light it so the Crawler goes to eat the flame, and when it's gone put Potboy on one switch and yourself on the other to open the door.
- Drop down, run past all the Crawlers, get through the alcove and back onto the main path at the drawbridge. Send Potboy into the tubes to lower it so Housy can cross.
- 💿 Gramophone Disc 4/17 · GränsRun from the creatures hatching out of the eggs and crawl through the hole at the end. Look left on the far side: a hatch at the end of the road.
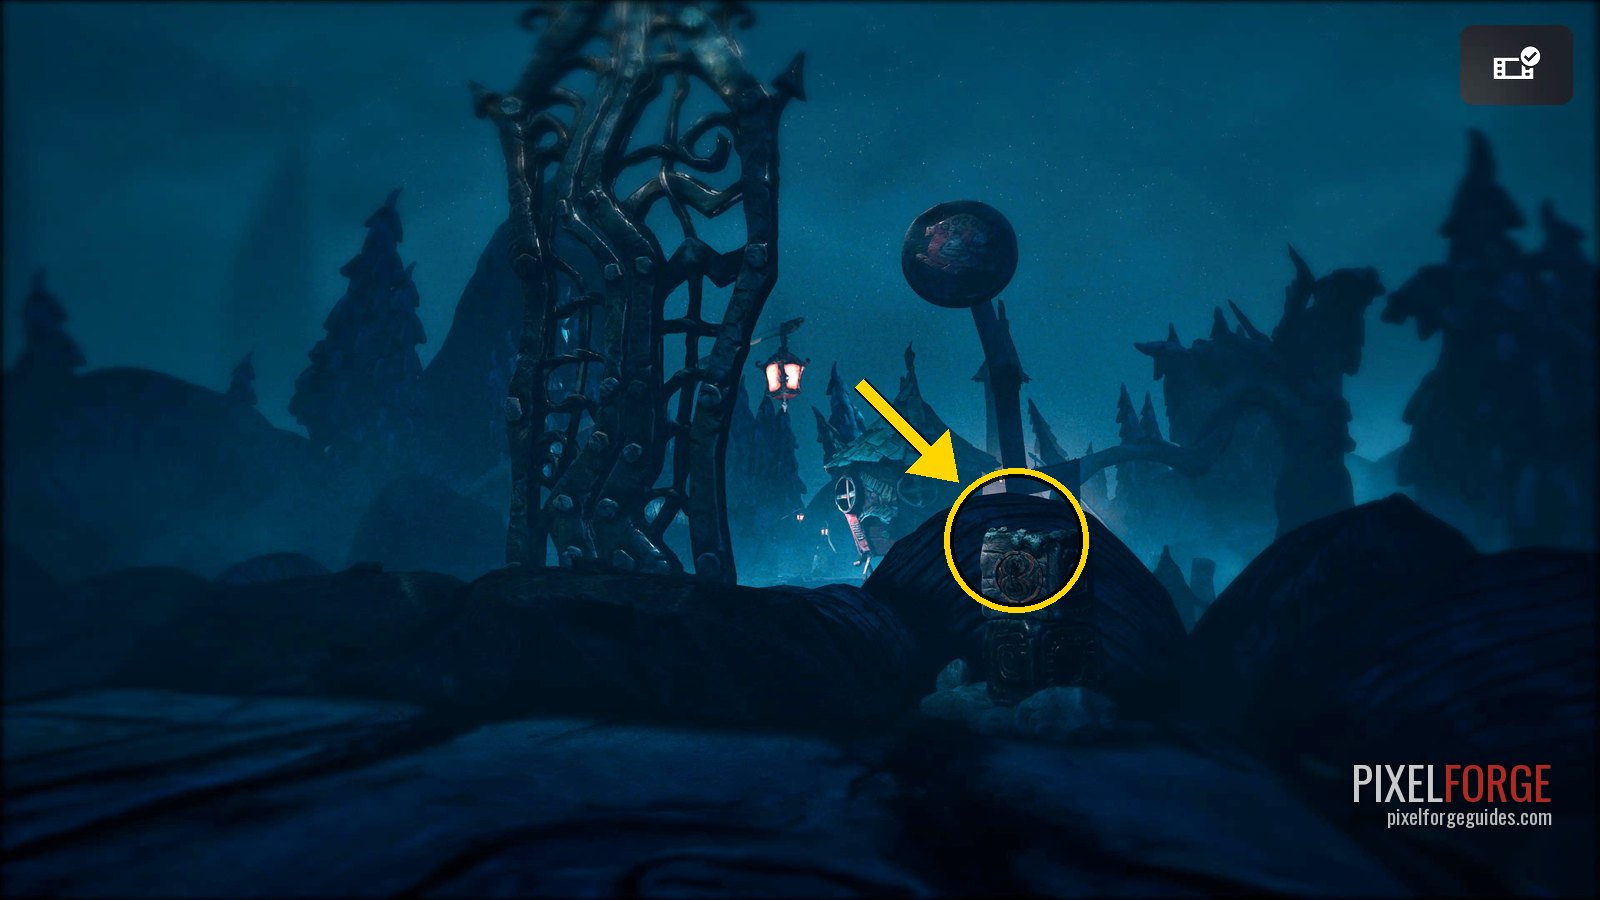
Gramophone Disc 4/17 · Gräns · Chapter 2 - Follow Housy; after the scene, walk on to the character at the bonfire. Light a match from the box and bring the fire to life.
- 📜 Story Page 3/15Just past the character who talks to you at the bonfire, a hatch on the left of the path.
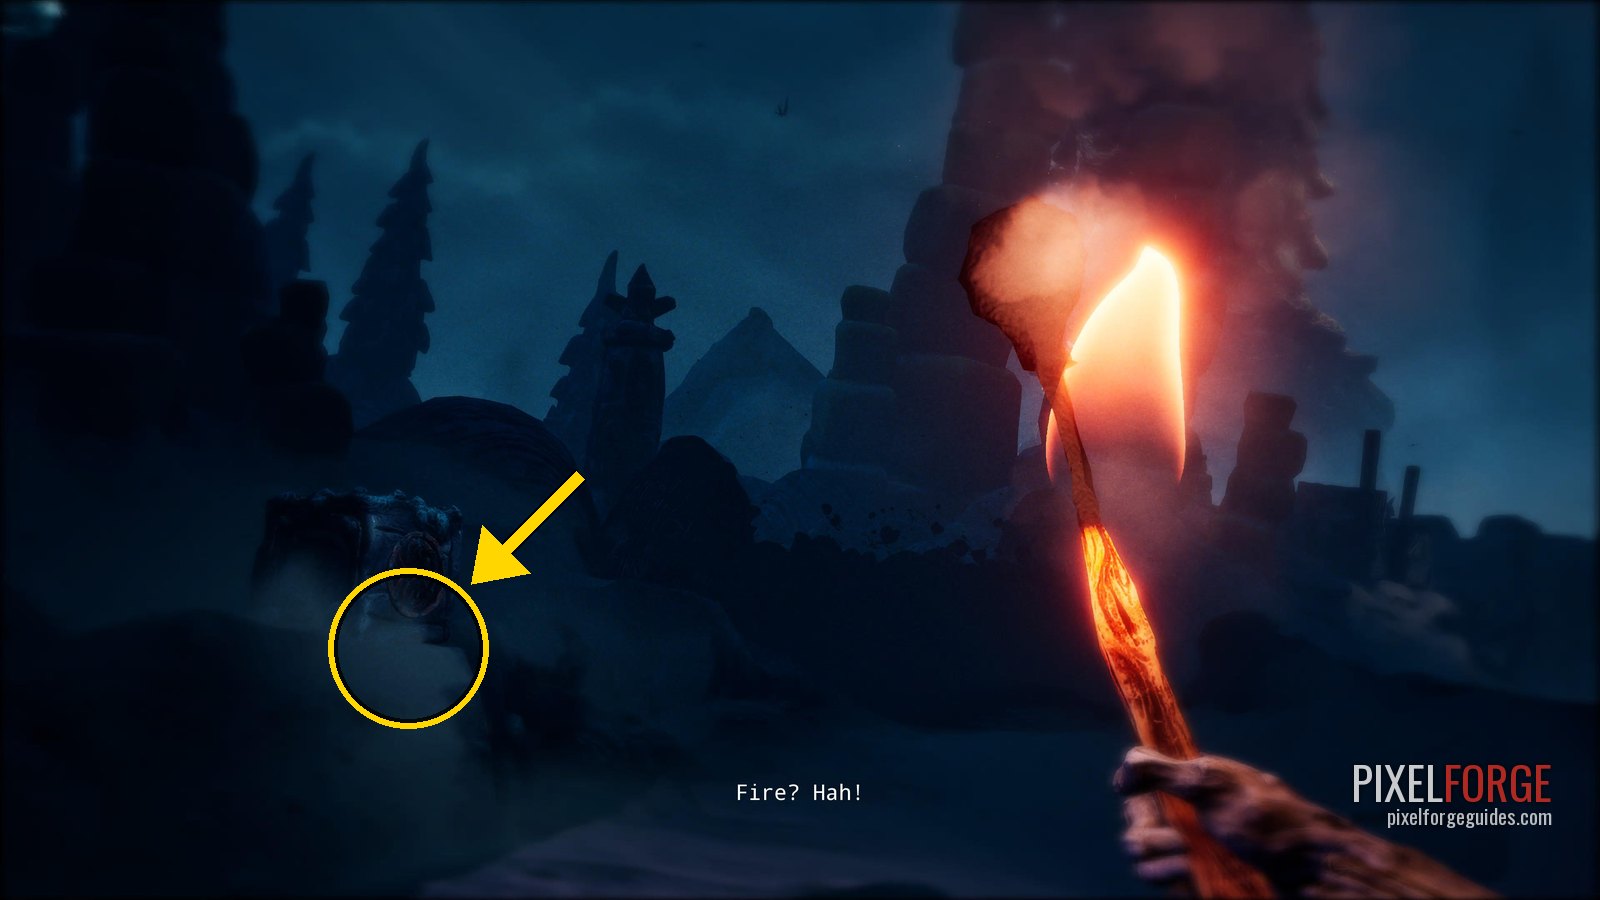
Story Page 3/15 · Chapter 2
The spiral door and the Headmaster
- Back with Housy, wait for the white eyes at the end of the path to fade.
- 🐚 Shellphone 6/25Back with Housy, follow the path until the screen goes dark and two white eyes appear: it's on the left, by a matchbox.
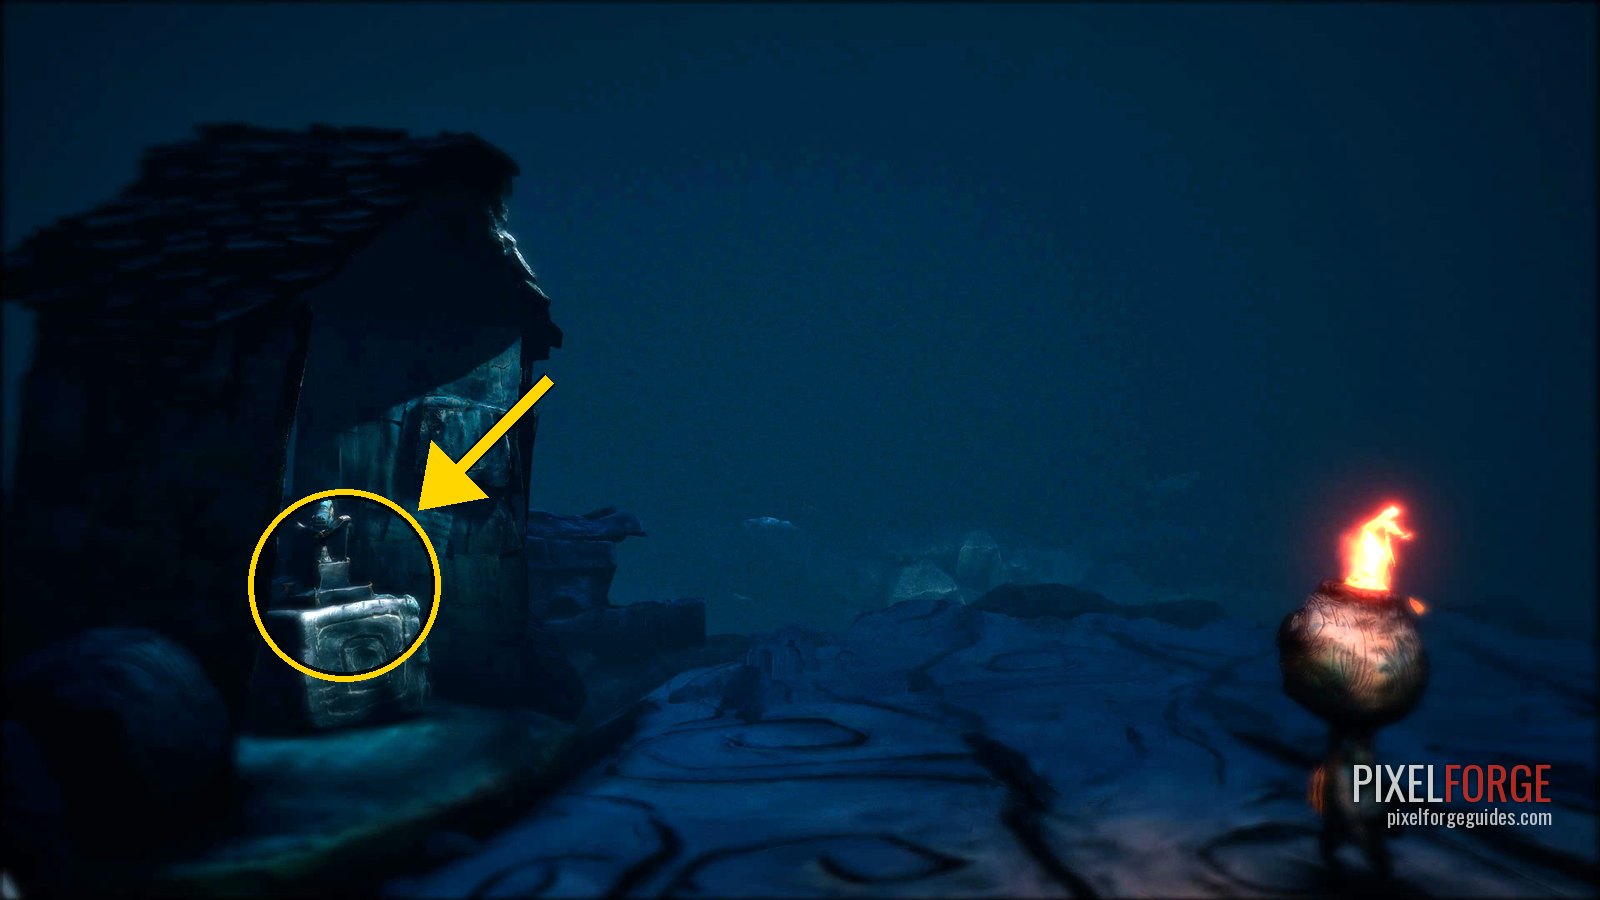
Shellphone 6/25 · Chapter 2 - Take a match from the box by that shellphone, light it, hold R2 and throw it into the darkness where the white eyes were. A key is spat back out: it opens the spiral door.
- 🗿 Clay Figurine 5/19 · The HeadmasterAfter the chapter title, the villagers mock you as a “limb tree”. It's on the left of the path, in front of them.
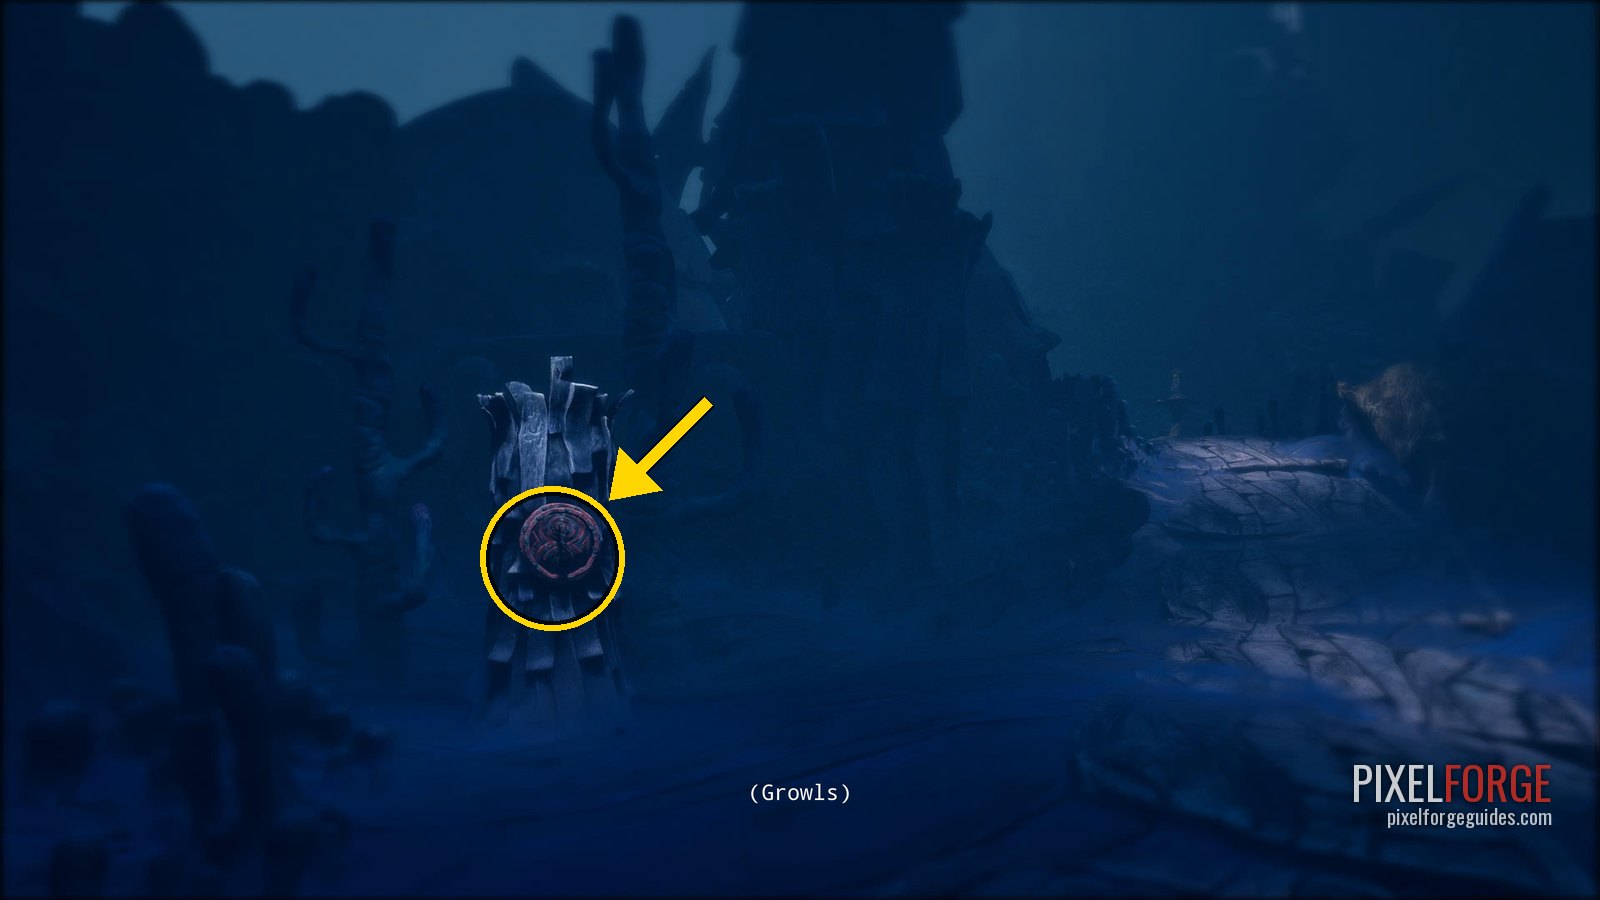
Clay Figurine 5/19 · The Headmaster · Chapter 2 - Before going on, take the side path to the right, behind the heads and between two fallen logs: a stick is at the end. Wait for the giant head to finish talking, then slot the stick into the middle of the lever console.
- Candle puzzle: the left and right levers slide two rings between the six containers; the middle lever raises or lowers the candles under the rings. Raise all six, then send Potboy onto the bridge and press Square to light them all at once.
- 💿 Gramophone Disc 5/17 · NobodyvilleSolve the candle puzzle to open the gate; the hatch is on the right of the path beyond it.
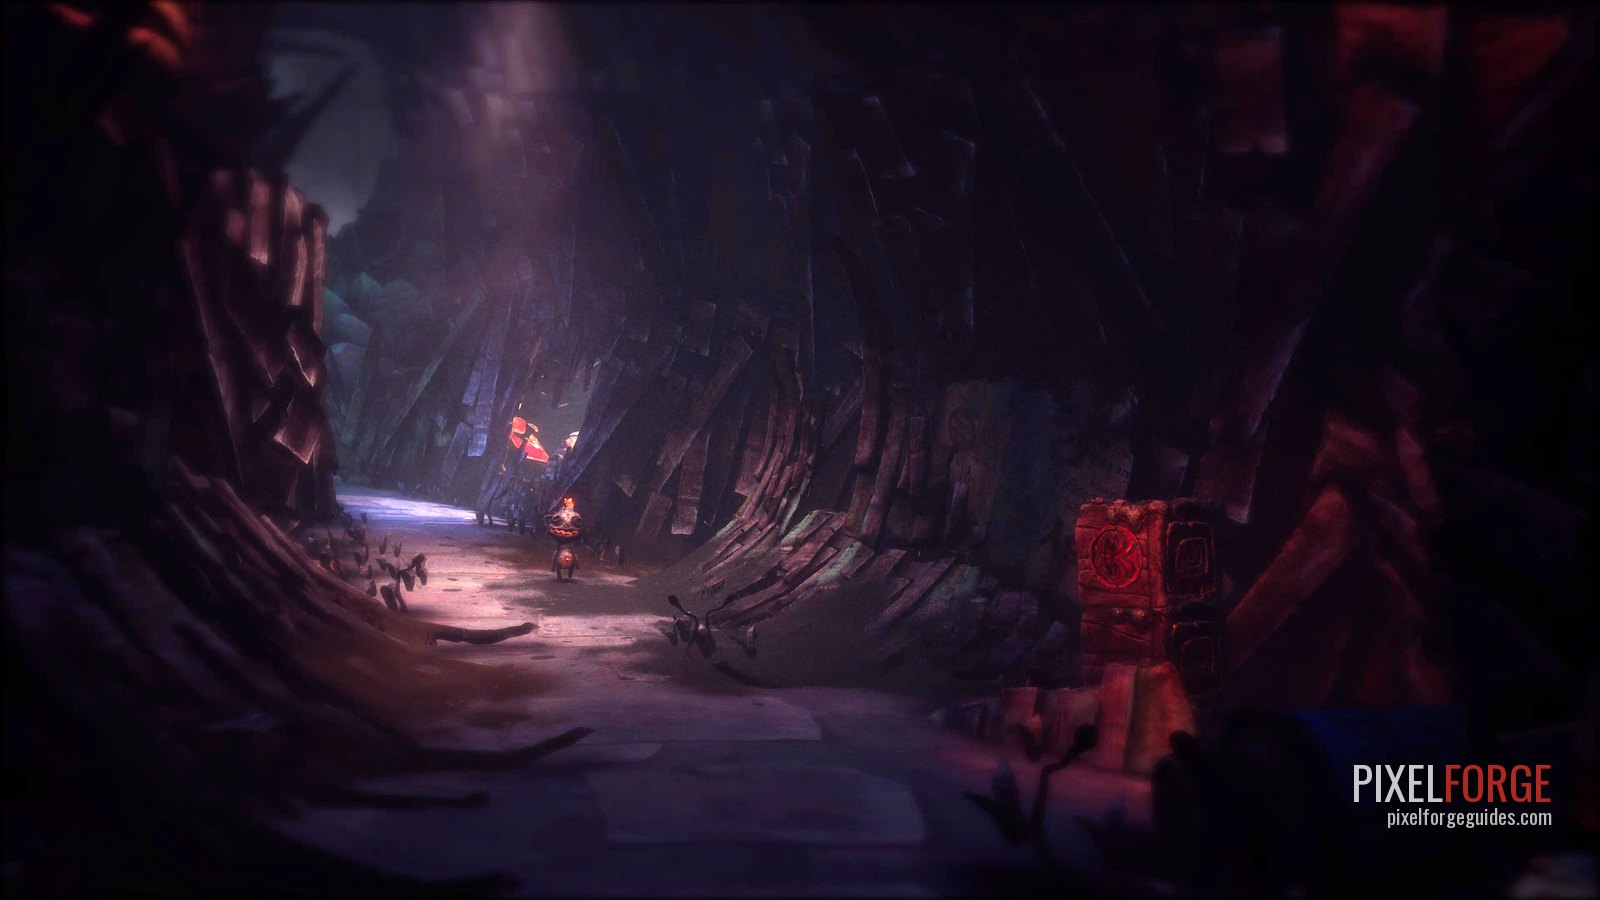
Gramophone Disc 5/17 · Nobodyville · Chapter 2 - In the big round arena with the heads, take the path on the left into a little house.
- 🐚 Shellphone 7/25After you meet the Headmaster and get the firearm, go into the building on the left (the guillotine room for Mind Over Body).
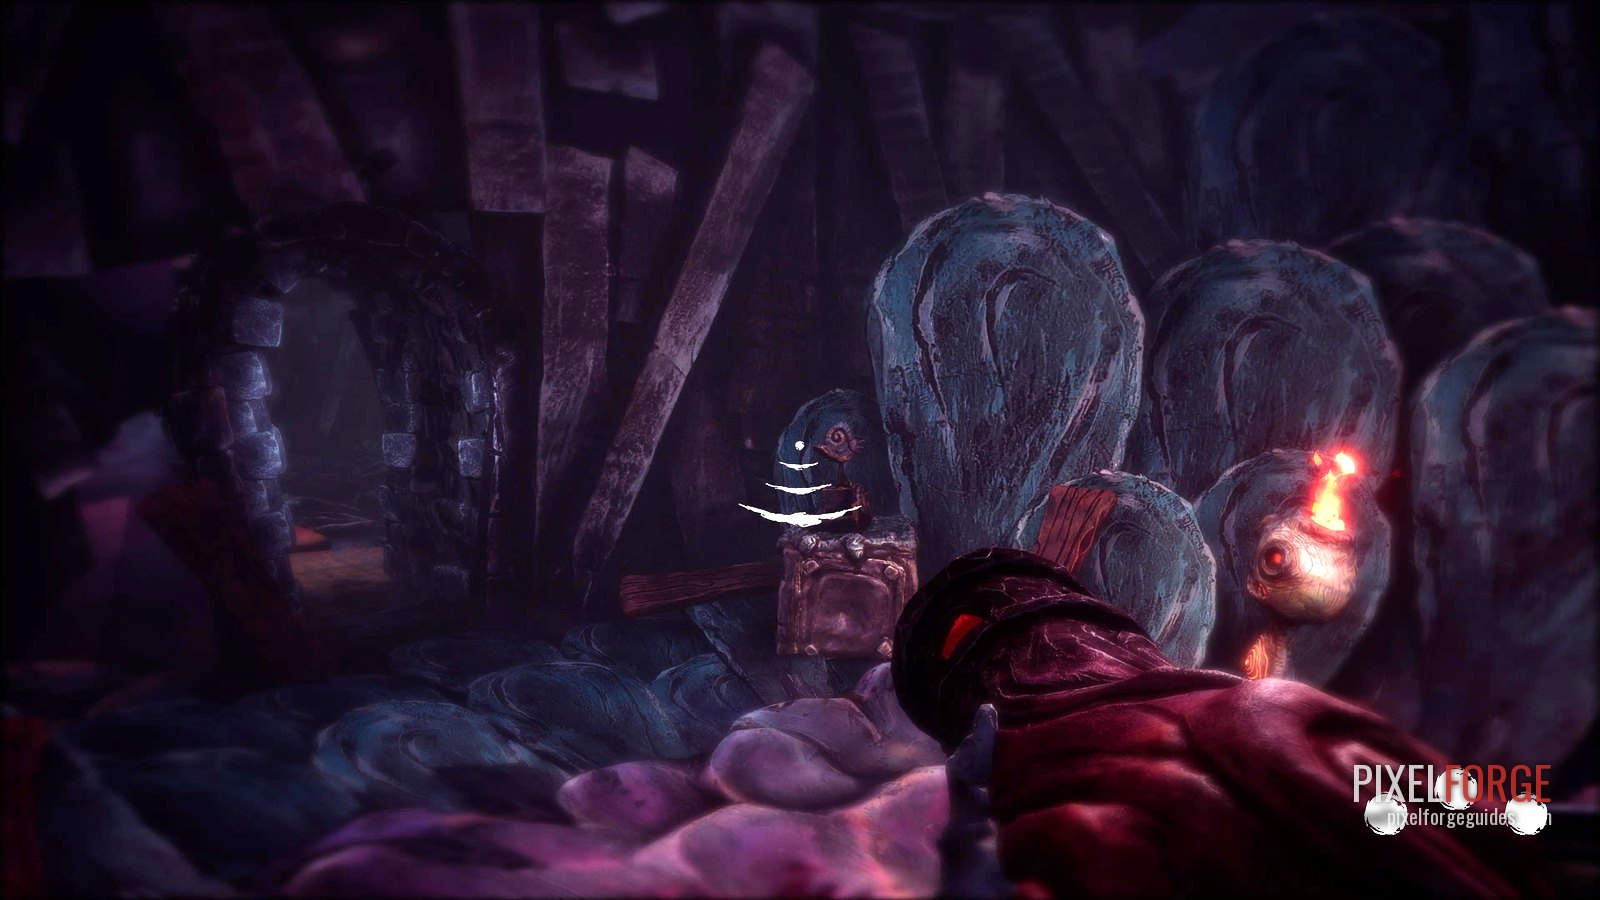
Shellphone 7/25 · Chapter 2 - Before leaving the house, go up the stairs to the back of the guillotine and wait: Potboy chops his own head off. 🏆 Mind Over Body
Mind Over Body: our clip - Back at the Headmaster, light the fire in the middle. After the scene you get the Matchlock: it fires matches at candles out of reach. Refill it at matchboxes; the shot arcs, so aim a little above the wick.
- Shoot the two candles to open the door, then use the flying contraption: Square to start it, hold X to hang on.
The swamp and the Molgrim's lair
- 🐚 Shellphone 8/25The flying contraption drops you in a swamp: it's in plain sight to the right of the main path.
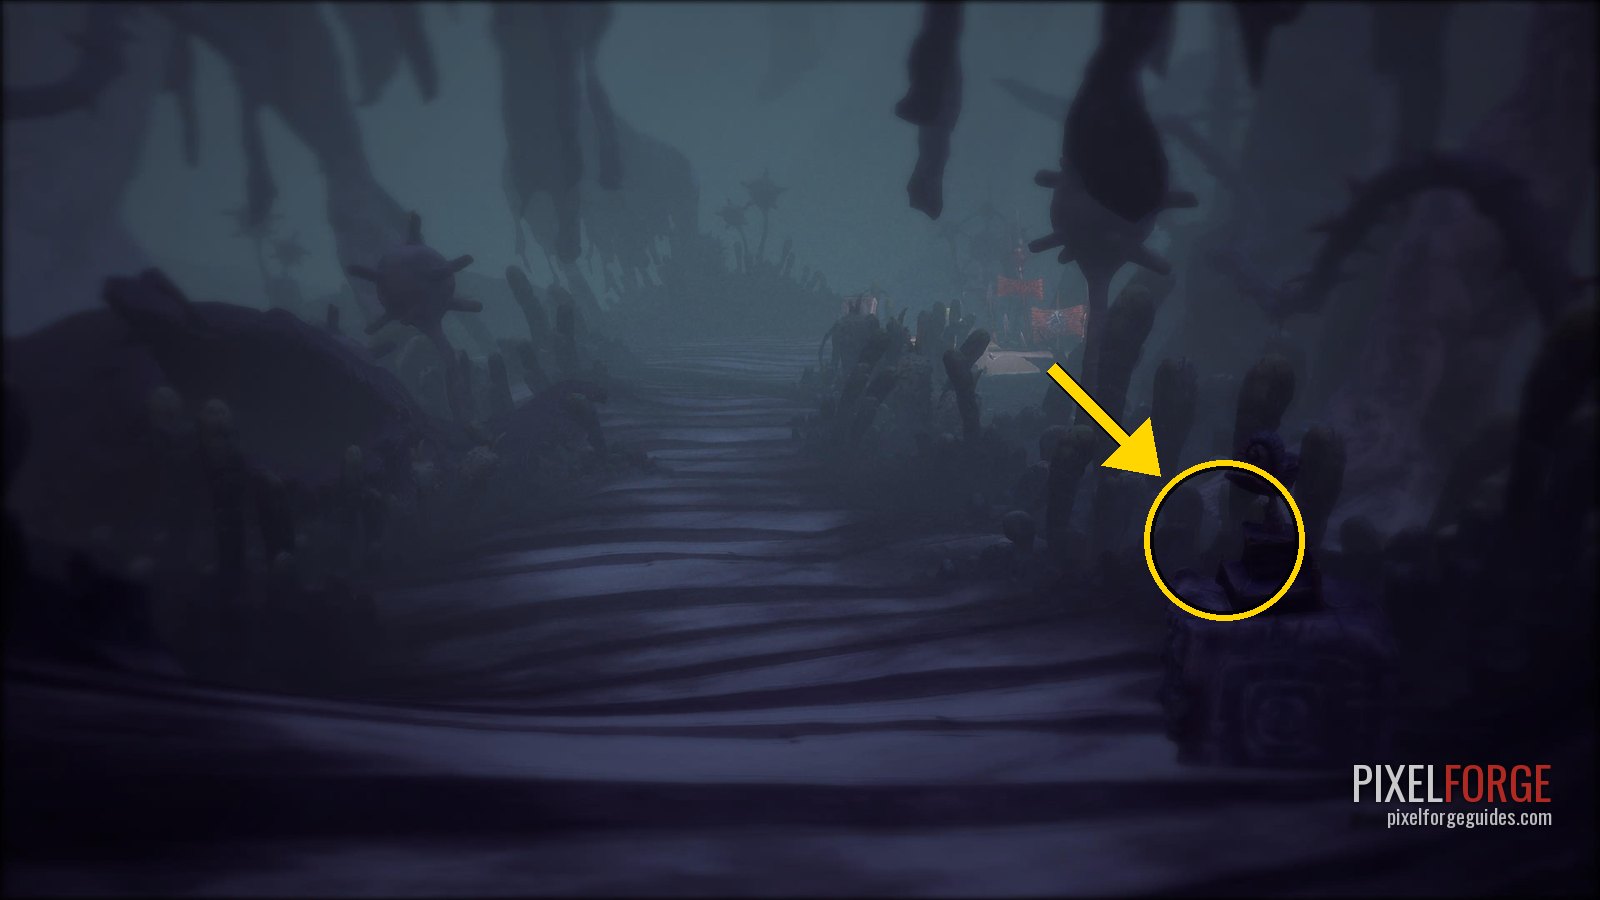
Shellphone 8/25 · Chapter 2 - At the Molgrim's lair door on the right, shoot all three candles with the Matchlock: two are on the right of the door, the third is high up.
- Have Potboy light the furnace by the door on the left of the main path. When the door opens, the Molgrim grabs Potboy and takes him away.
- Follow the wisp across the swamp (a wardrobe holds an optional swamp map). At the end, close your eyes at the frog to get into the lair.
- Inside, fill the Matchlock at the matchbox on the left path, go to the far-right path and shoot the candle to move the Crawler, then take the middle path.
- You drop into the lair. Stay crouched behind cover, watch the Molgrim through the gaps in the fences and move when it looks away. Light all four candles with Potboy (the last one through the pipes), then leave with him and follow the wisp.
- After the scene the Molgrim hunts you: whenever it comes close, hide in the burrows.
Three shards for the cauldron
- Three candles now mark the routes to the three shards of the Molgrim's broken cauldron.
- 🗿 Clay Figurine 6/19 · The Old ManBack in the swamp after the monster cave, there are three blue candles that show the routes to the three fragments. Take the path to the left of them first: a hatch in the next area.
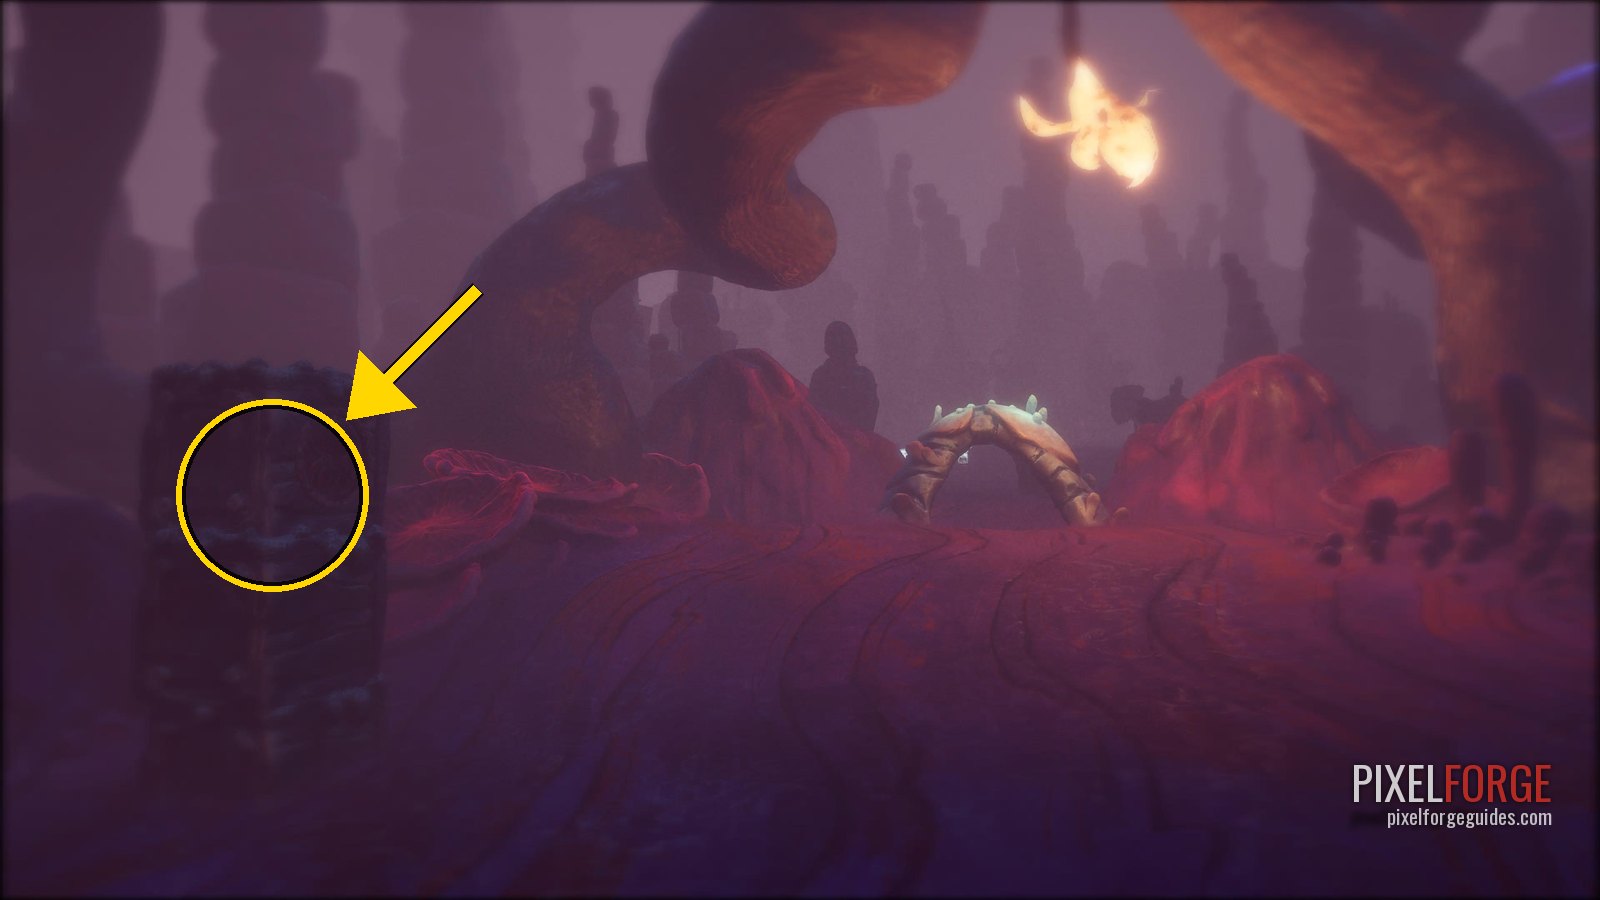
Clay Figurine 6/19 · The Old Man · Chapter 2 - At the end of that path, a crawlspace on the right holds a jar with a talking head in it: Headvig. Take him with you.
- Go through the hole right of the figurine into the room with three masks. Close your eyes to pop the frogs hiding them: one by the entrance on the far left, one just right of a figure at the back, and one at the back of the room that uncovers an alcove with the third mask. Put the masks on the three figures for the Shard of Trinity.
- 🐚 Shellphone 9/25Crawl through the hole to the right of The Old Man into the area where you put three masks on three creatures. It's on the left side.
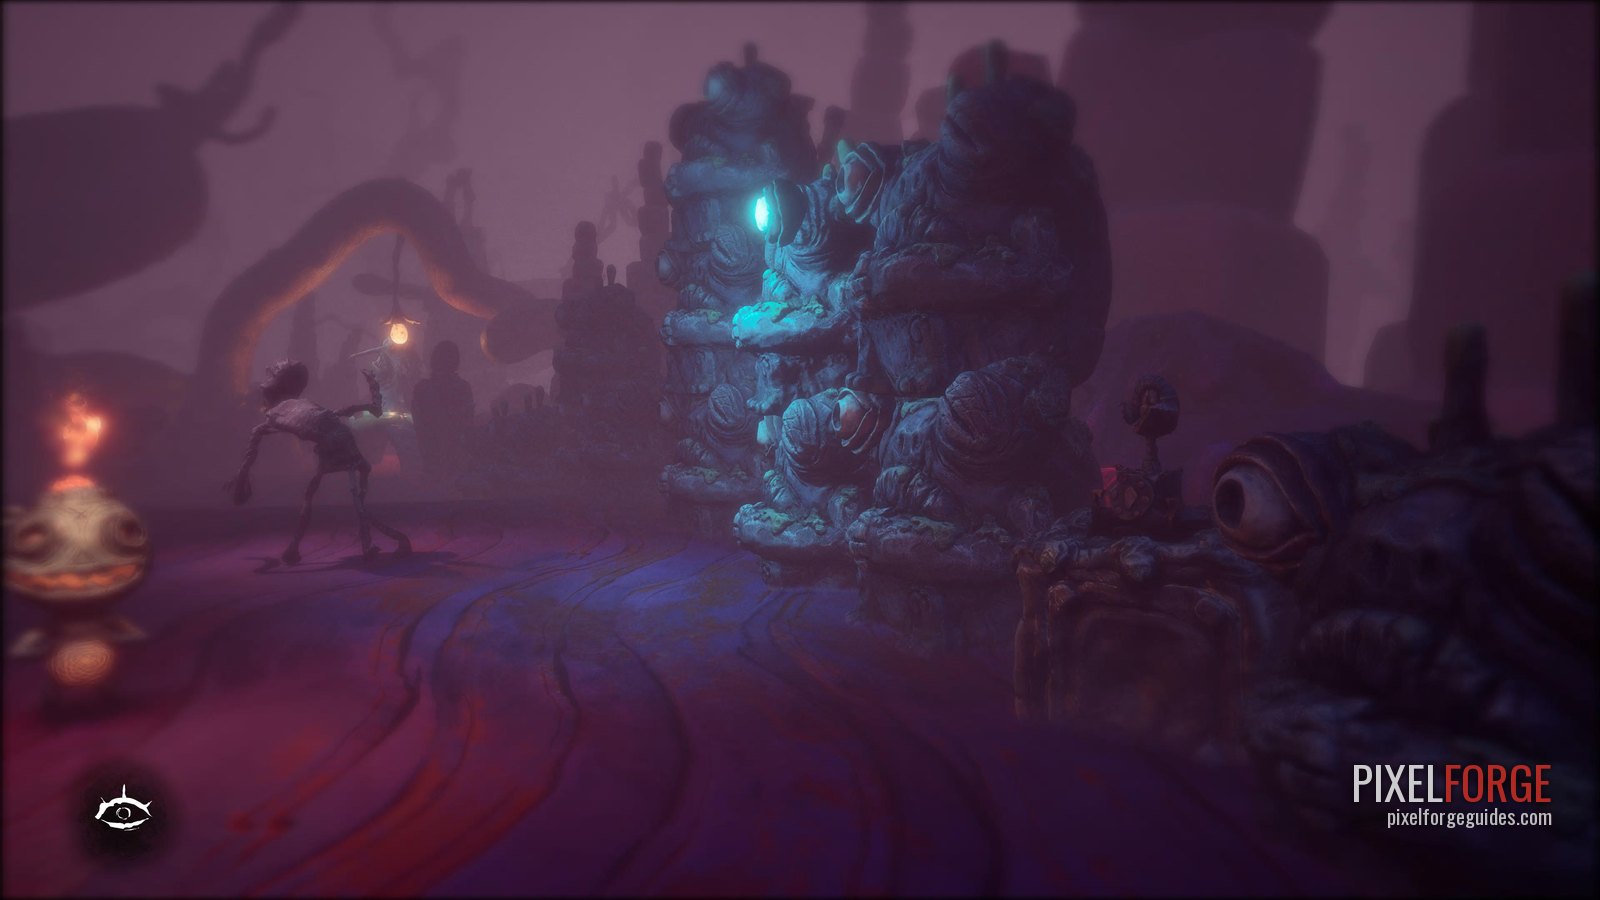
Shellphone 9/25 · Chapter 2 - Go back to the swamp entrance and set Headvig on the round pedestal there: the Shard of the Heart.
- Take the right path over the wooden bridge and turn left straight away.
- 💿 Gramophone Disc 6/17 · The SparkGo back to the three blue candles and take the right path. Just after the giant guitar on your left, turn left: a hatch on a small island.
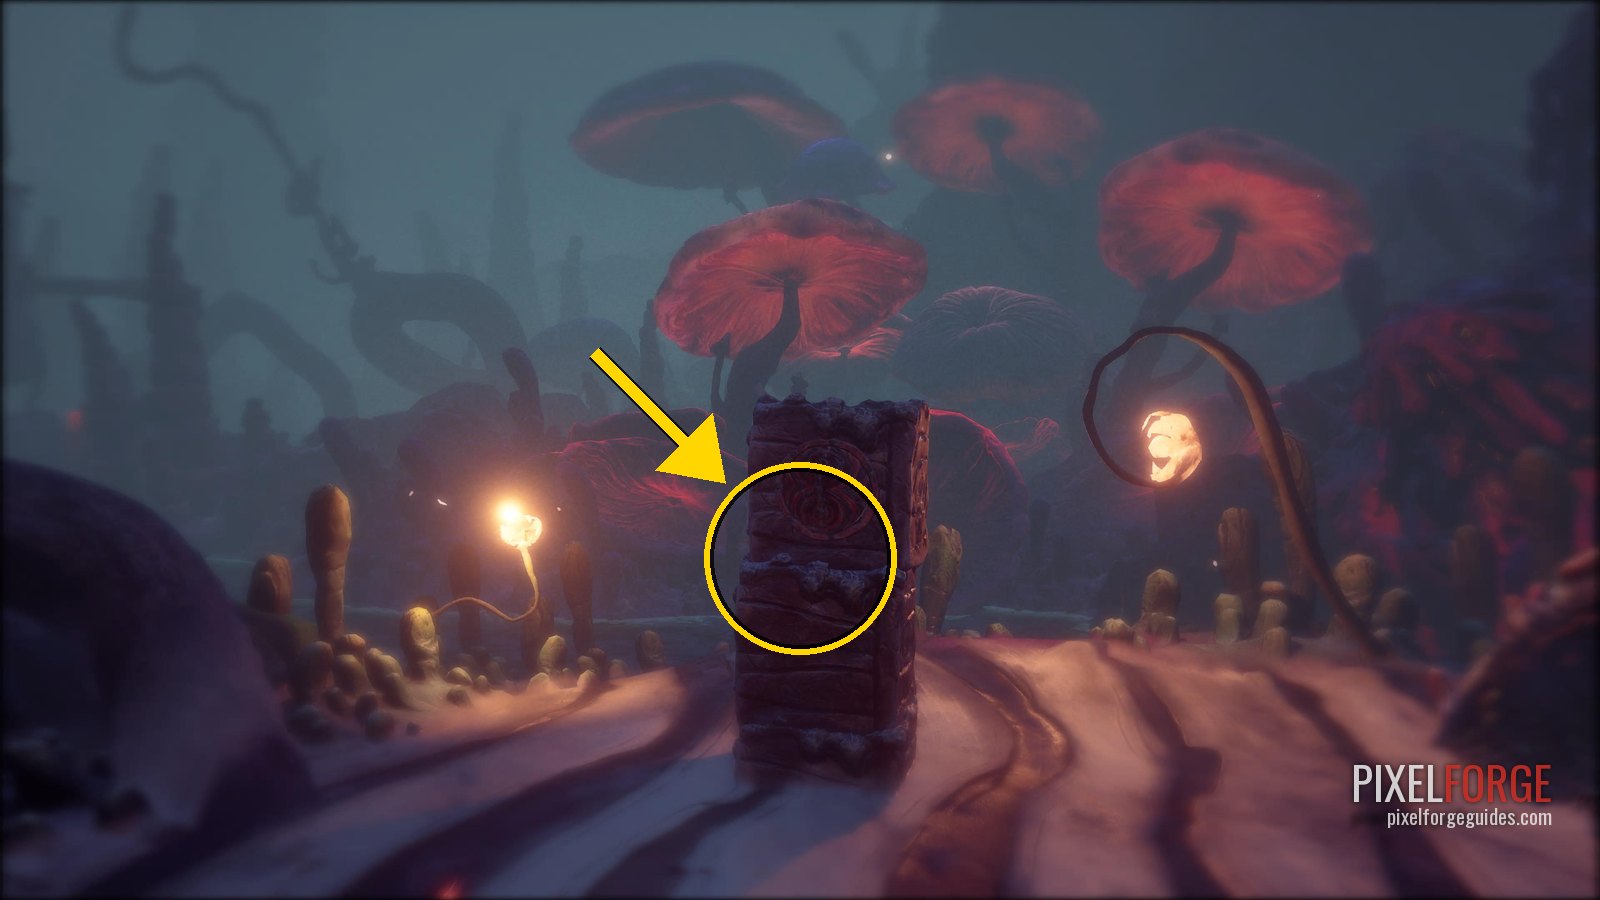
Gramophone Disc 6/17 · The Spark · Chapter 2 - In the bottom drawers of the wardrobe along this path is the clue “Reading the Stones”.
- 🐚 Shellphone 10/25Keep following the right path to a pipe and a cauldron: next to the pipe.
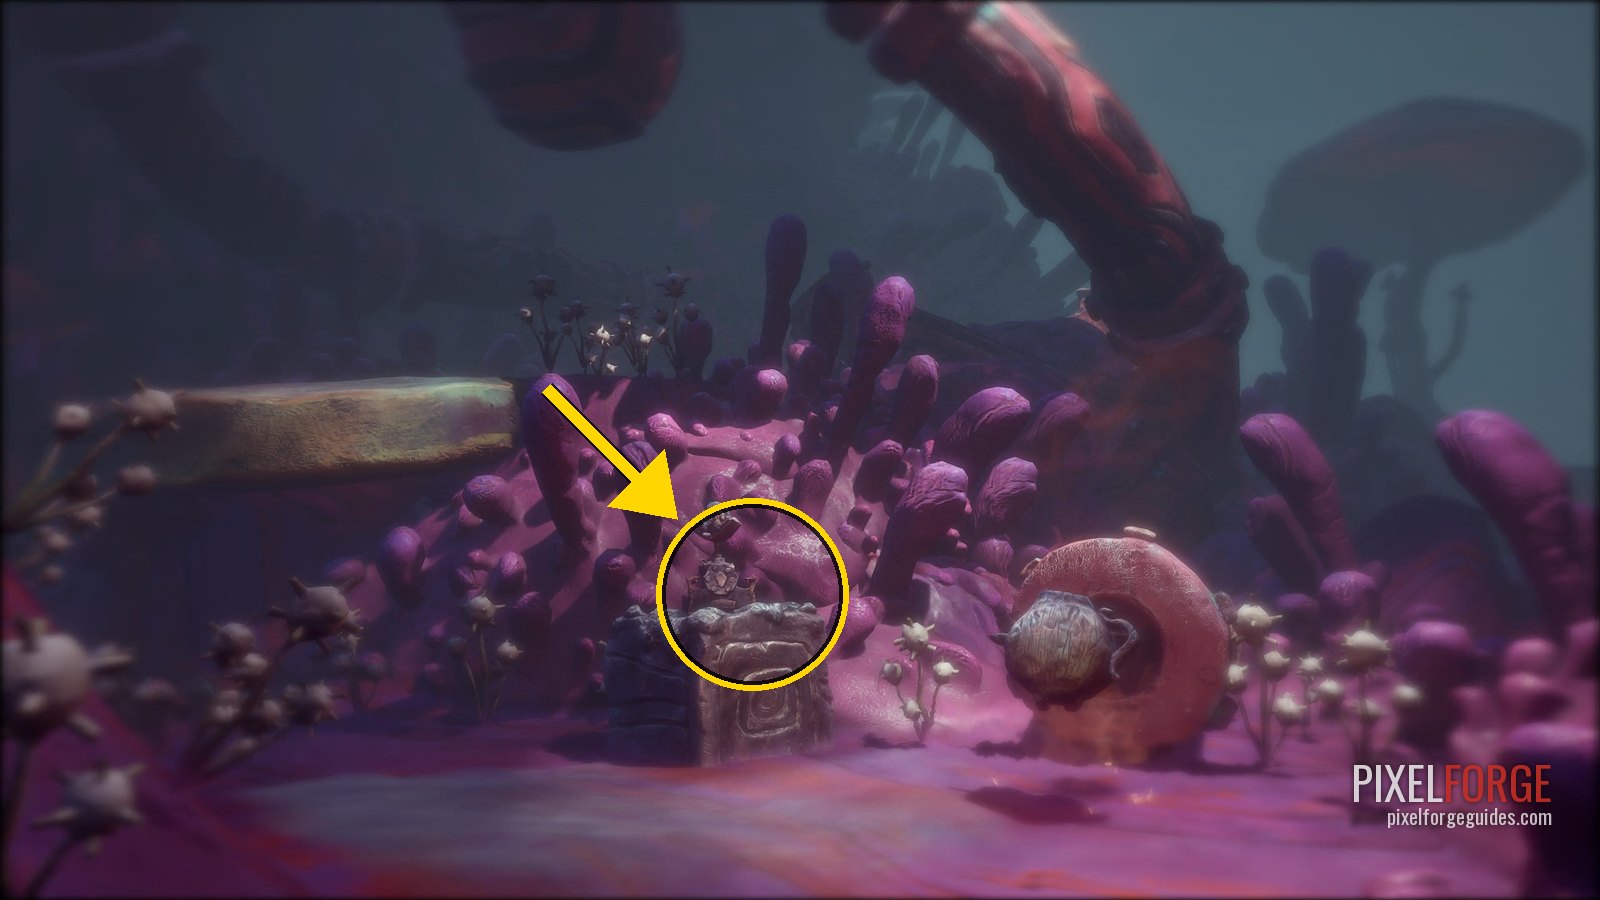
Shellphone 10/25 · Chapter 2 - Have Potboy light the furnace to lift the platform and cross.
- 📜 Story Page 4/15Use that cauldron to raise the platform across the gap. The hatch is to the left of the flying contraption.
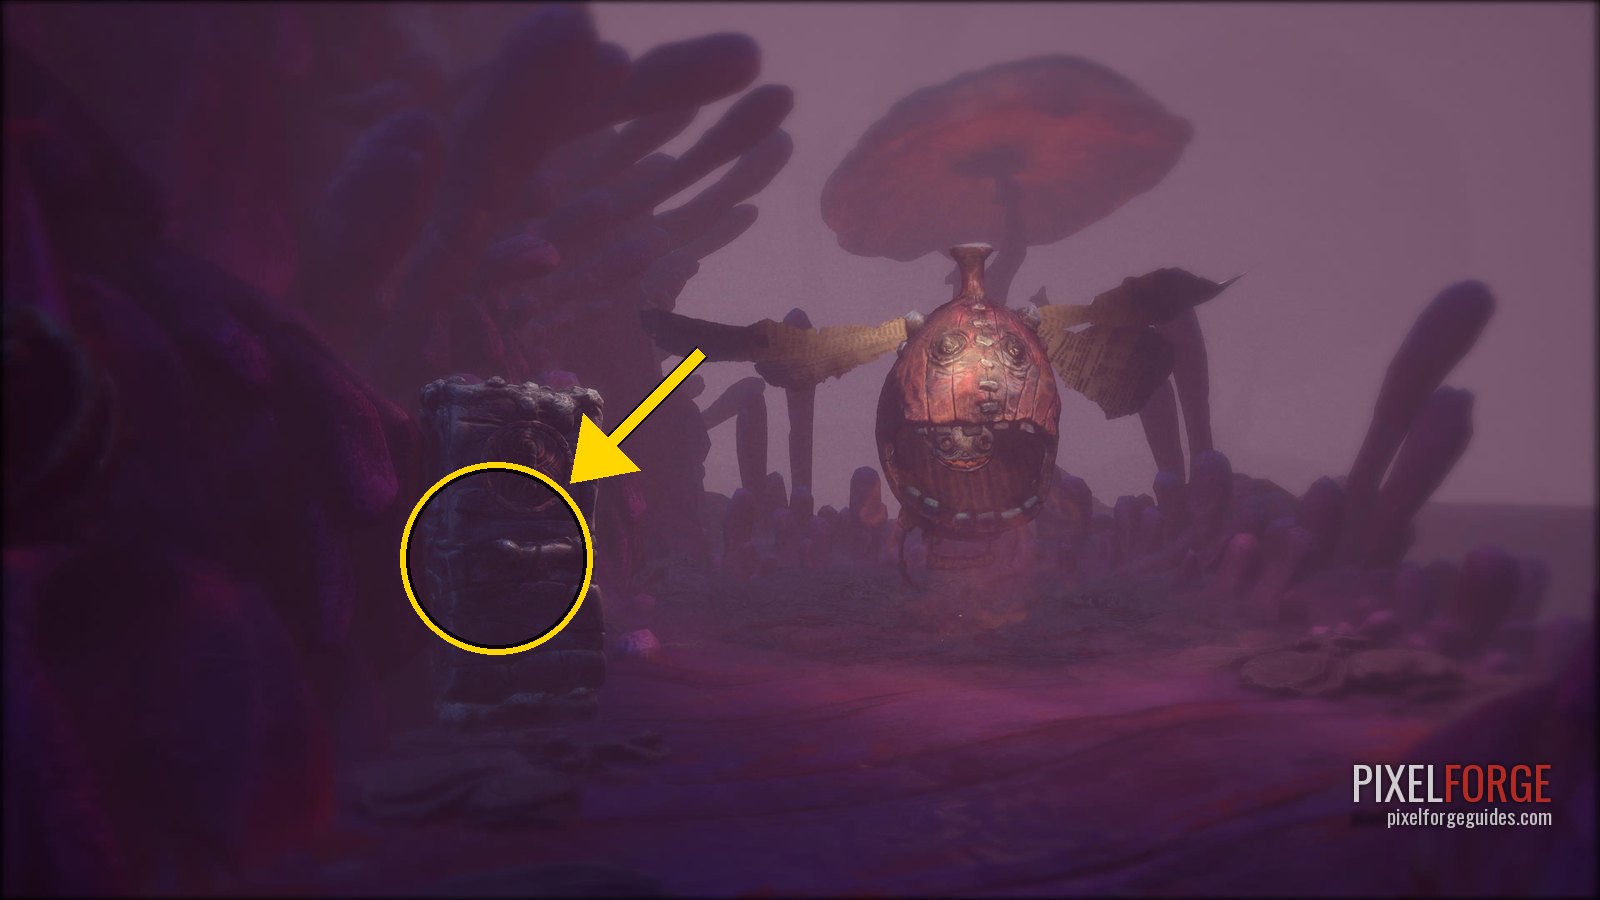
Story Page 4/15 · Chapter 2 - Ride the flying machine up. In the round clearing, light the five candles in the order of the story on the stones (counting the pictures from the left): 2 (the Molgrims at the fire), 4 (the Molgrim attacked by soldiers with torches), 5 (the soldiers fighting), 3 (the Headmaster and the headless bodies), 1 (the scared heads and the Molgrim). You get the Shard of the Moon.
- On the way back the Molgrim spots you: hide in the little grotto right behind you.
Fixing the cauldron
- Put the three shards into the cauldron and have Potboy light it (Square three times). After the scene, pop the blue eye on the wardrobe: it's a shortcut back to the Headmaster, who gives you a key.
- Go back to the entrance of Nobodyville and open the door on the left with it (the wisp leads the way).
- 🐚 Shellphone 11/25Once the three fragments are in the cauldron, the Headmaster gives you a key. After you use it, it's on the right of the path.
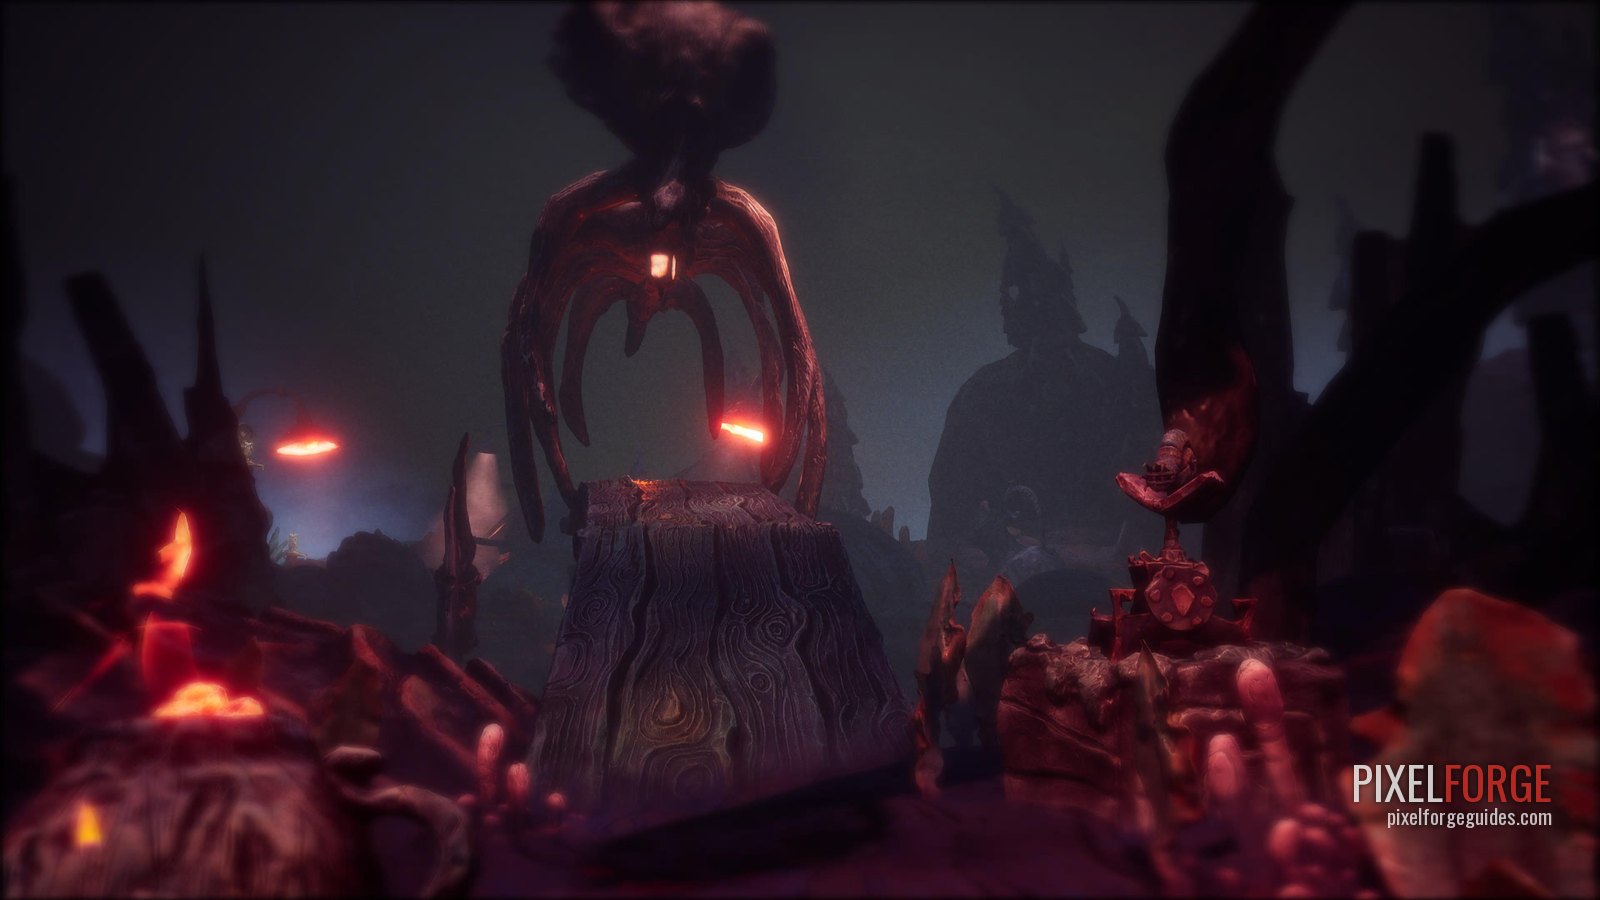
Shellphone 11/25 · Chapter 2 - 🗿 Clay Figurine 7/19 · The MolgrimIn the open area with the villager just after Shellphone 11: a hatch in plain view.
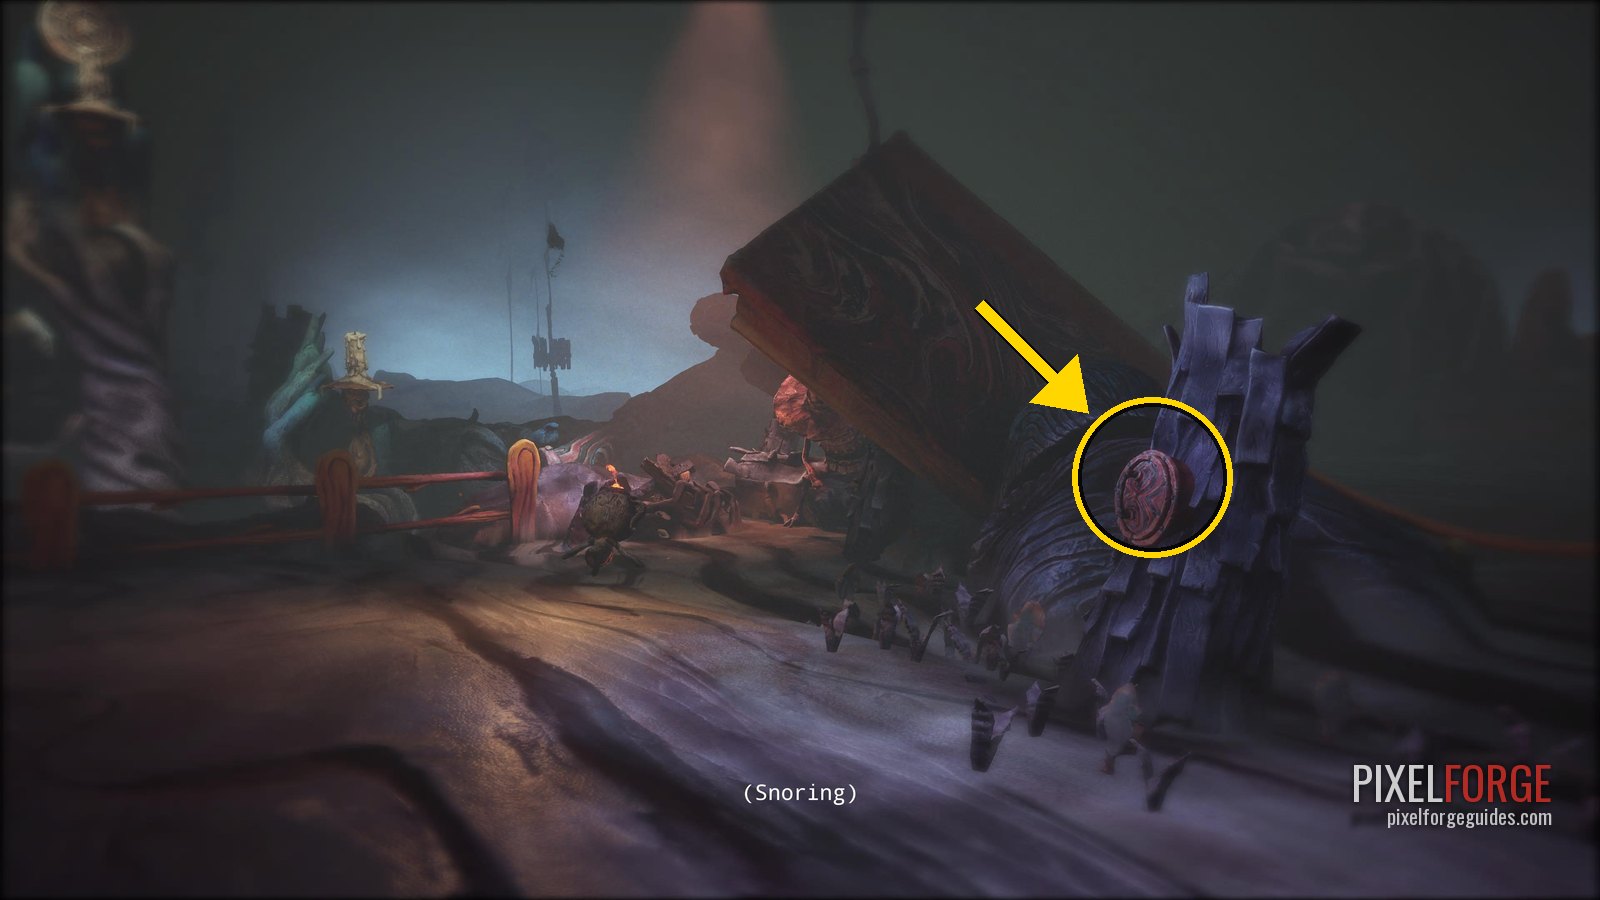
Clay Figurine 7/19 · The Molgrim · Chapter 2 - Light the bonfire, listen to the character, then light the three candles to his left with the Matchlock and Potboy. Close your eyes at the yellow eye that appears: you're back with Housy.
- 📜 Story Page 5/15After the eye and reuniting with Housy, walk down the path where bodies shuffle towards you. Just past them, a hatch on the right.
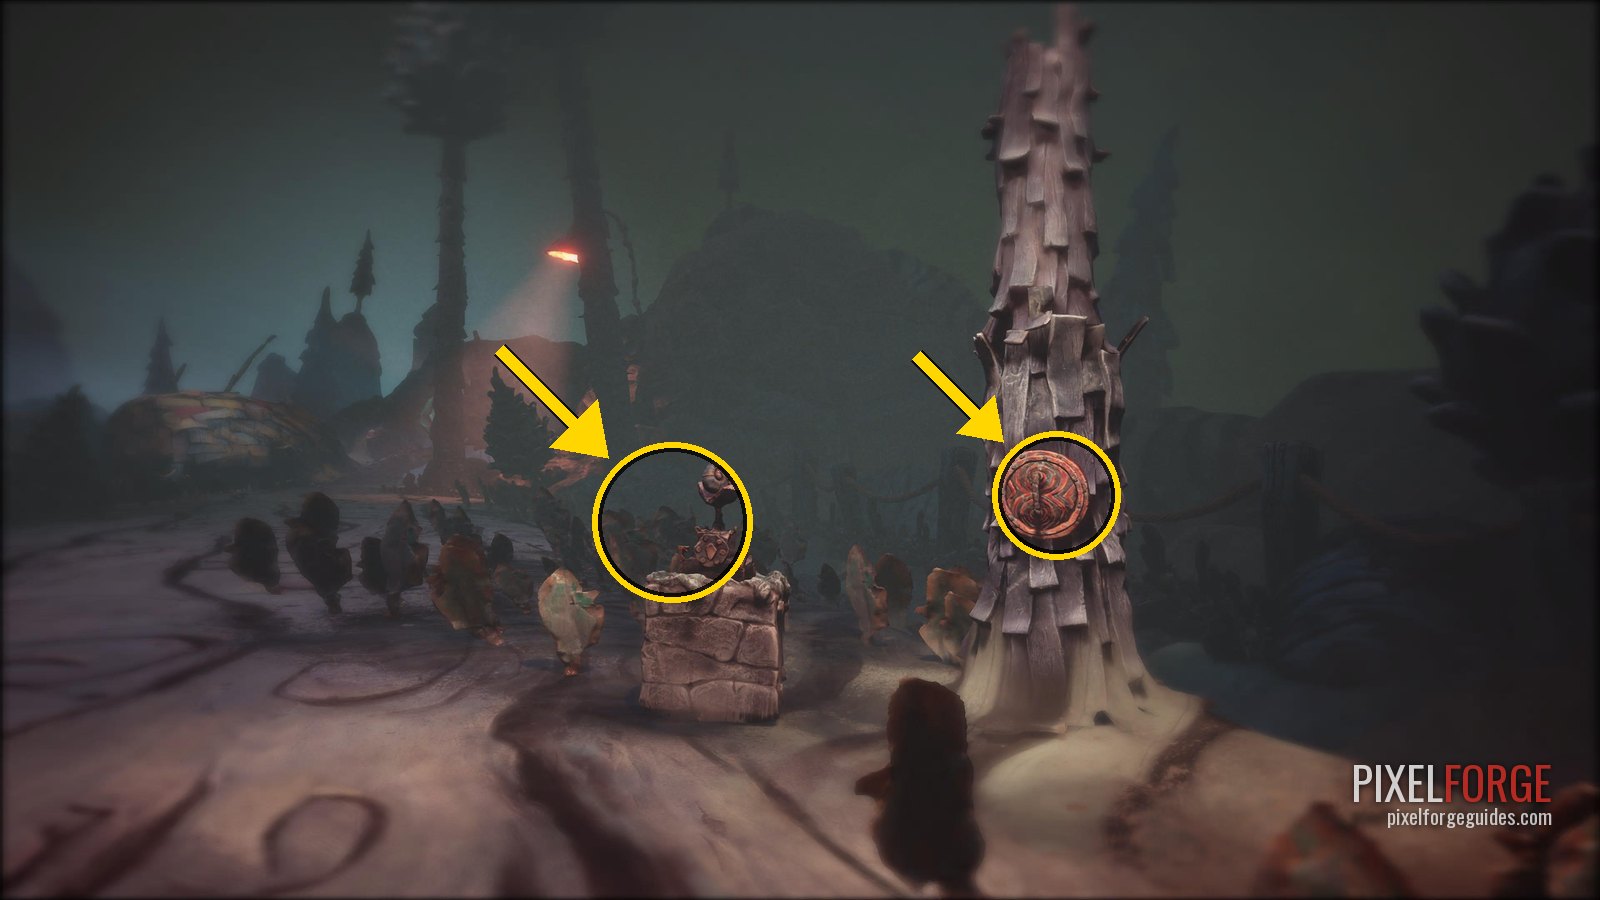
Story Page 5/15 · Chapter 2 - 🐚 Shellphone 12/25Right next to Story Page 5.
Shellphone 12/25 · Chapter 2 - Walk on to the next bridge and go underneath. 🏆 The Tale Of The Loathsome Molgrim
Chapter 3: The Tale of Coalhaven 21 collectibles · 5 figurines · 5 discs · 6 shellphones · 5 story pages
Coalhaven: the mine tracks in the dark, the freezing walk between Potboy's candles, the village with the gas boilers and the frozen lake, the house on the hill and the thief's missing limbs. 21 collectibles, the most of any chapter.
Into the mines
- Potboy lights the candle behind a burnt-out Potboy from another walk. Follow the path under the bridge; you rest in Housy and arrive outside Coalhaven.
- 💿 Gramophone Disc 7/17 · All Darkness VanishesAt the start, take the right-hand path just past the character with the umbrella: behind a hatch.
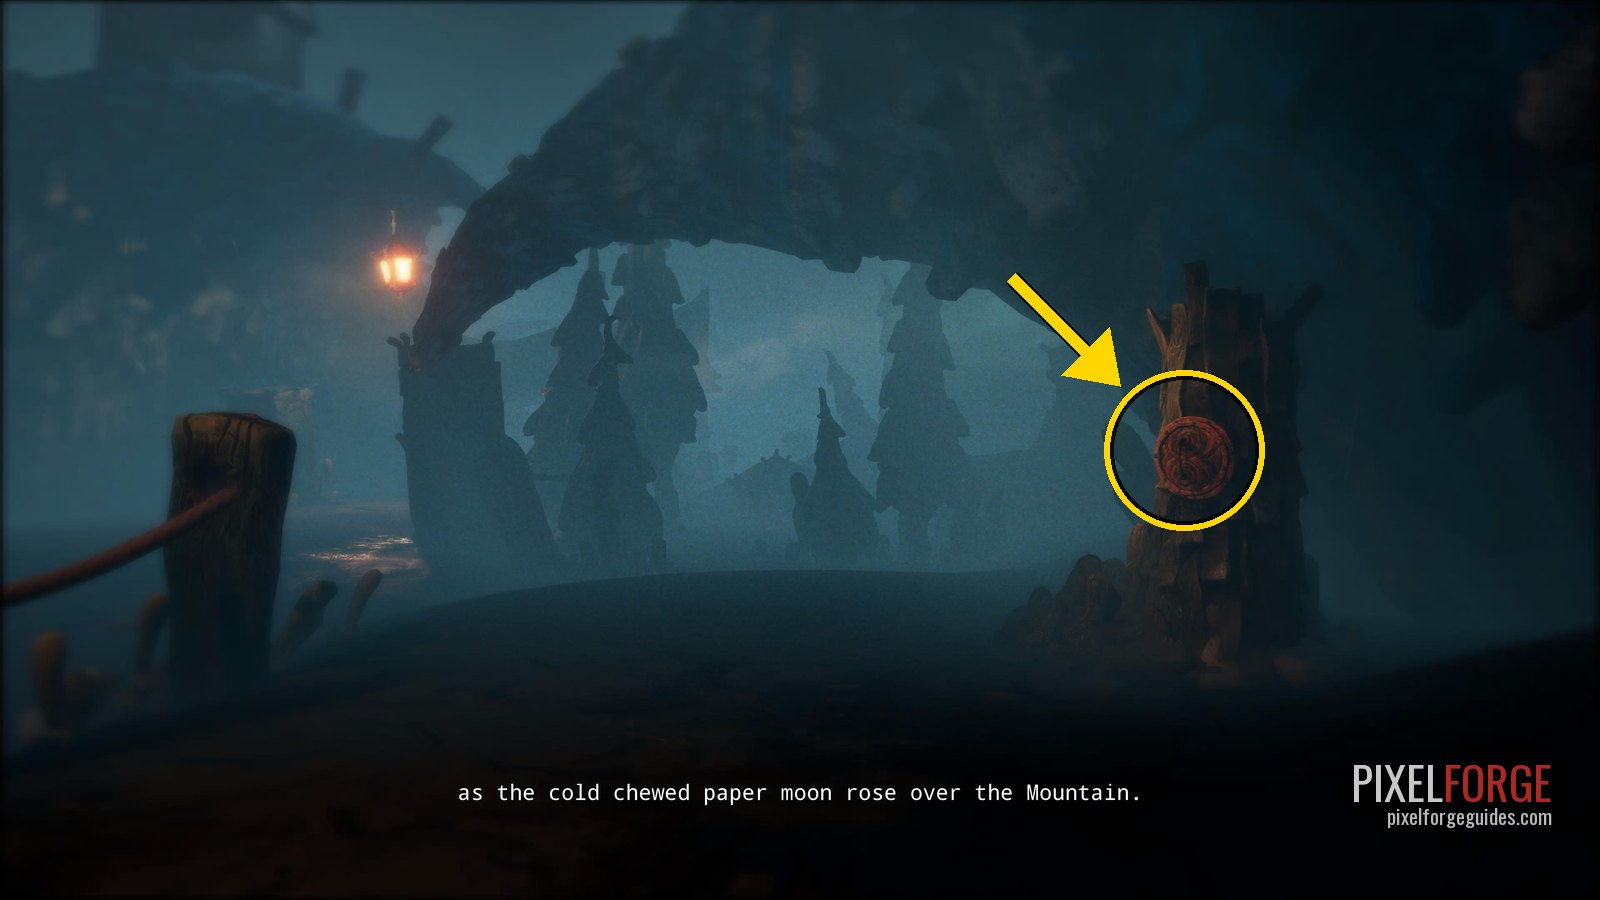
Gramophone Disc 7/17 · All Darkness Vanishes · Chapter 3 - Go into Housy and come back out.
- 🐚 Shellphone 13/25As soon as you leave Housy, turn around.
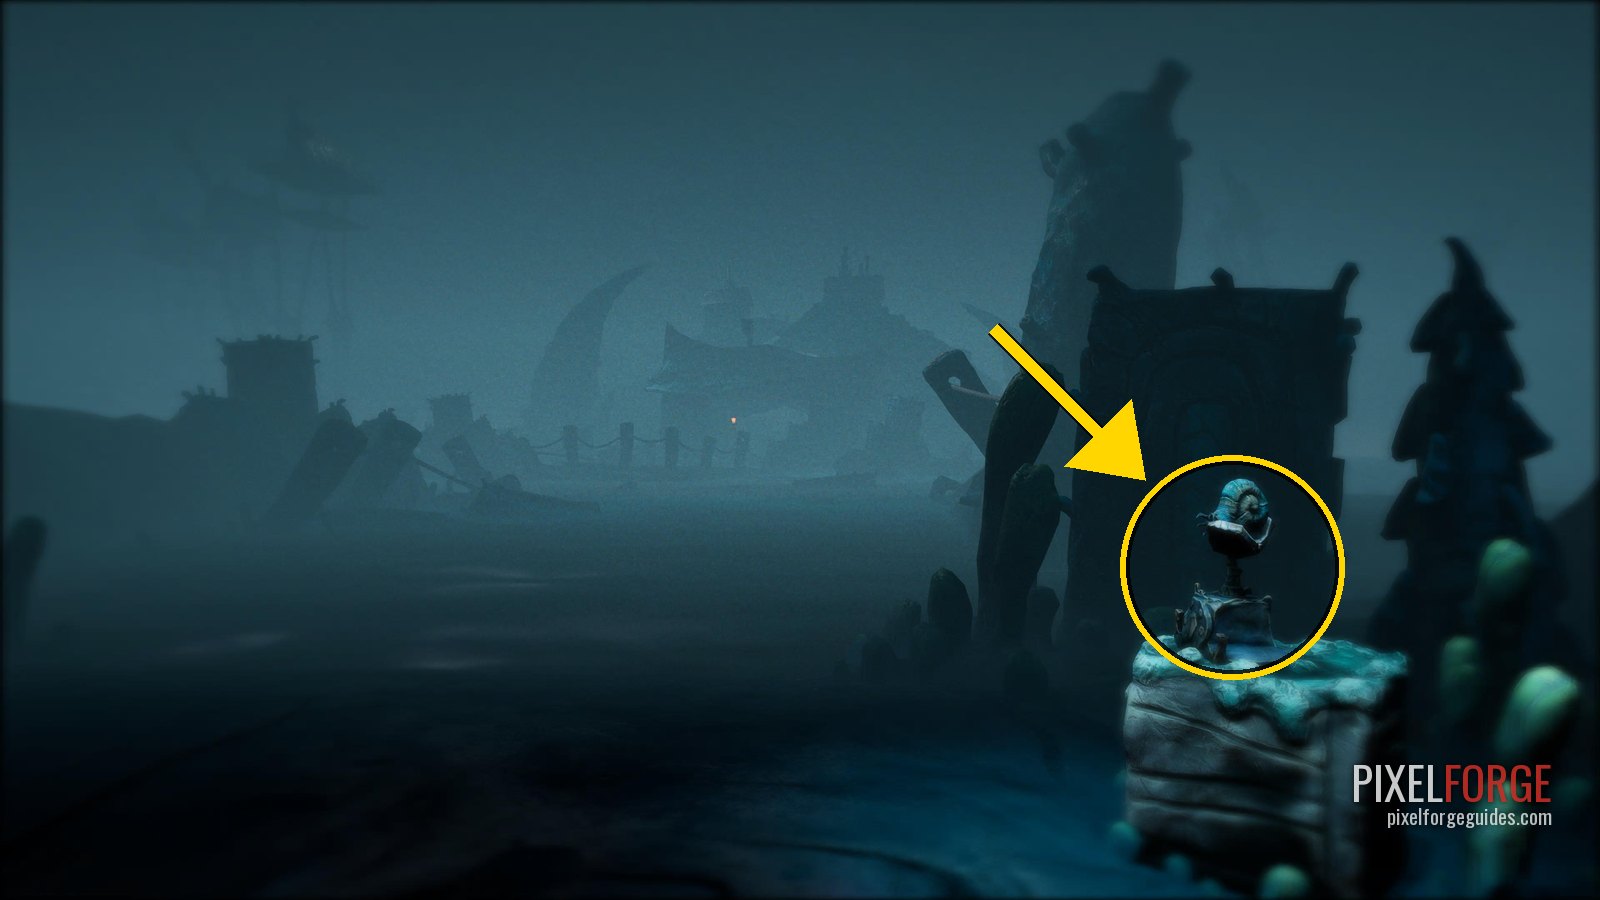
Shellphone 13/25 · Chapter 3 - Follow Housy up the main road until it stops, then drop to the lower level.
- 📜 Story Page 6/15A hatch to the right of the giant cat.
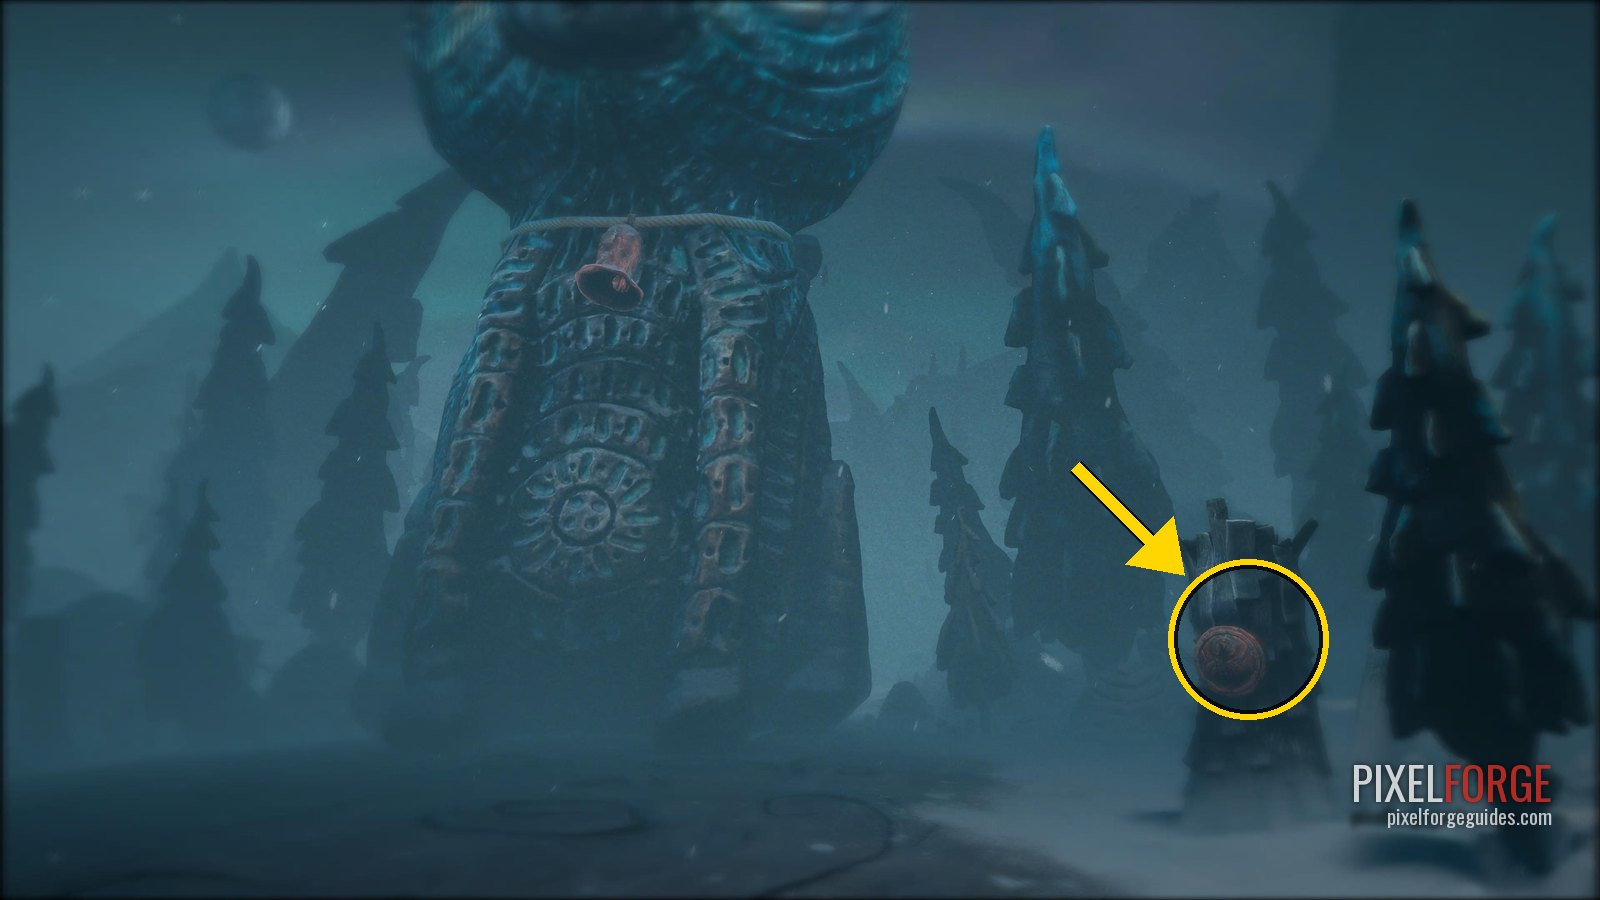
Story Page 6/15 · Chapter 3 - Take the path right of the big cat into the mines. Close your eyes at each blue frog statue round the circle, working counter-clockwise, until the cave opening clears.
- 💿 Gramophone Disc 8/17 · I TrappanInside the cave: the area with the tracks, a hole in the middle and orange plants. The hatch is on a block on the far side of the hole.
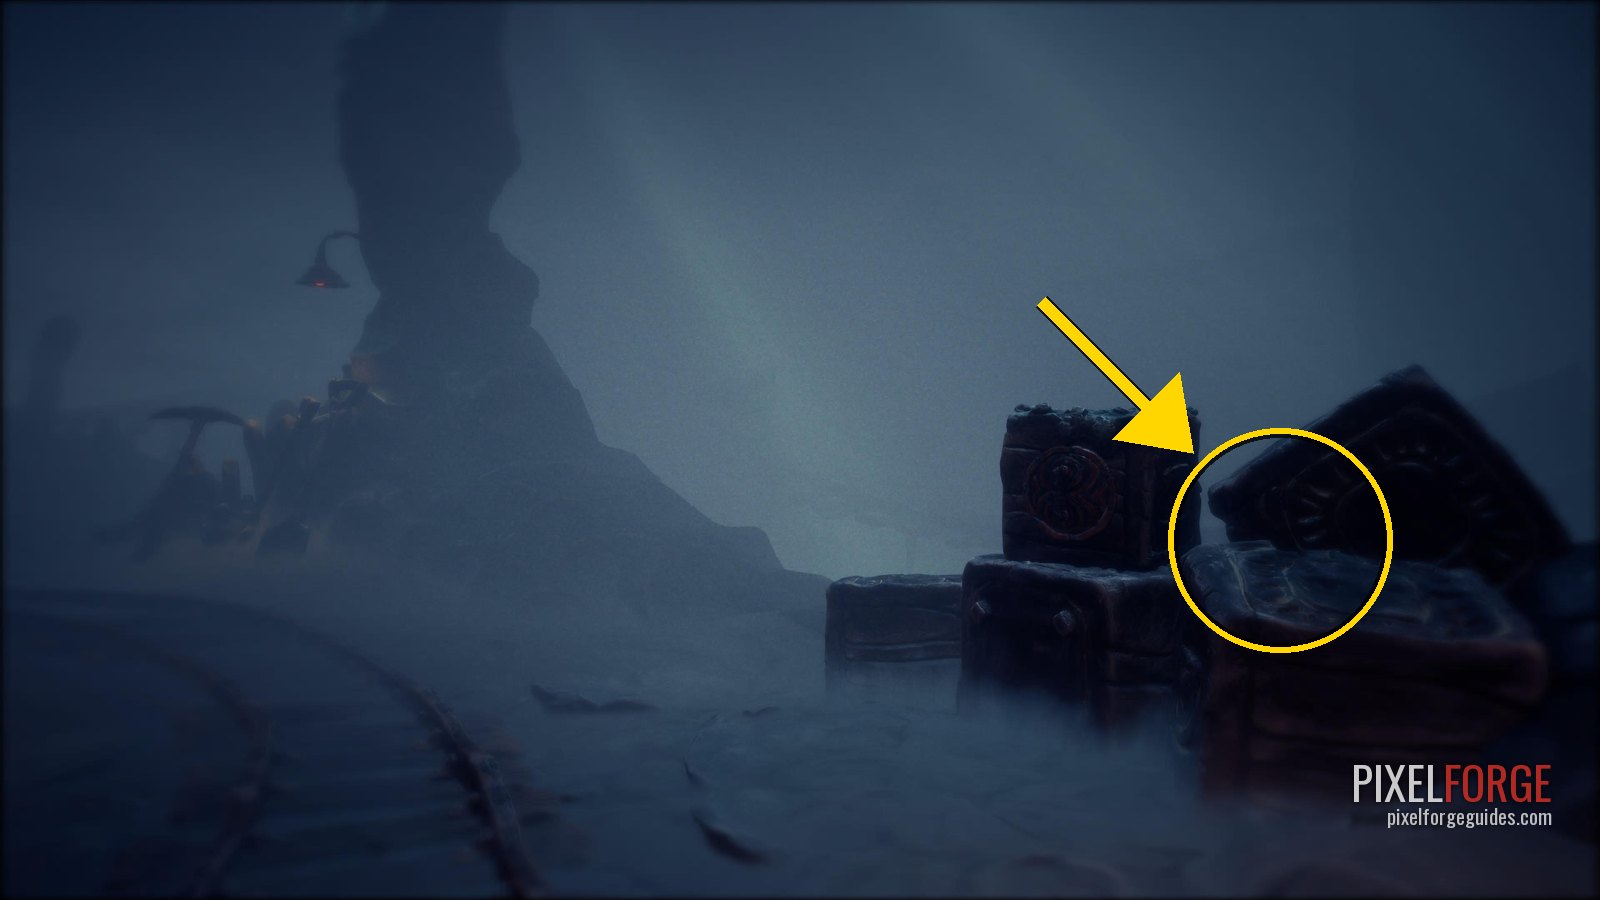
Gramophone Disc 8/17 · I Trappan · Chapter 3 - In the room full of pipes, ignore the main ones: take the stairs on the right to a hidden pipe that sends Potboy to the high platforms on the left, then the right pipe to the back chamber. Stand on the platform and have Potboy light the furnace to ride up.
- In the dark rooms, keep lighting candles so you can see the monsters before they see you. You can't hide from these: run, and time popping the blue eyes that block the way.
- 🐚 Shellphone 14/25Walking the dark tracks lighting candles, one candle sits where the tracks split. Take the right-hand tracks: it's by the next candle.
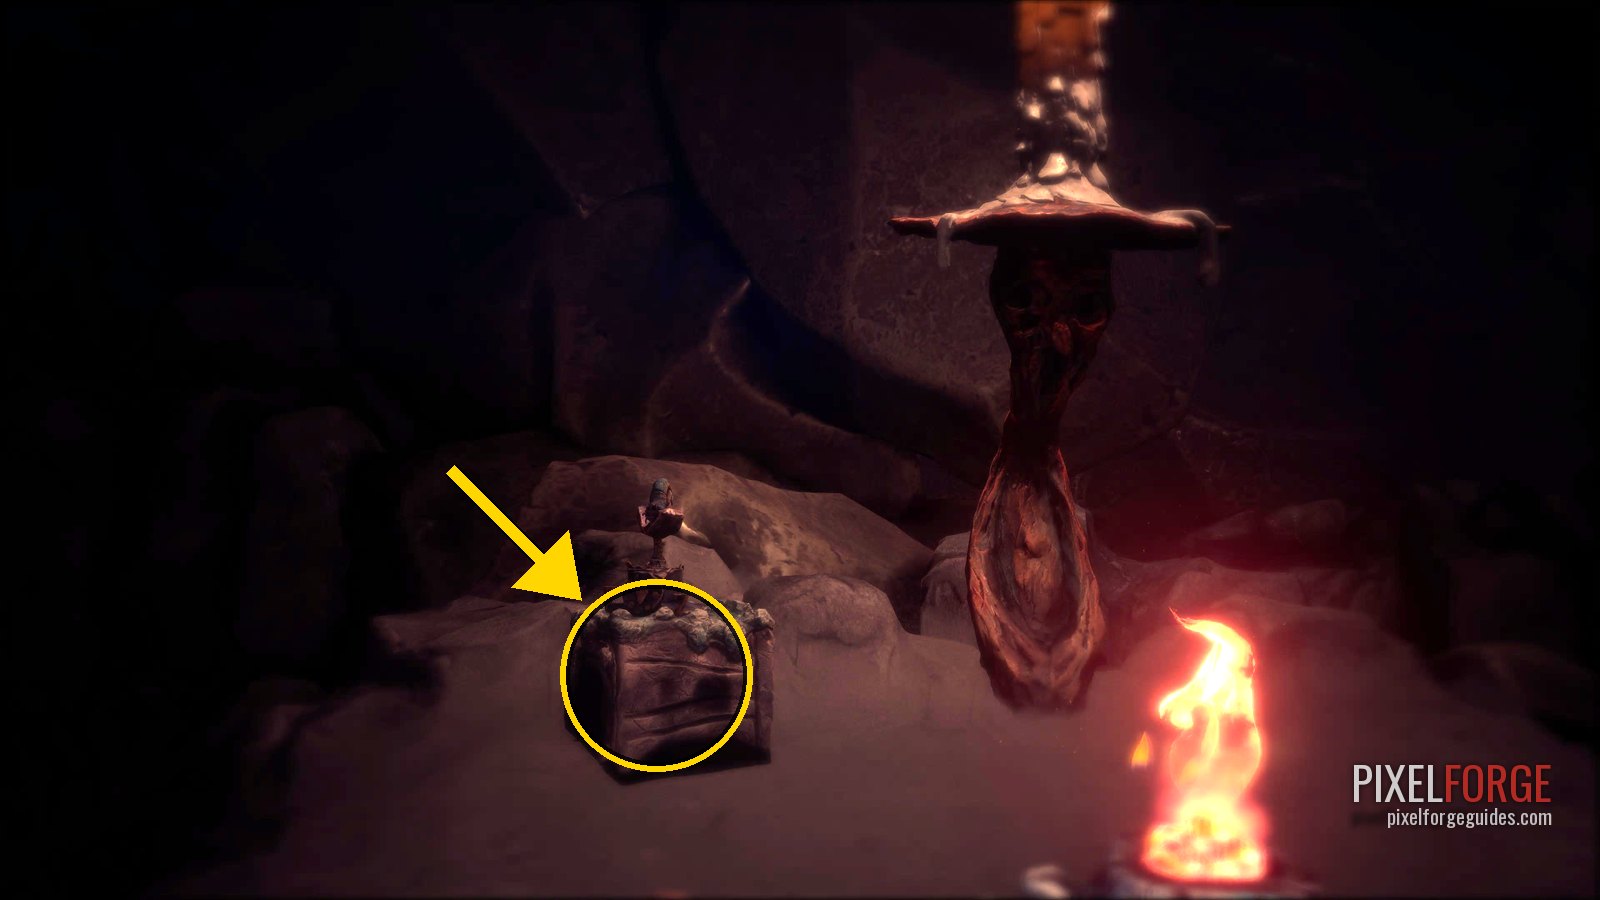
Shellphone 14/25 · Chapter 3 - 🗿 Clay Figurine 8/19 · The MoonbirdKeep following the dark tracks to the next split and take the right-hand tracks again to a hatch.
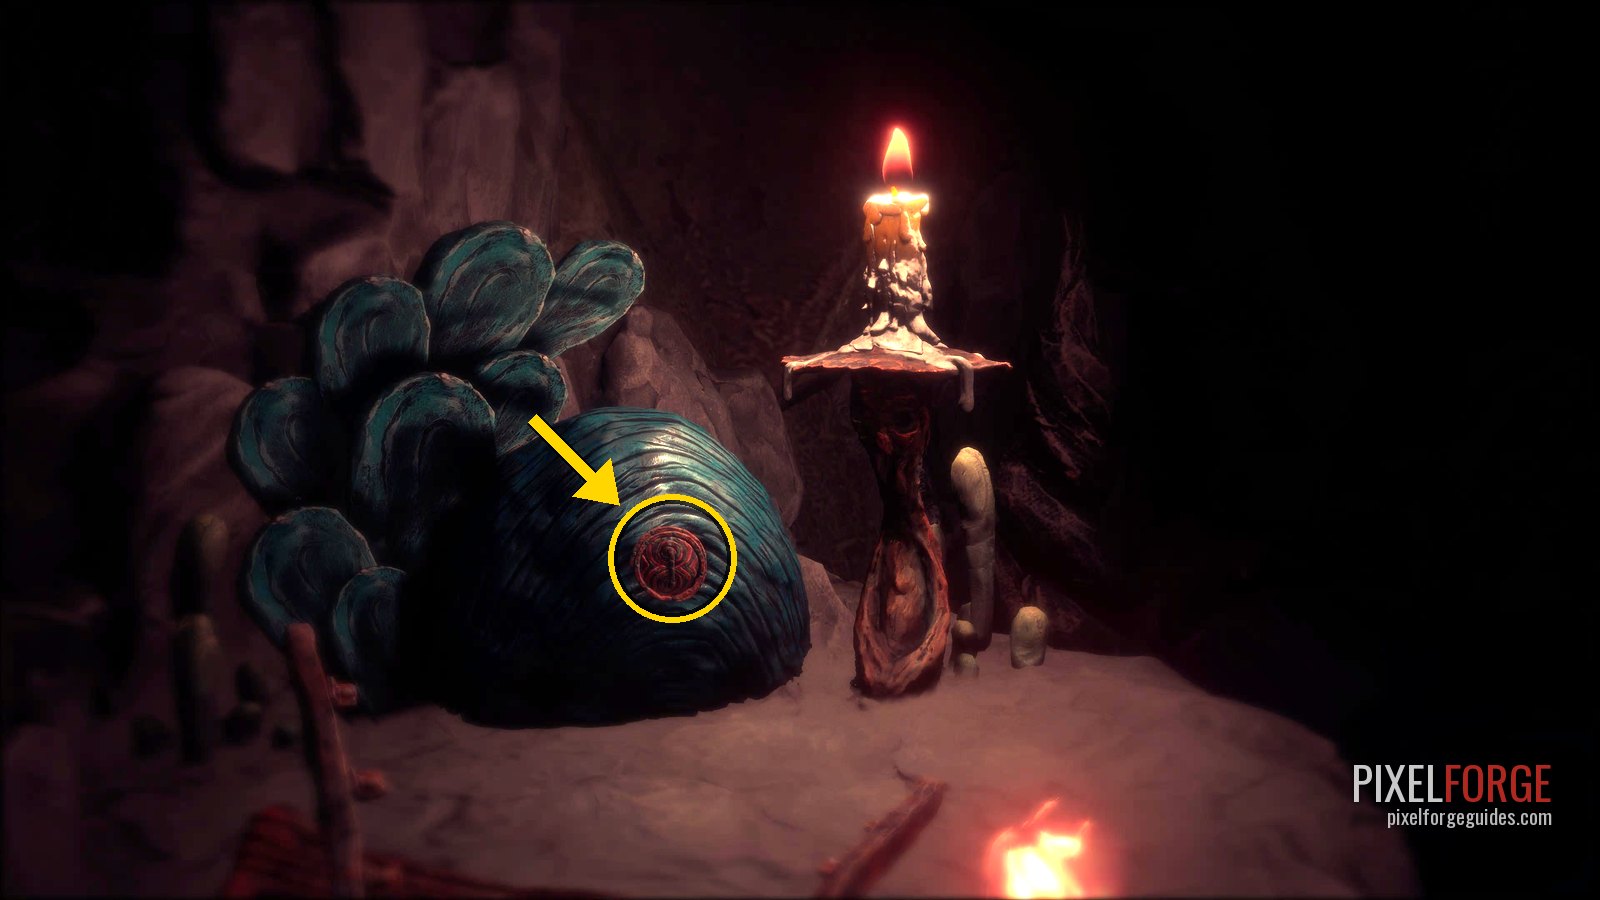
Clay Figurine 8/19 · The Moonbird · Chapter 3 - 💿 Gramophone Disc 9/17 · Alla SoverFollow the tracks until you drop down a small ledge (the tracks carry on below): a hatch on your right as you land.
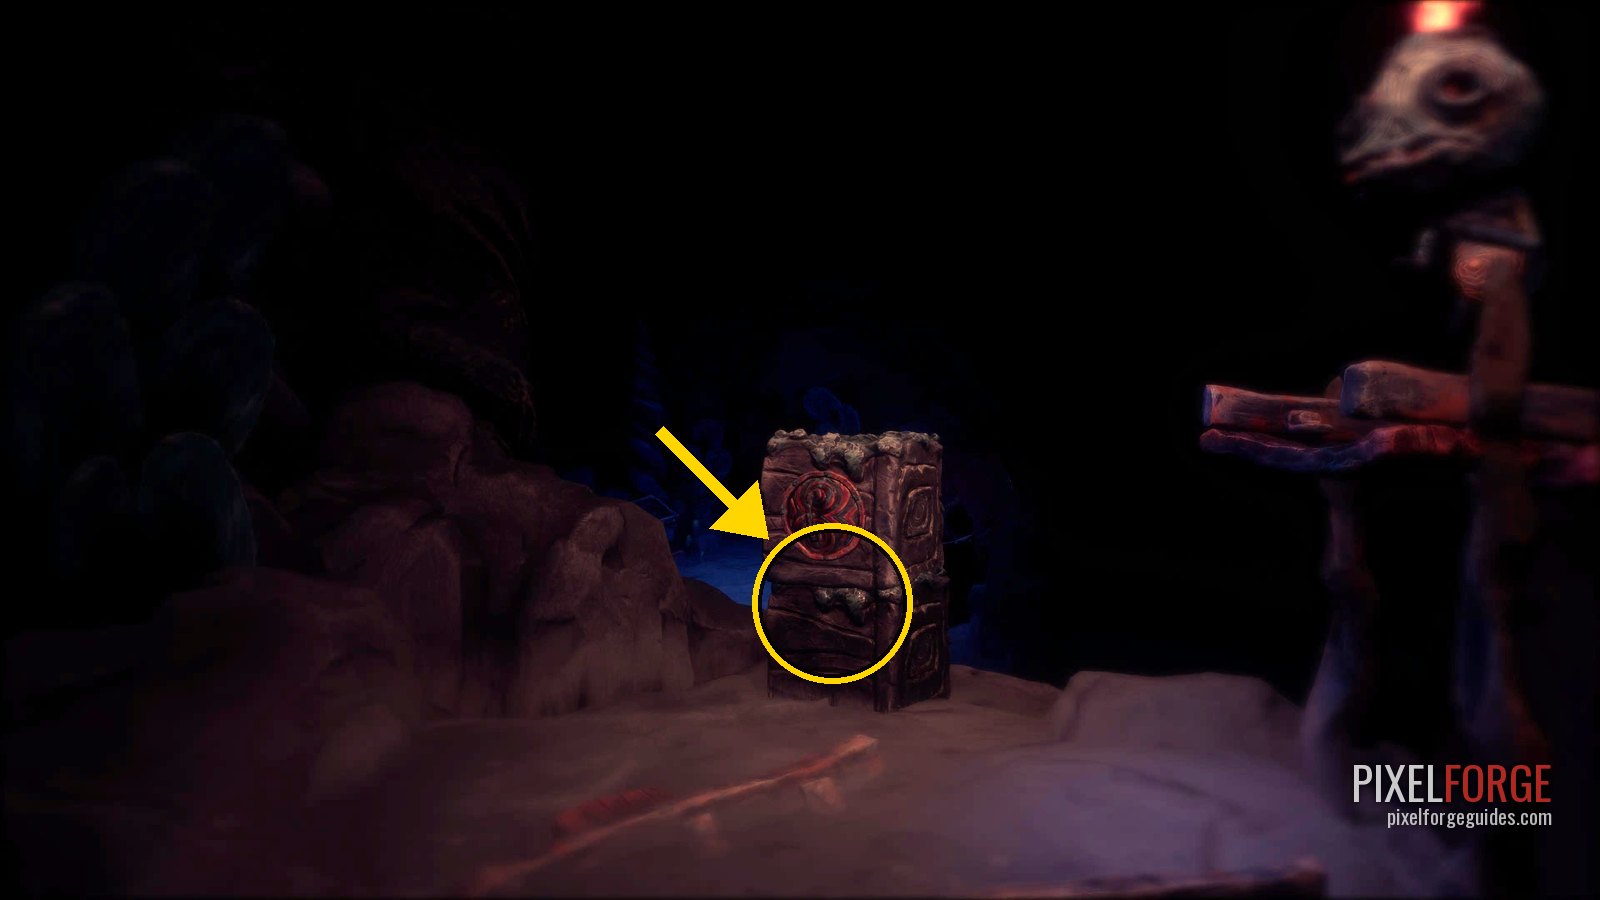
Gramophone Disc 9/17 · Alla Sover · Chapter 3
The frozen wasteland
- Out of the mine, the cold kills you if you stray from Potboy or a candle. When the wind blows, Potboy must be behind shelter or his flame goes out: send him (Square) to the sheltered spots in front of you during the lulls, and relight him with matches if he goes out.
- 📜 Story Page 7/15Out of the mine you move between Potboy's candles to keep from freezing. The hatch is just before the third candle.
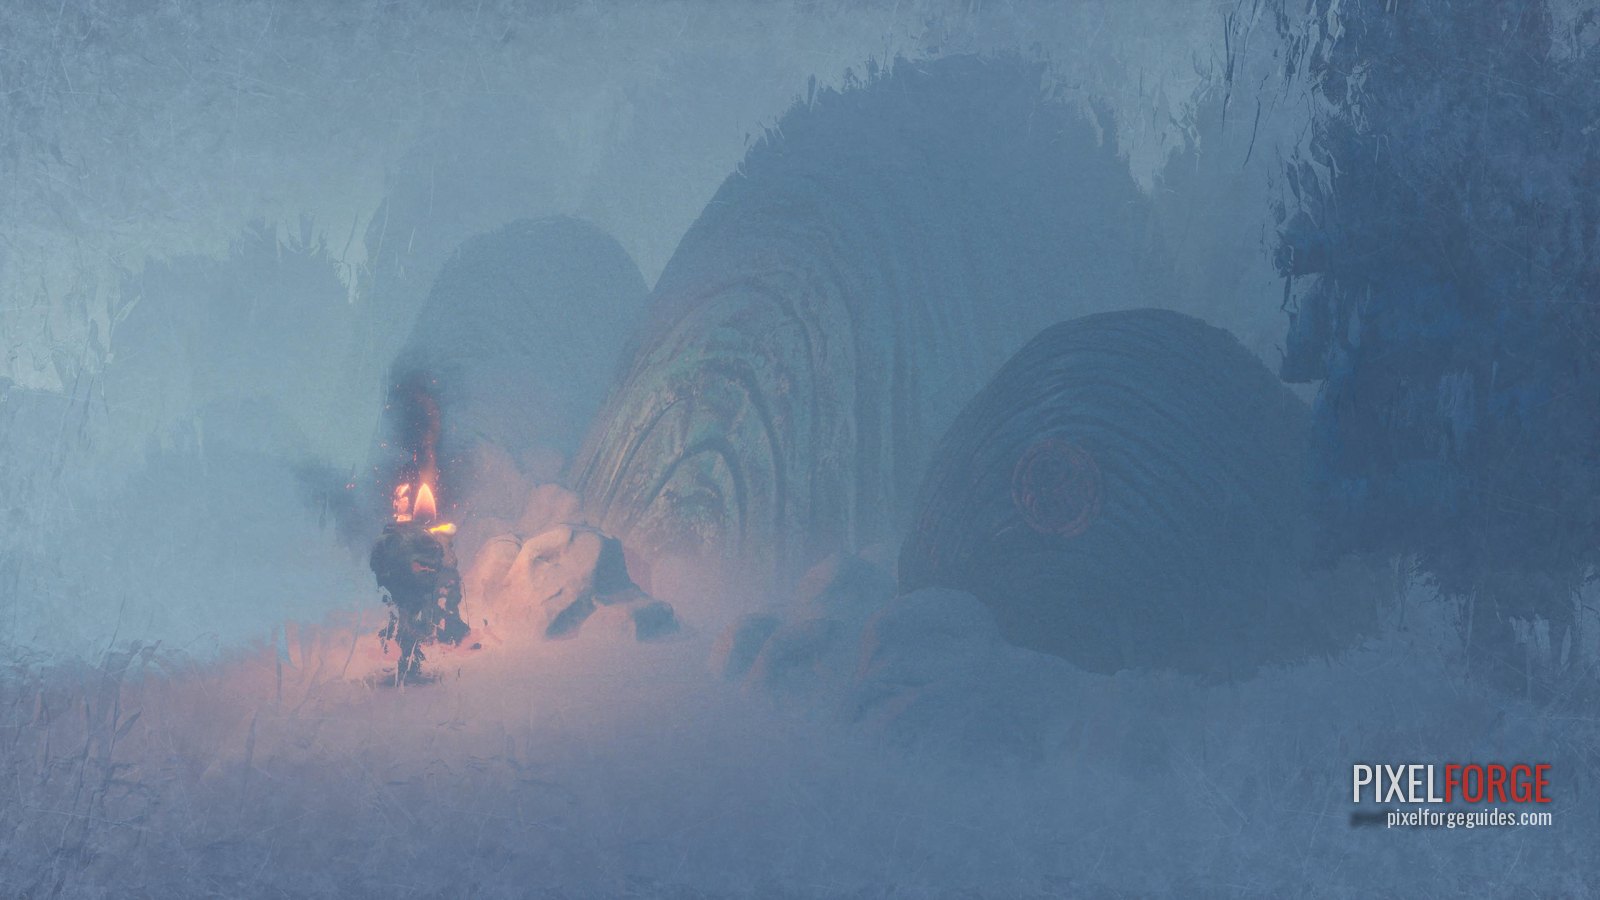
Story Page 7/15 · Chapter 3
Coalhaven town · the gas boilers
- The chapter title appears as the wind drops. There's a map on the right as you enter.
- 🐚 Shellphone 15/25In the village after the snowstorm, next to the well where the eye appears.
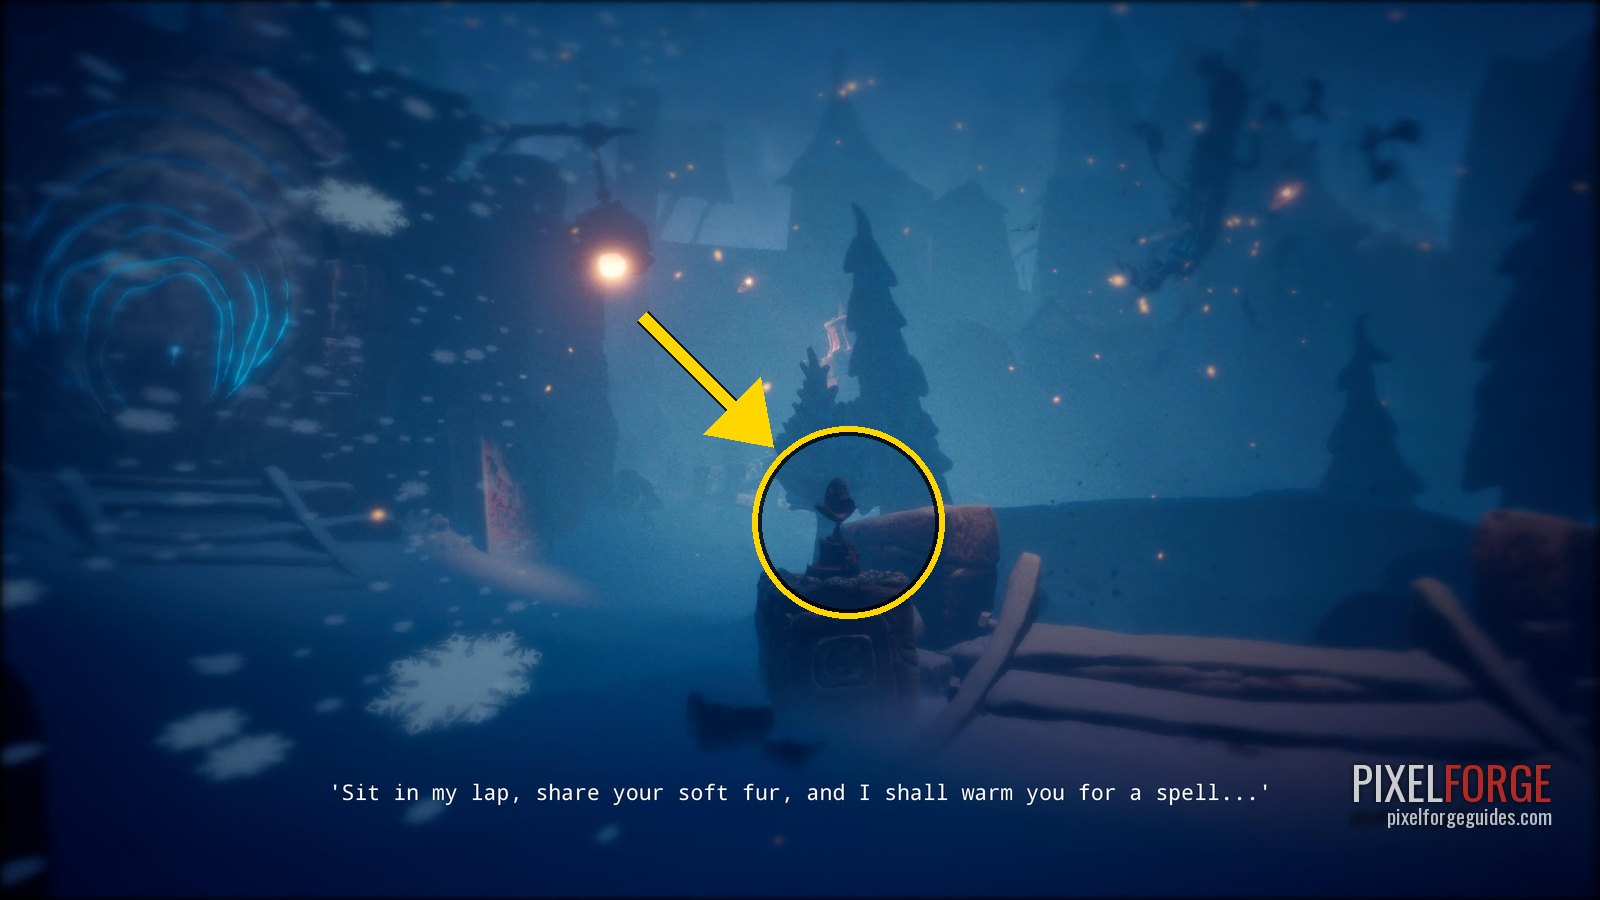
Shellphone 15/25 · Chapter 3 - Throw a lit match into the well with the eye: it gives you a key. Open the house left of the well, next to the matchbox, put Potboy on the switch inside, then go out and shoot the gas boiler in the distance with the Matchlock to open the next path.
- 💿 Gramophone Disc 10/17 · Tröstetankar I JuletidLight the first gas boiler; the door behind it opens. Go through and take the left path: behind a hatch.
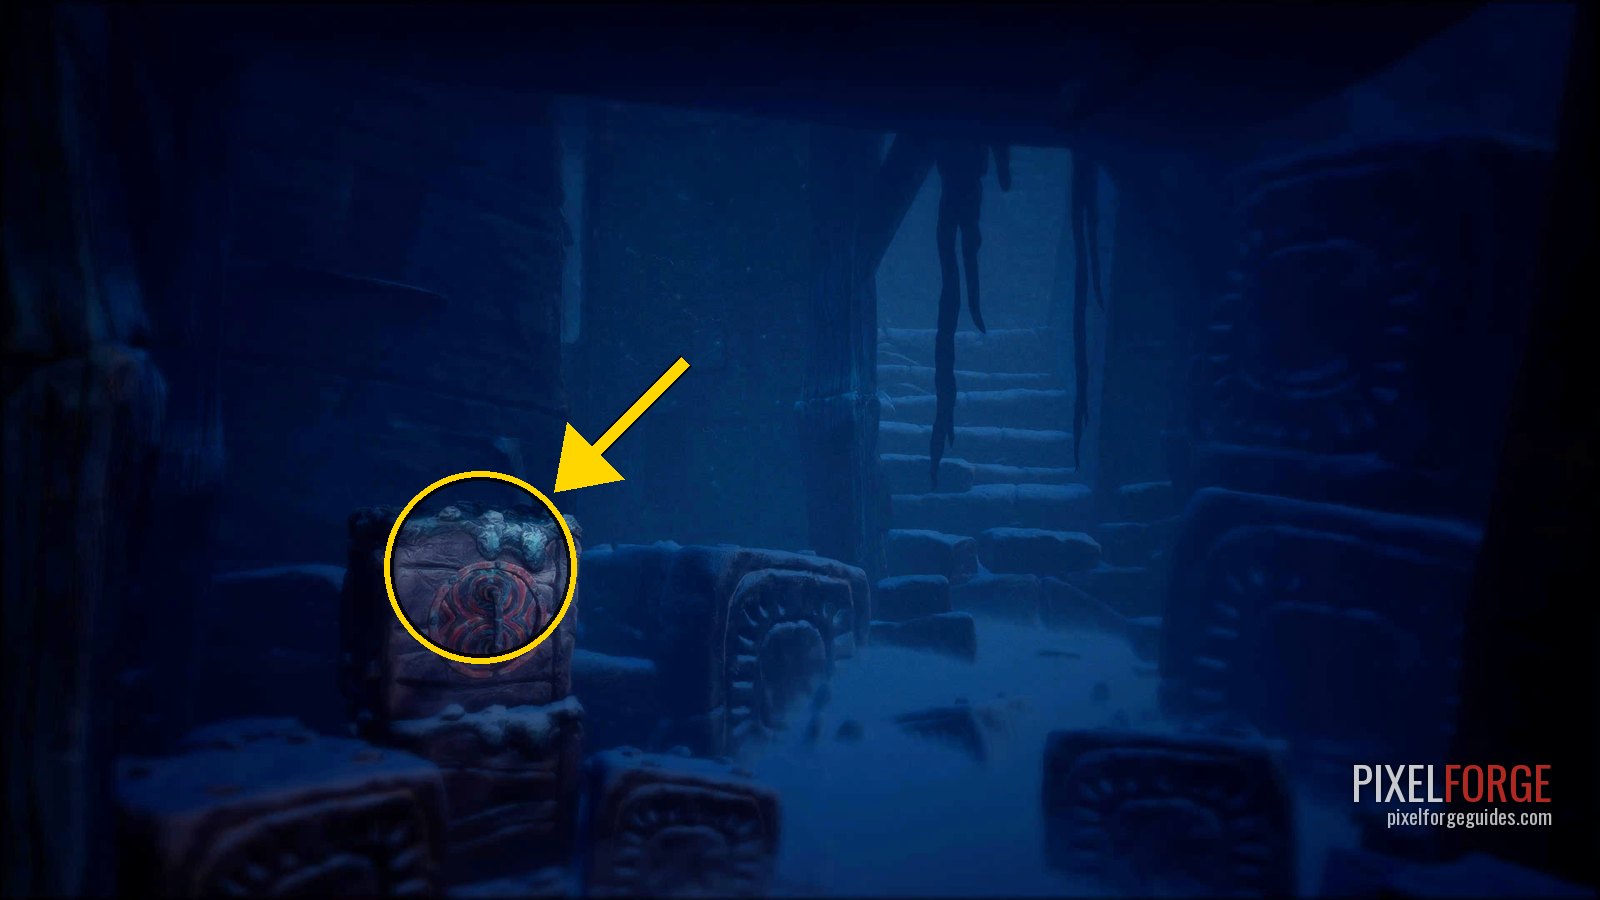
Gramophone Disc 10/17 · Tröstetankar I Juletid · Chapter 3 - Put Potboy on the switch on the other side of that room, then go out and shoot the second boiler next to the big locked door.
- 🐚 Shellphone 16/25Light the second gas boiler and go through its door. It's to the left of the wardrobe in the open area.
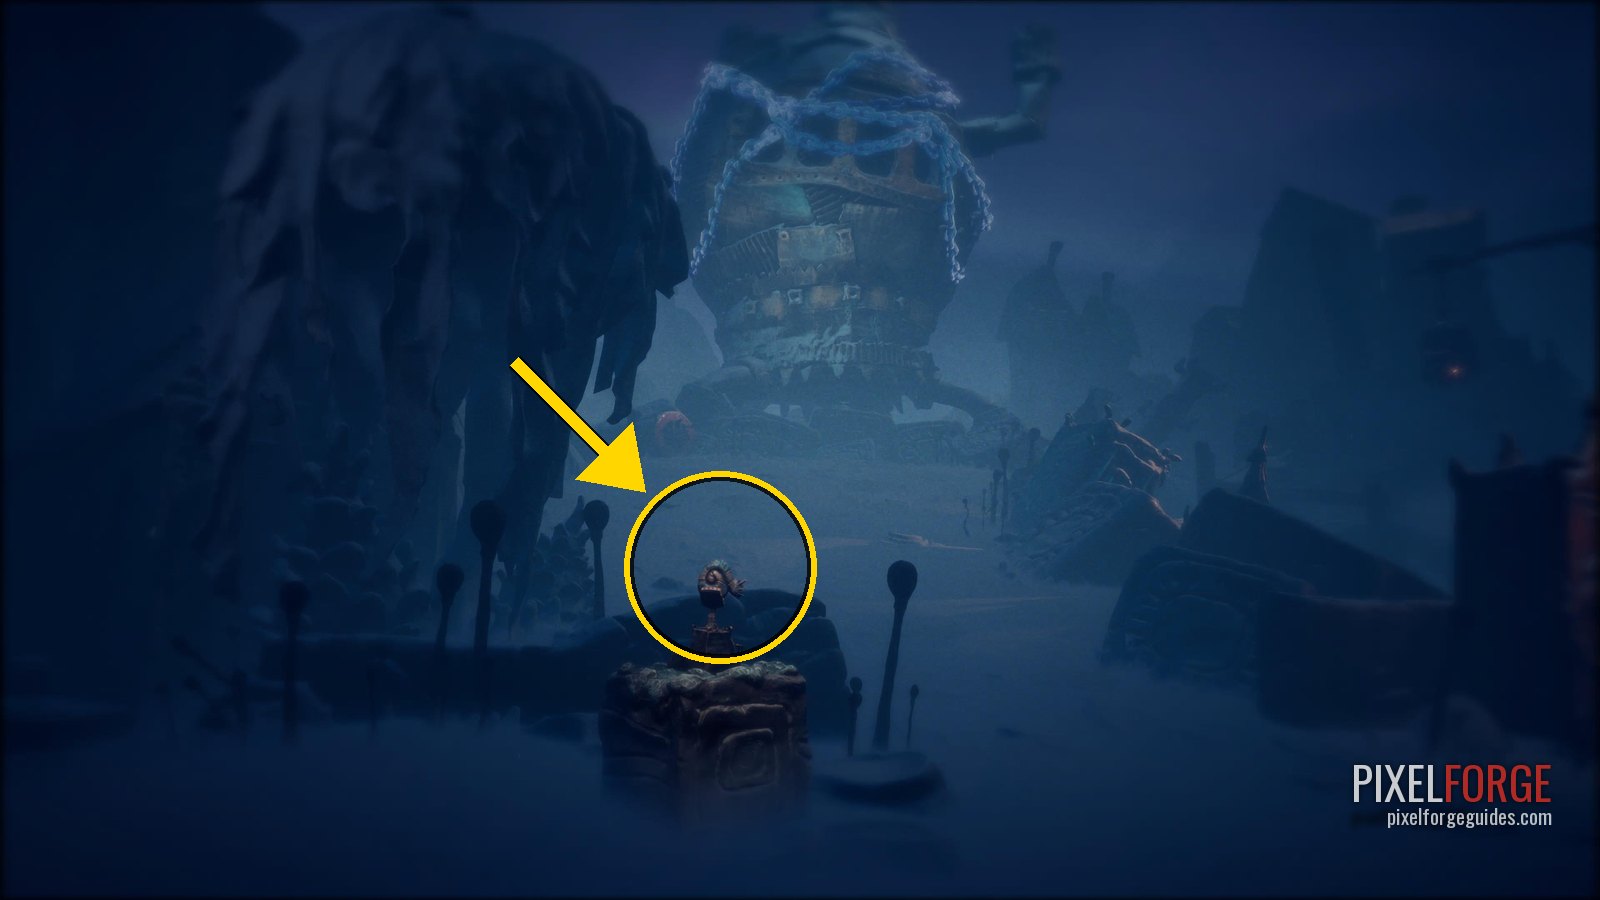
Shellphone 16/25 · Chapter 3 - 🗿 Clay Figurine 9/19 · The SoulfisherTake the path left of Shellphone 16, go under the small bridge, and climb the stairs on your right just past it.
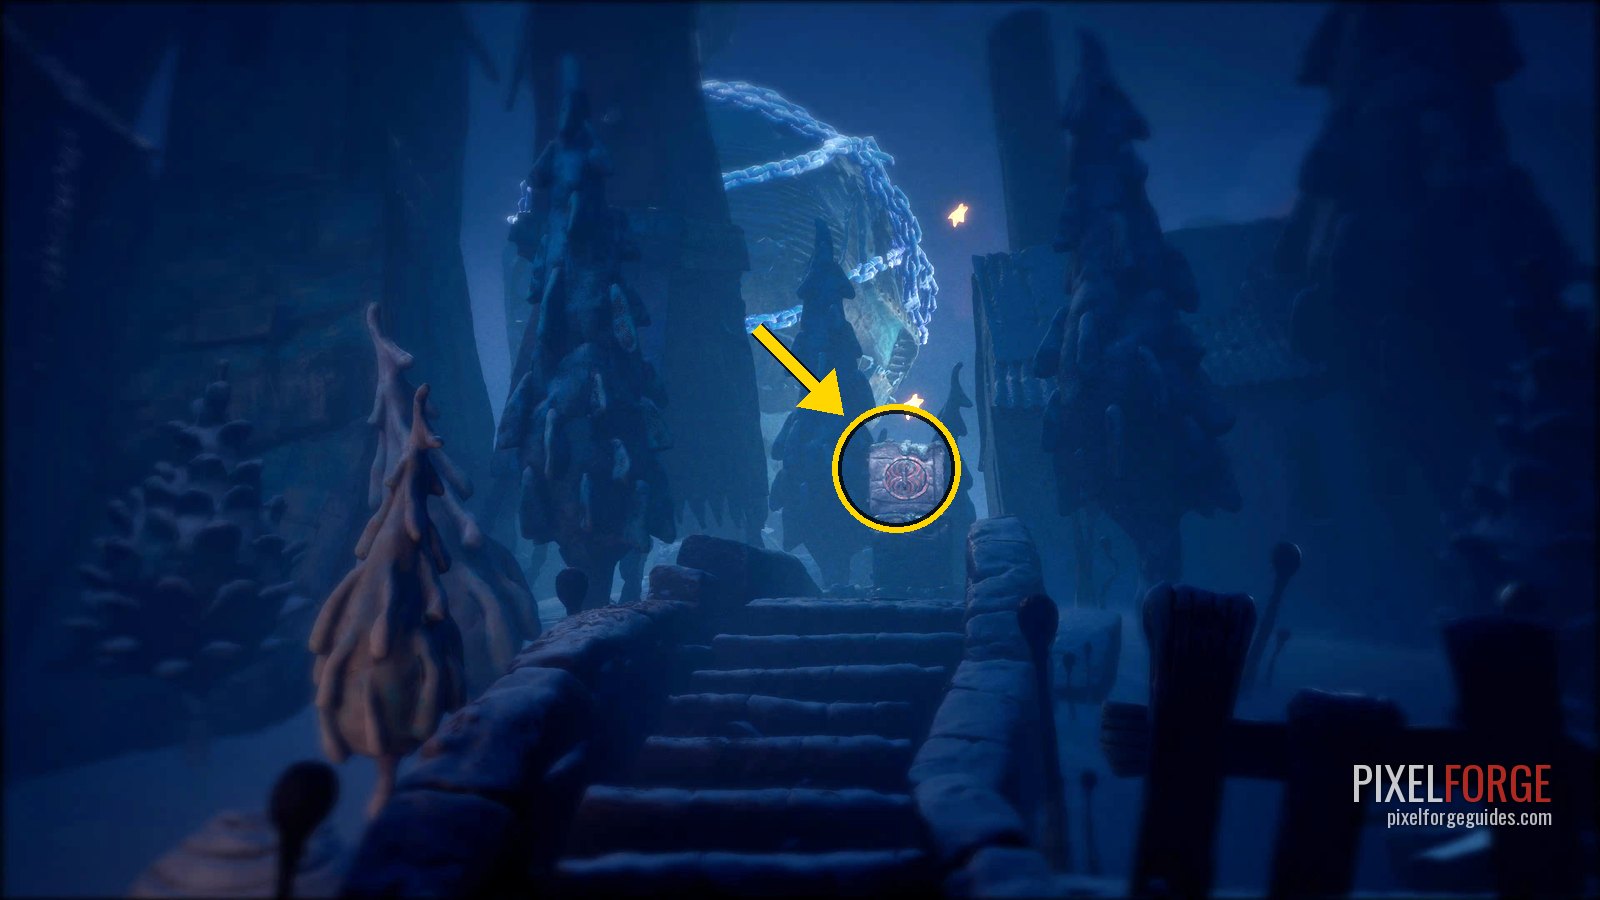
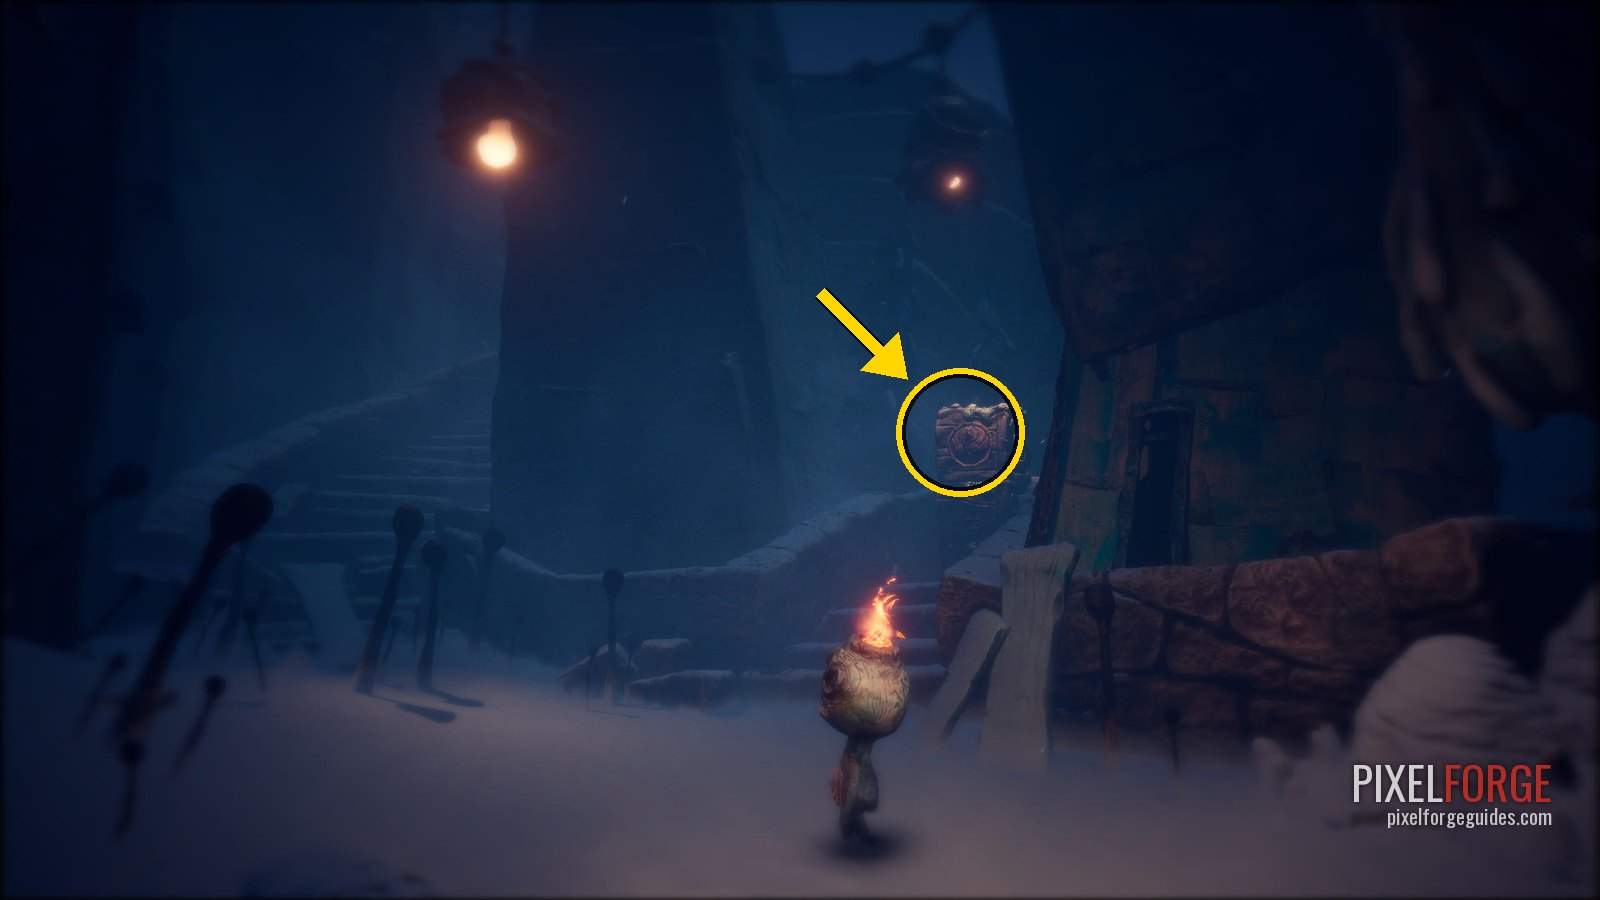
Clay Figurine 9/19 · The Soulfisher · Chapter 3 - 🗿 Clay Figurine 10/19 · A Nameless CreatureBack in the open area, cross the middle bridge over the frozen lake, go left to two flights of stairs and climb the right-hand one.
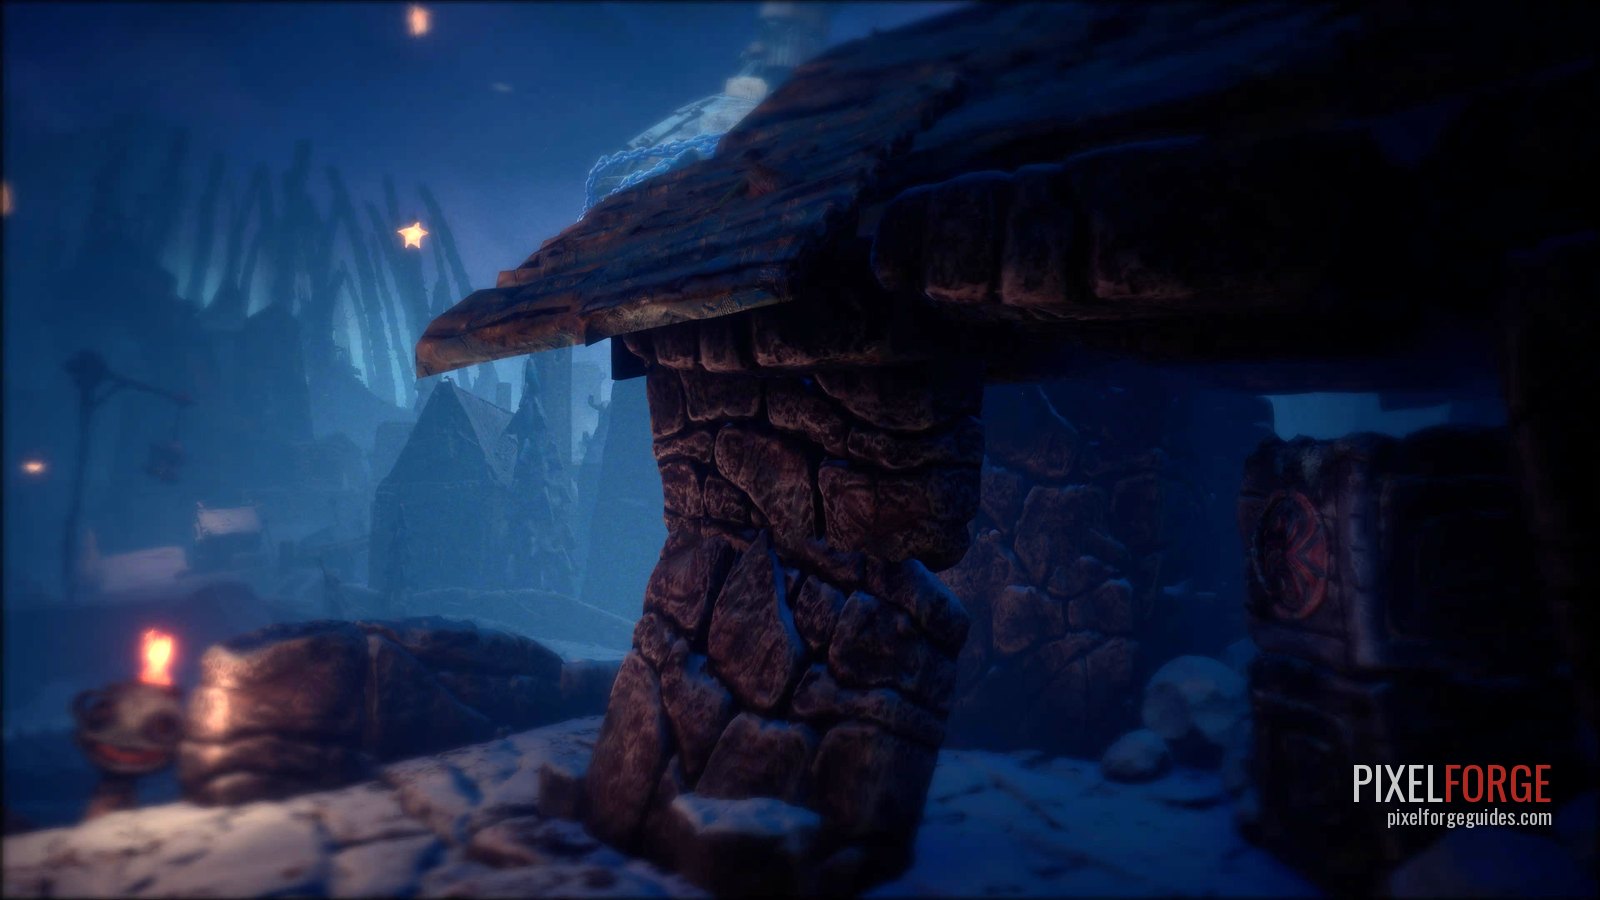
Clay Figurine 10/19 · A Nameless Creature · Chapter 3 - 💿 Gramophone Disc 11/17 · The LullabyOn the same side of that bridge there's a sealed well. Climb the stairs to the left of it.
Gramophone Disc 11/17 · The Lullaby · Chapter 3
The thief's bones
- Follow the wisp to a burnt man in a coffin and an open grave with a skeleton missing its bones. Each bone you return breaks one chain on the great furnace in the town centre.
- Right arm: it's sticking out of the ground right by the grave (wait for him to finish talking).
- Right leg: in a hidden cave on the left of the well you passed coming in. Open the coffin with the skeleton: a red eye appears; close your eyes at it. A red-eyed creature then comes for you: close your eyes at its eye before it reaches you.
- Take a blue match from the box and keep it lit the whole time: if it goes out or you drop it, you die. Close your eyes, listen for the bone, and open the coffin the sound comes from; repeat through the next areas until you find the real leg. Don't equip it straight away: that puts the match out, and the creature comes back. Run out the way you came in.
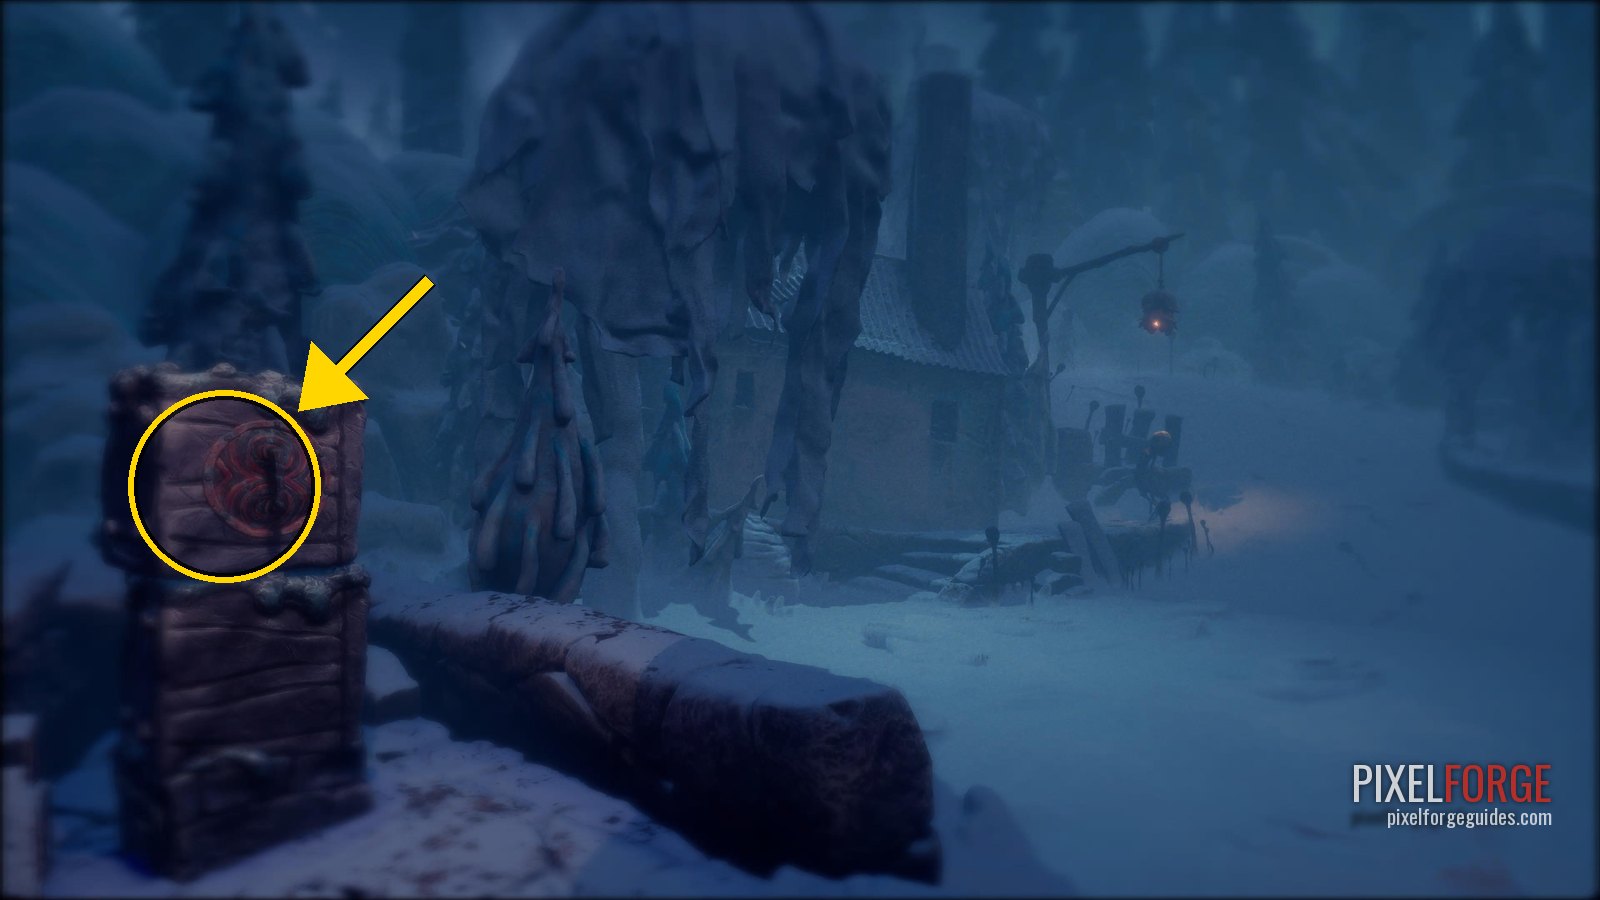
- 📜 Story Page 8/15Getting the thief's leg opens a second path to a small town. The hatch is to the left of the first character you meet.
Story Page 8/15 · Chapter 3 - Left arm: walk up to the house on the hill with the red door, then take the right and go down the stairs to a locked door with a burnt figure beside it. Put Potboy on the marked spot so he lights three candles while you shoot the other two with the Matchlock at the same time. Take the mask from inside and put it on the figure's face.
- In the open area with a Crawler, shoot the candle right of the matchbox to lure it away from the door. Have Potboy light the furnace, stand on the block to ride up, press the switch to start the gas and shoot the gas with the Matchlock: the door opens.
- Sneak past the sleeping Crawlers and crouch to take the key from a burnt one's hand. They wake up the moment you take it: sprint down the path and keep running.
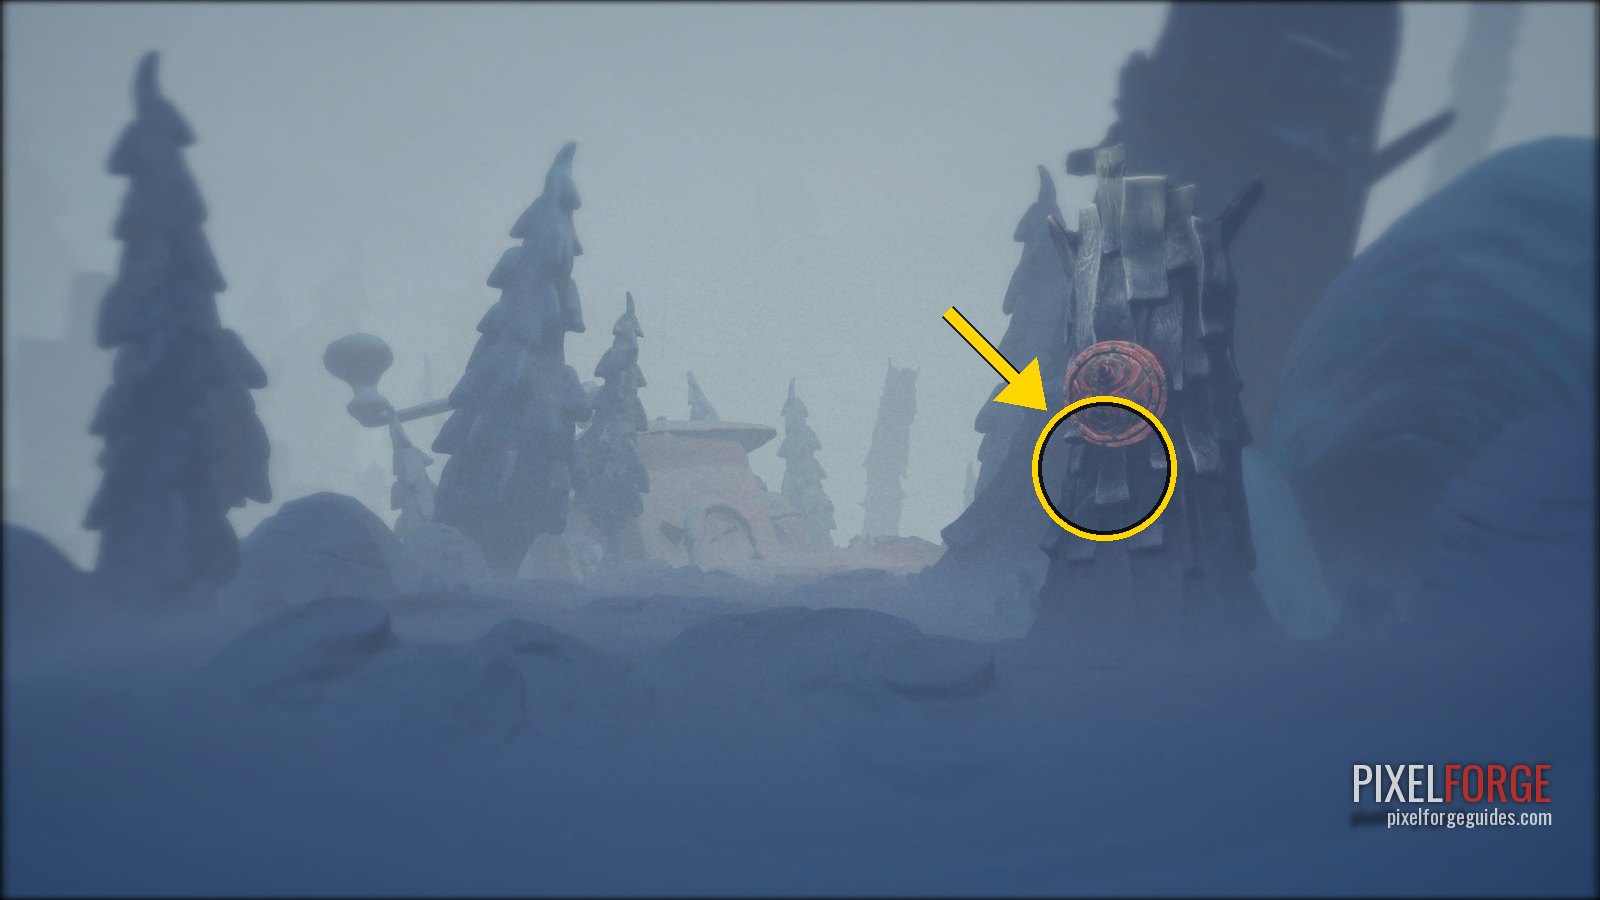
- 🗿 Clay Figurine 11/19 · The CrawlerIn the village with the house on the hill, sneak past the crawlers and take the house key. Follow the main path: a hatch in plain view.
Clay Figurine 11/19 · The Crawler · Chapter 3 - Use the key on the house on the hill: the left arm is on the lap of the skeleton in the chair.
- 🐚 Shellphone 17/25Inside the house on the hill, where you find the Left Arm.
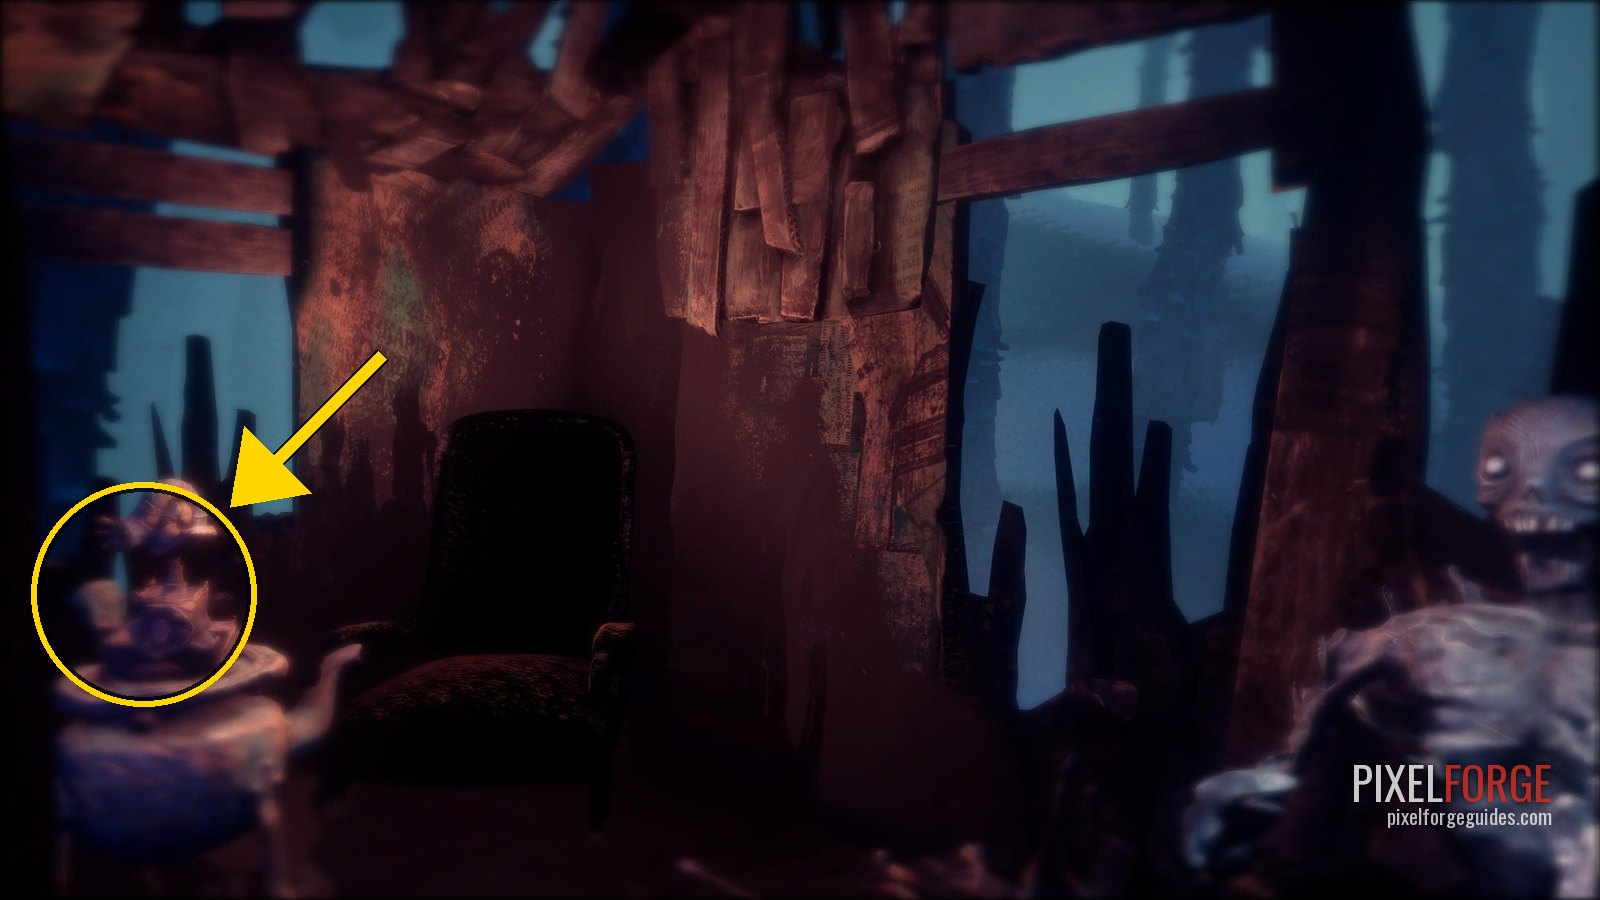
Shellphone 17/25 · Chapter 3 - Return the arm. Follow the wisp through the new path.
- 🗿 Clay Figurine 12/19 · Auntie MurklePut the left arm in the grave to open the last path. Go through the door and look right: a hatch.
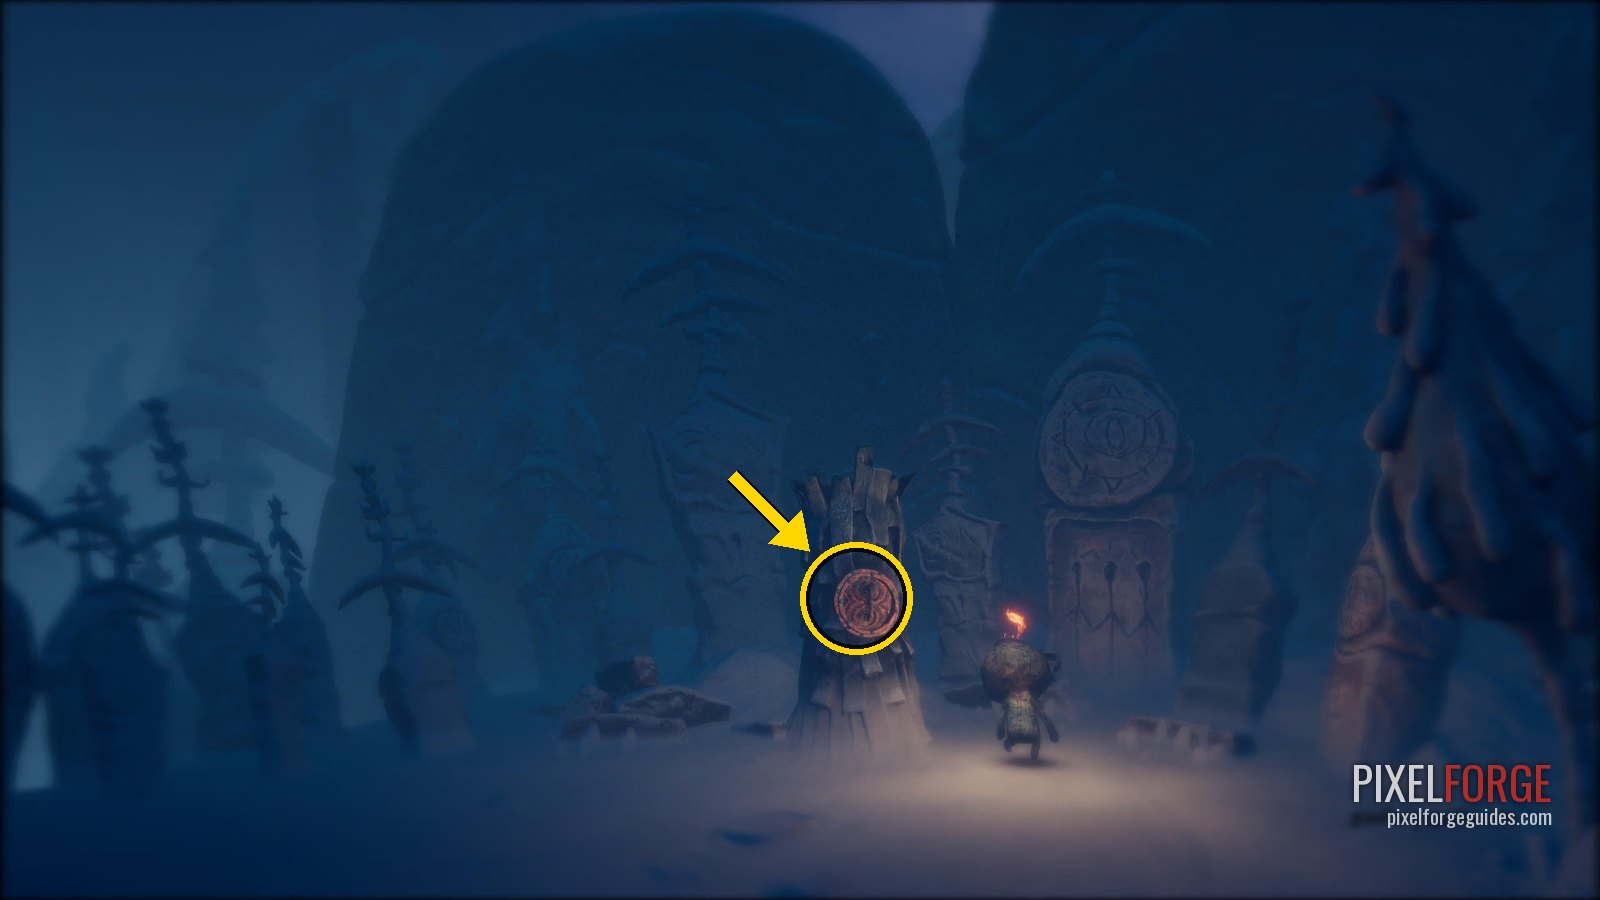
Clay Figurine 12/19 · Auntie Murkle · Chapter 3 - 🐚 Shellphone 18/25Just after Auntie Murkle there's a group of characters. Go left and up the hill.
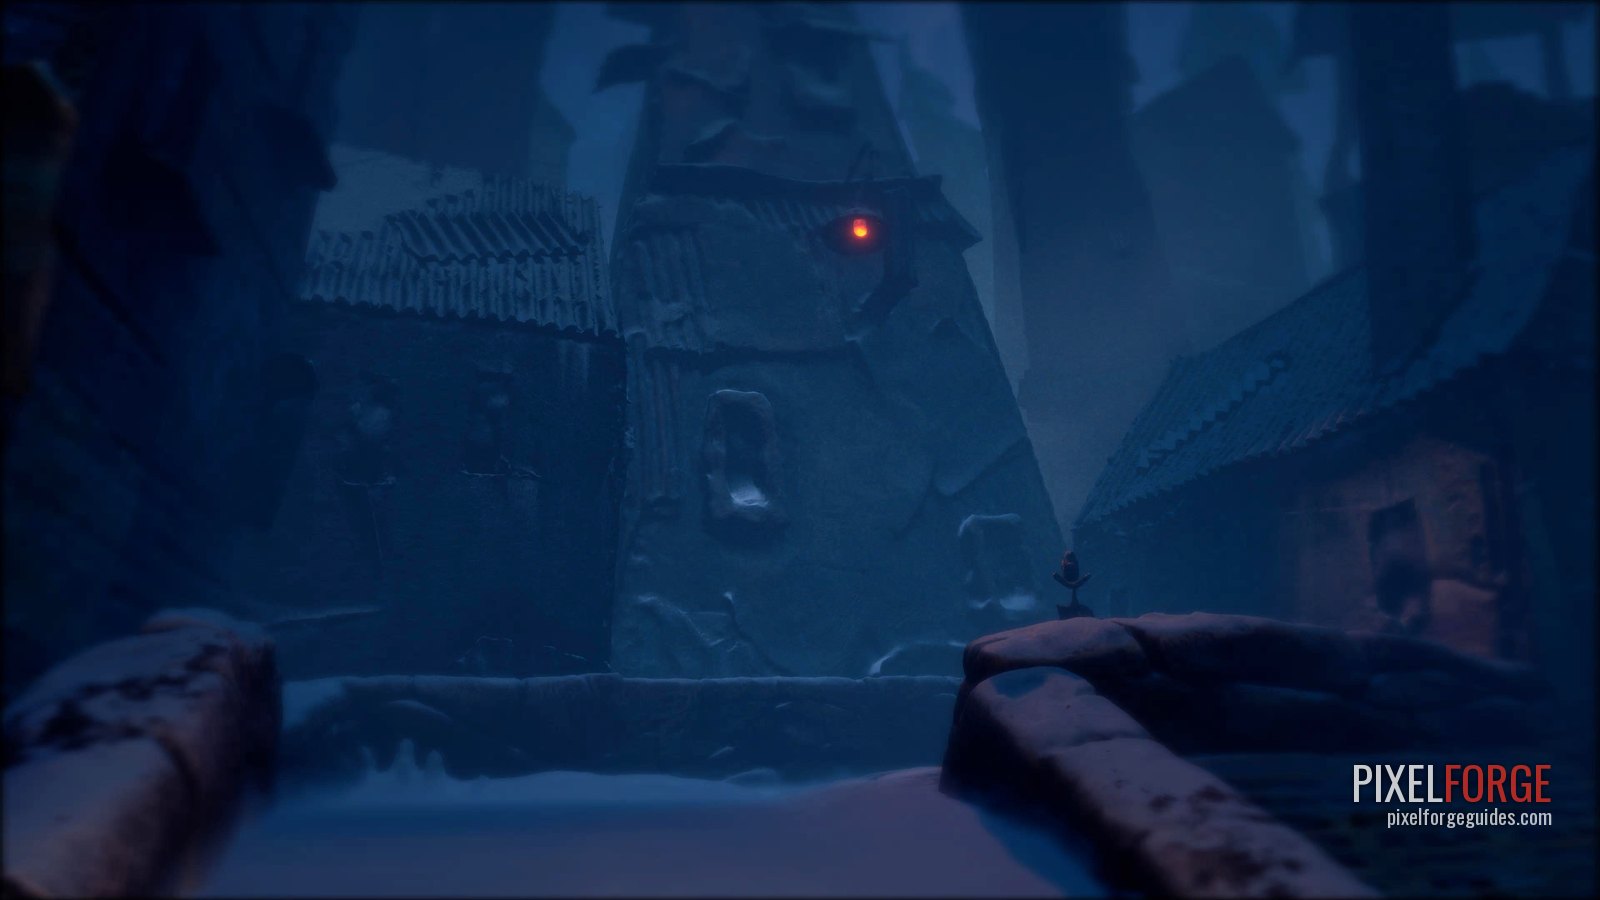
Shellphone 18/25 · Chapter 3 - Skull: go down the stairs to the old woman holding a skull. She wants her song back.
- 📜 Story Page 9/15A hatch to the right of the character holding the skull.
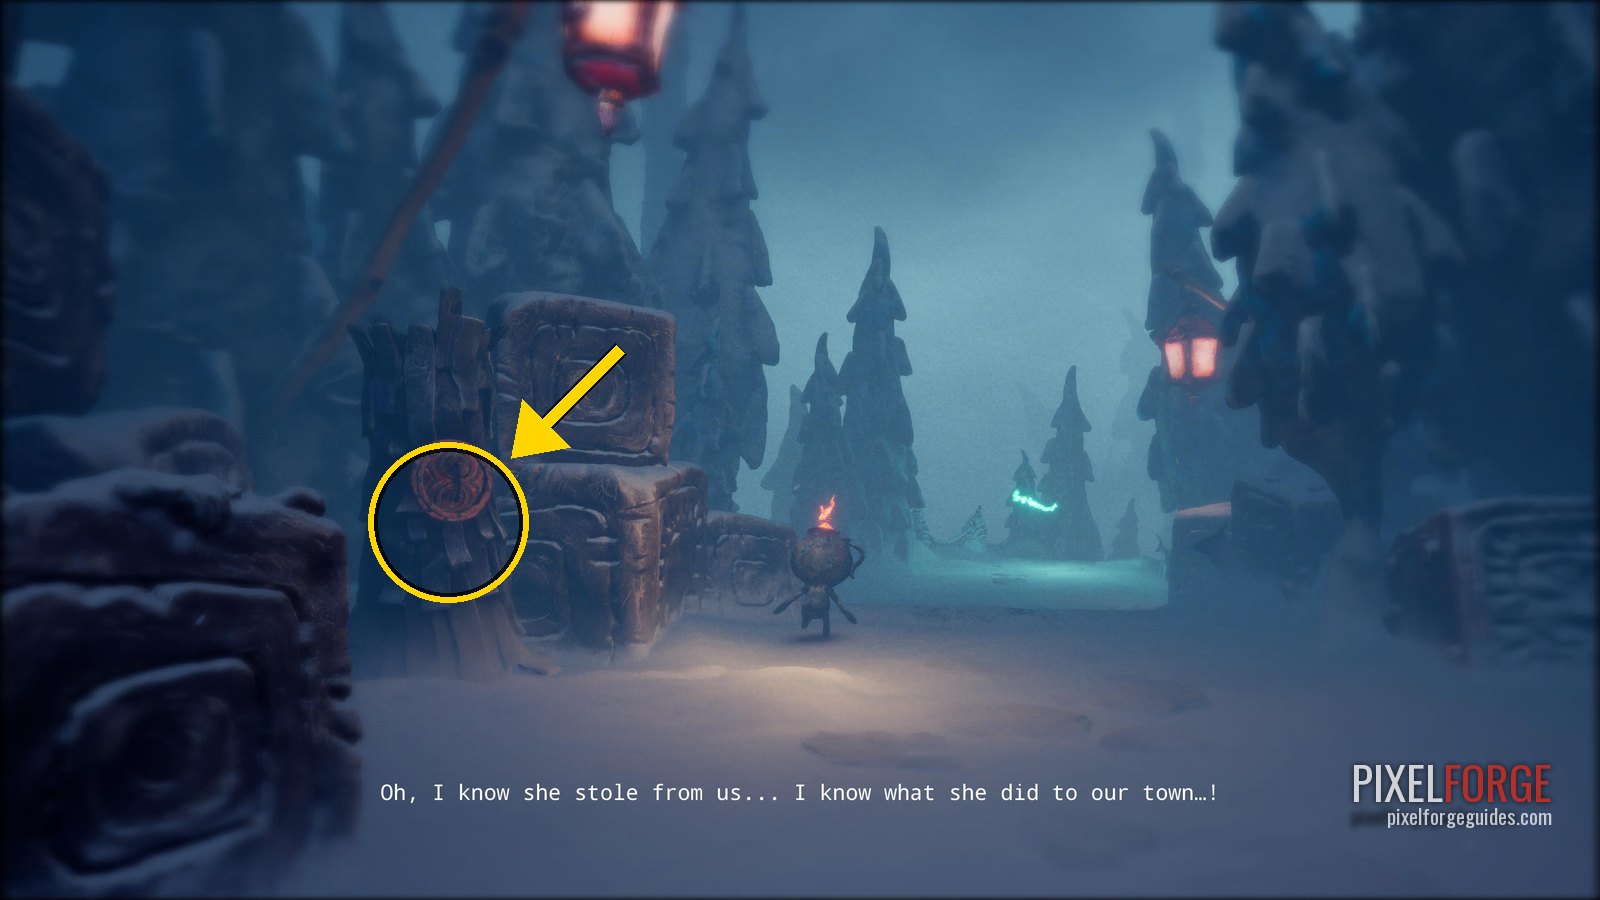
Story Page 9/15 · Chapter 3 - Light a match at the box (a red eye early on opens the way through the woods), then follow the jingling key creature: close your eyes, listen, open the tree hatch it hides in, and follow it again when it runs. Close your eyes at the red eyes of anything that comes for you.
- At the end it turns into a key for the door over the bridge. In the cave, have Potboy light the Songcatcher on the floor, then pop the blue eye on the wardrobe for a shortcut back to the old woman. Trade the song for the skull and put it in the grave.
The great furnace
- With every chain gone, send Potboy into the pipe left of the great furnace and press Square three times to light it.
- Back at the grave, take the blanket from the ghost and light the match in her hand: she fades away. Go through the wardrobe in front of the big cat. 🏆 The Tale Of Coalhaven
- 📜 Story Page 10/15After the bones quest, go through the wardrobe in front of the giant cat back to Housy. Head down the path: a hatch on the left just before the bridge a creature is crossing.
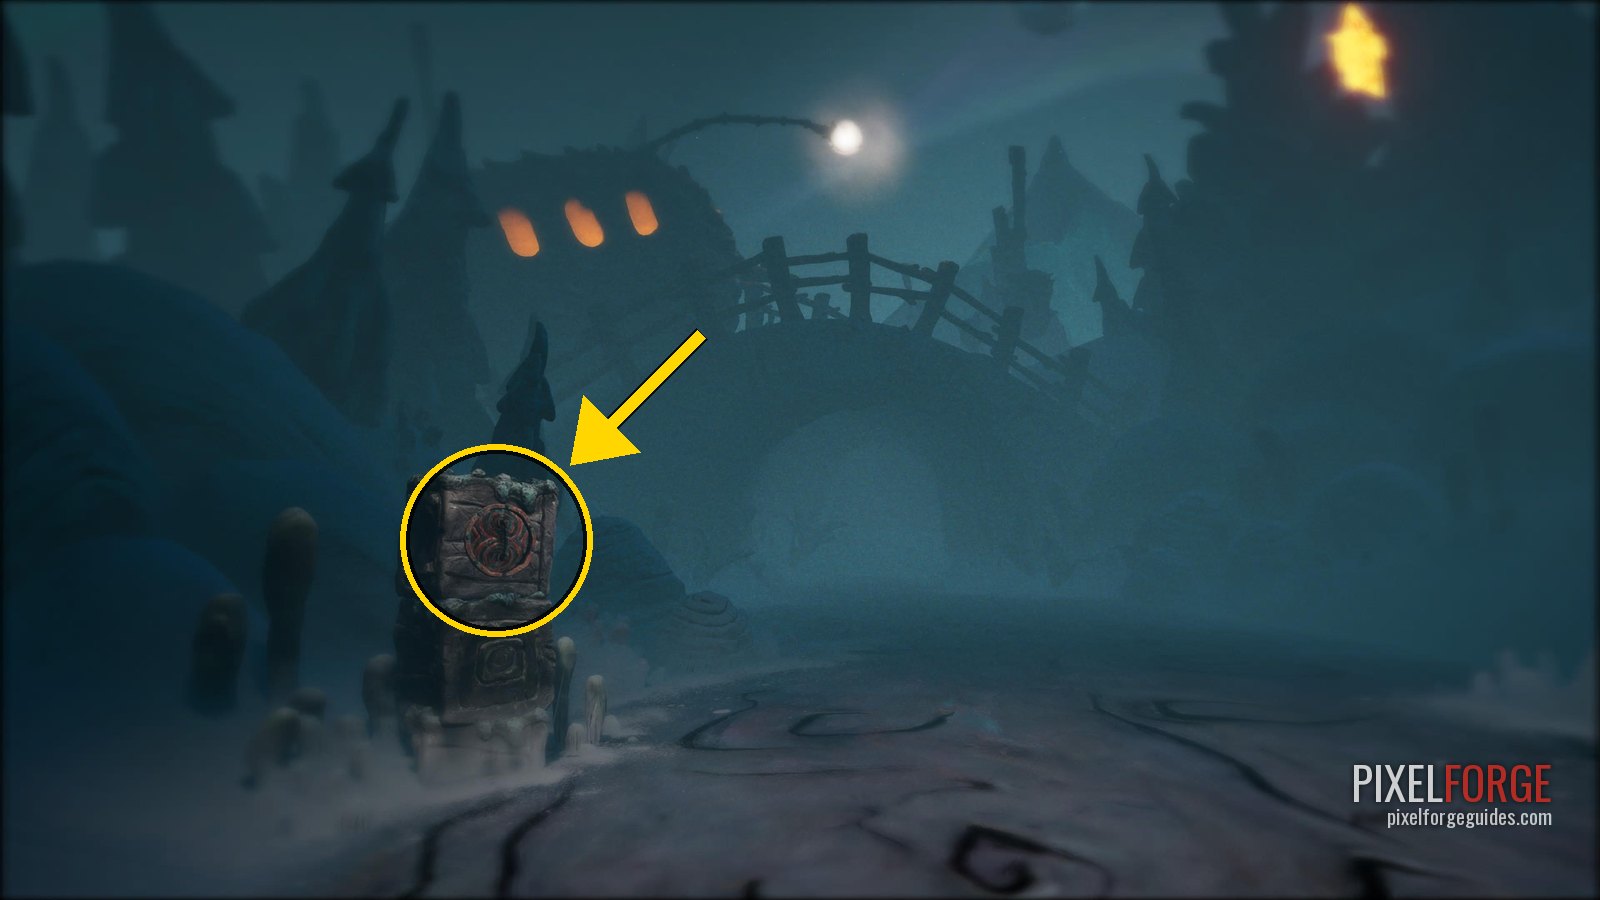
Story Page 10/15 · Chapter 3
Chapter 4: The Tale of the Craftsman's Heart 10 collectibles · 2 figurines · 2 discs · 3 shellphones · 3 story pages
The town square with the Moonbird, the furnaces and the hunter, the theatre, the sewers full of Grinners and the projectors.
The Soulfisher and the dream
- 📜 Story Page 11/15Right at the start of the chapter, a hatch on the left of the main path.
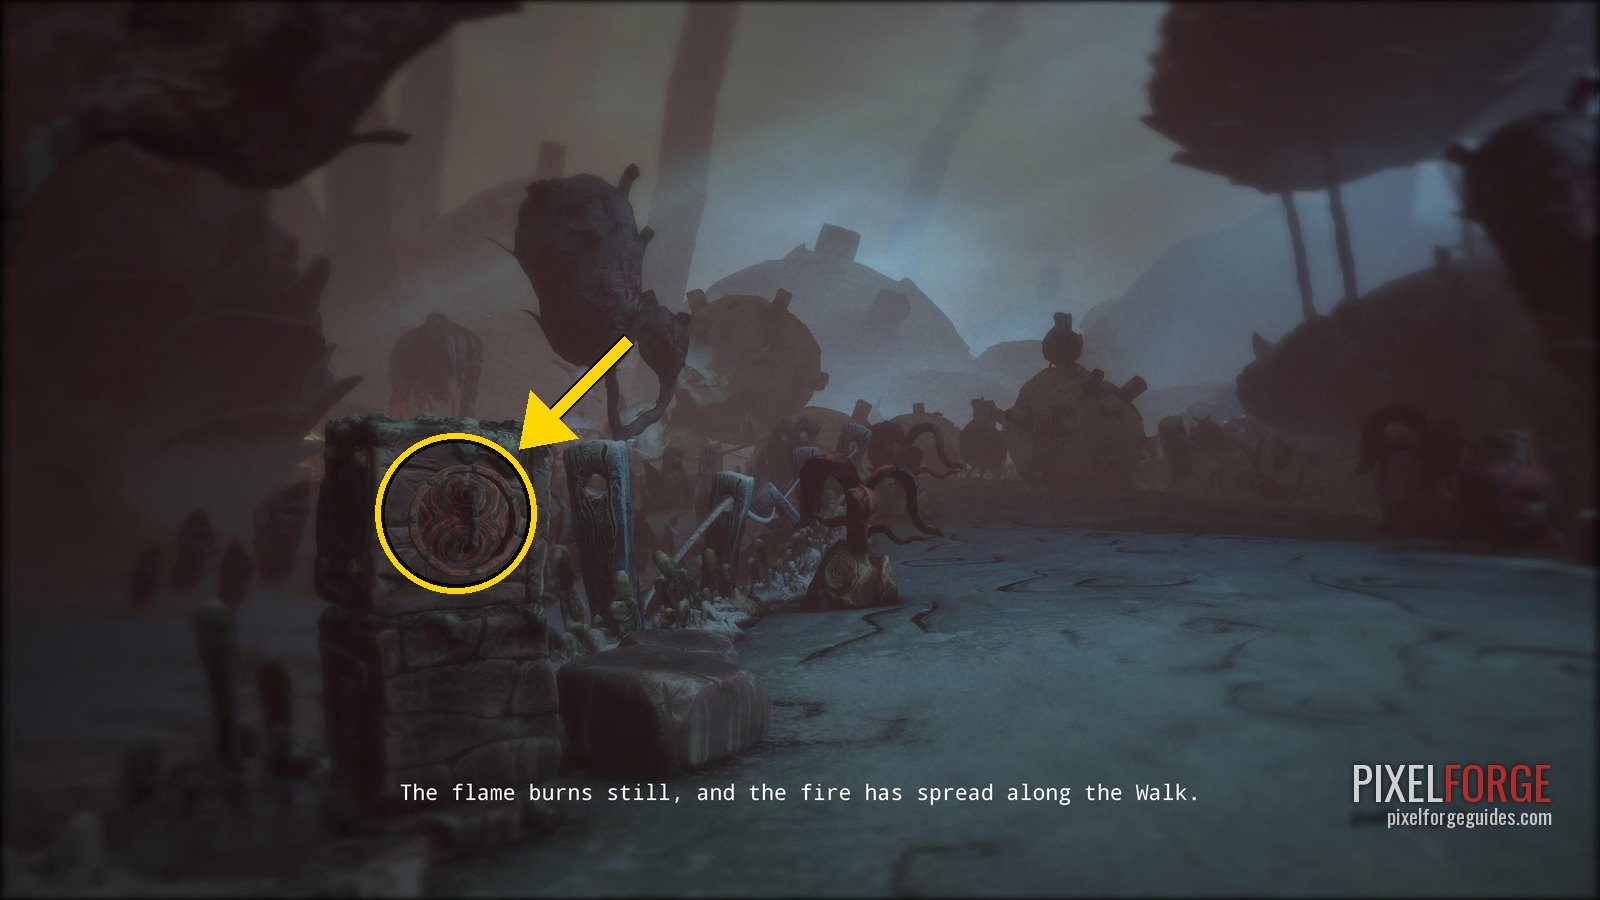
Story Page 11/15 · Chapter 4 - 🐚 Shellphone 19/25A few steps further, on the right of the main path.
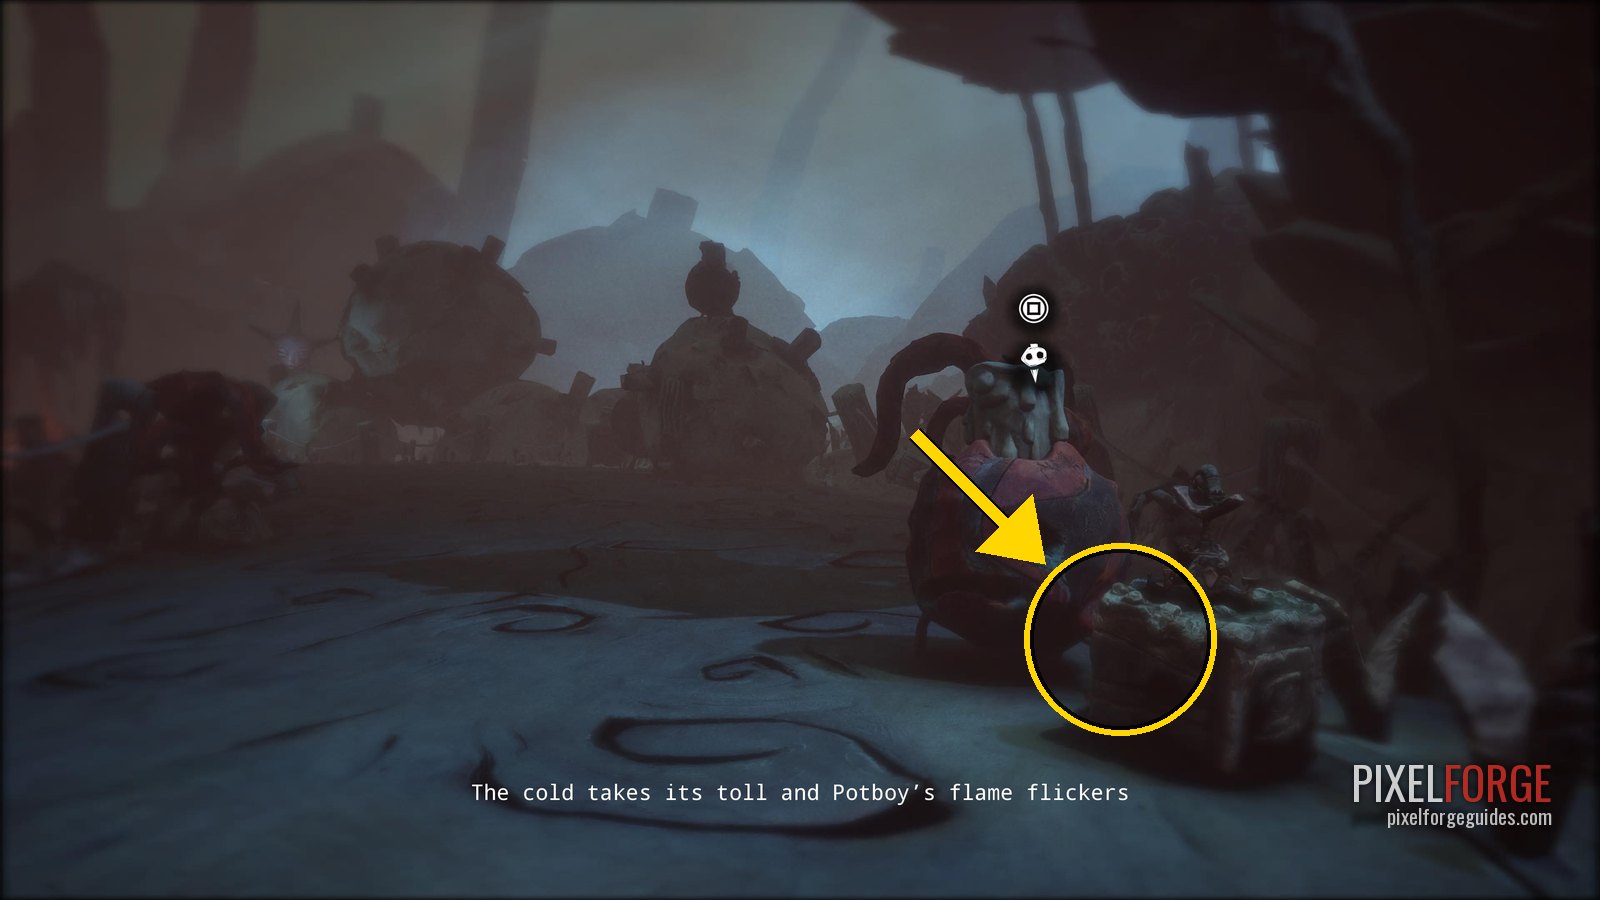
Shellphone 19/25 · Chapter 4 - Light the candles on the way to the Soulfisher, light his bonfire and listen, then rest in Housy.
- Pop the blue eye by the door and, in the dream, trace each of the white eyes floating in the air. The fire part can't be escaped: wait it out. Housy is carried off.
The Crawler pads
- Pop the eye above the bridge and go under it into a puzzle with pressure pads. Closing your eyes on a Crawler's orange eye wakes it or freezes it: wake one, lead it onto a pad, freeze it there.
- First room: wake the Crawler on the left, stand behind the candle and light it; the Crawler comes to eat the flame. Freeze it on the pad. Then move the Crawler blocking your way far enough into the big room to slip past.
- Second room: light the candle above the pad first, then wake the Crawler across the room and stay crouched out of sight until it's on the pad. Freeze it: another door opens with a second Crawler. Move them one at a time to the two candles either side of the door on the right, crouched, lighting one candle at a time.
- Ride the flying machine with Potboy (Square).
- 🐚 Shellphone 20/25After the flying contraption, on the right of the path where you land.
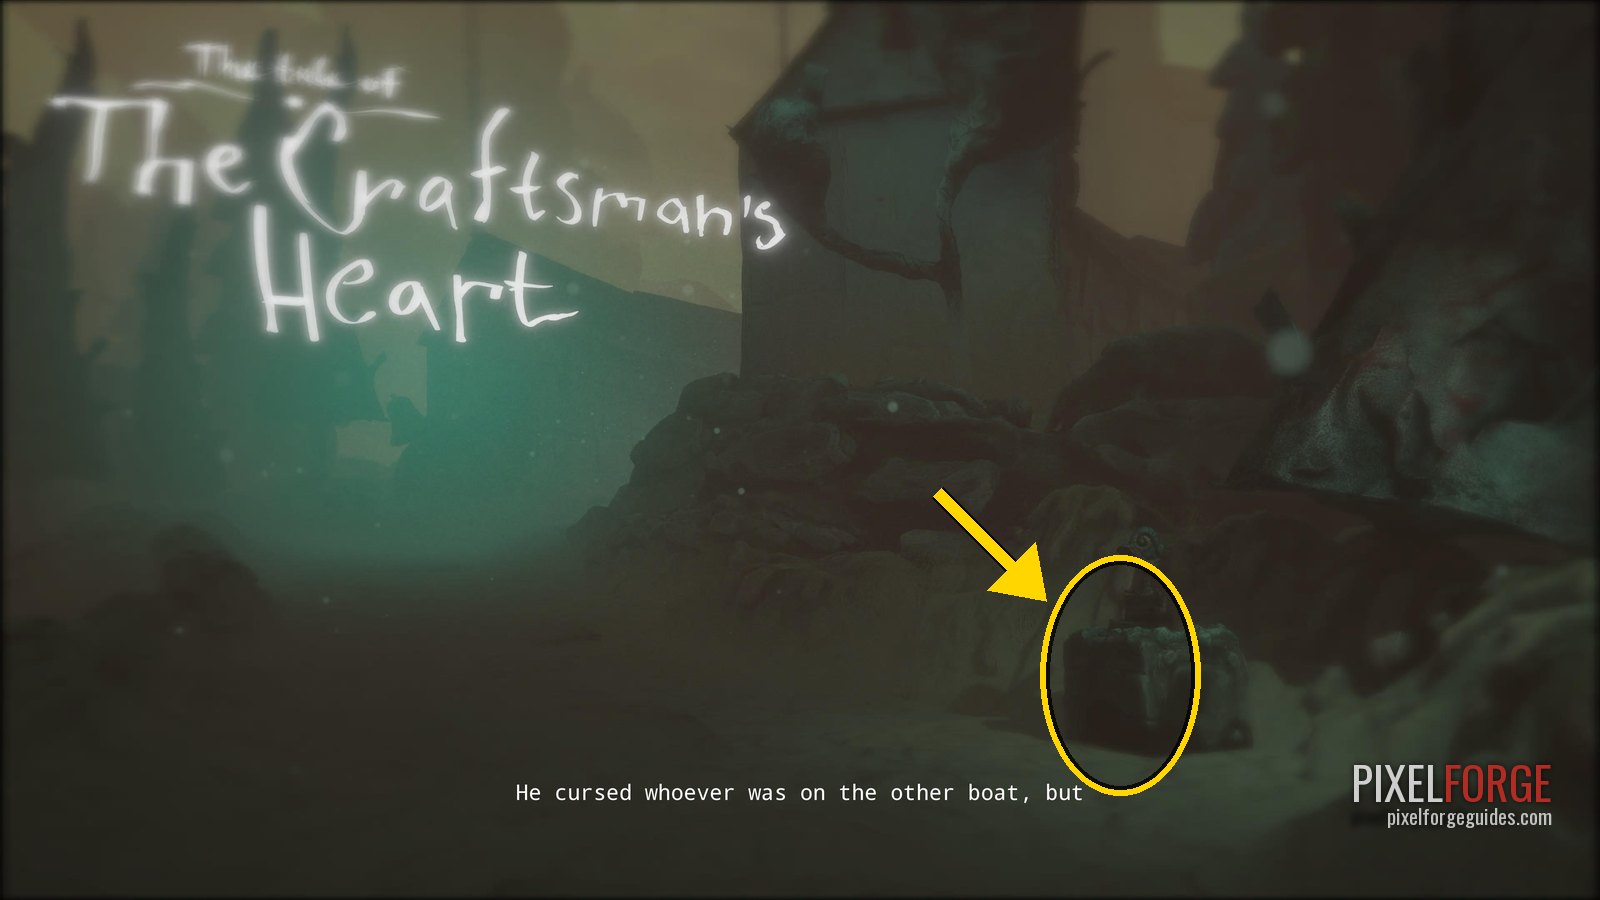
Shellphone 20/25 · Chapter 4
Grinners and the clock
- Grinners are new and deadly: they charge and kill in one hit, starting slow and speeding up the longer they see you. Only wardrobes and interiors save you.
- Face Your Fears: load the Matchlock and fire a match into a Grinner's face as it shows it. You may die doing it, but the trophy sticks. The sewers later (by the matchbox after the first projector) are another easy spot. 🏆 Face Your Fears
- Run past the Grinner and duck under the bridge to the clock puzzle. Copy the small clock onto the big one: the minute hand on 11, the hour hand on 3. Lever 1 turns the minute hand back, lever 2 forward, lever 3 turns the hour hand back, lever 4 forward. The fuse lights and the gate behind you opens.
- More Grinners down the hill: hide in the wardrobe. If one sits in front of a closed door, wake it, run back the way you came, pop the blue eye, hide in the wardrobe, and follow it slowly when it walks back down; go through the door it was blocking.
- 📜 Story Page 12/15The town square with the Moonbird, a few villagers and the giant in the background: a hatch on the left side.
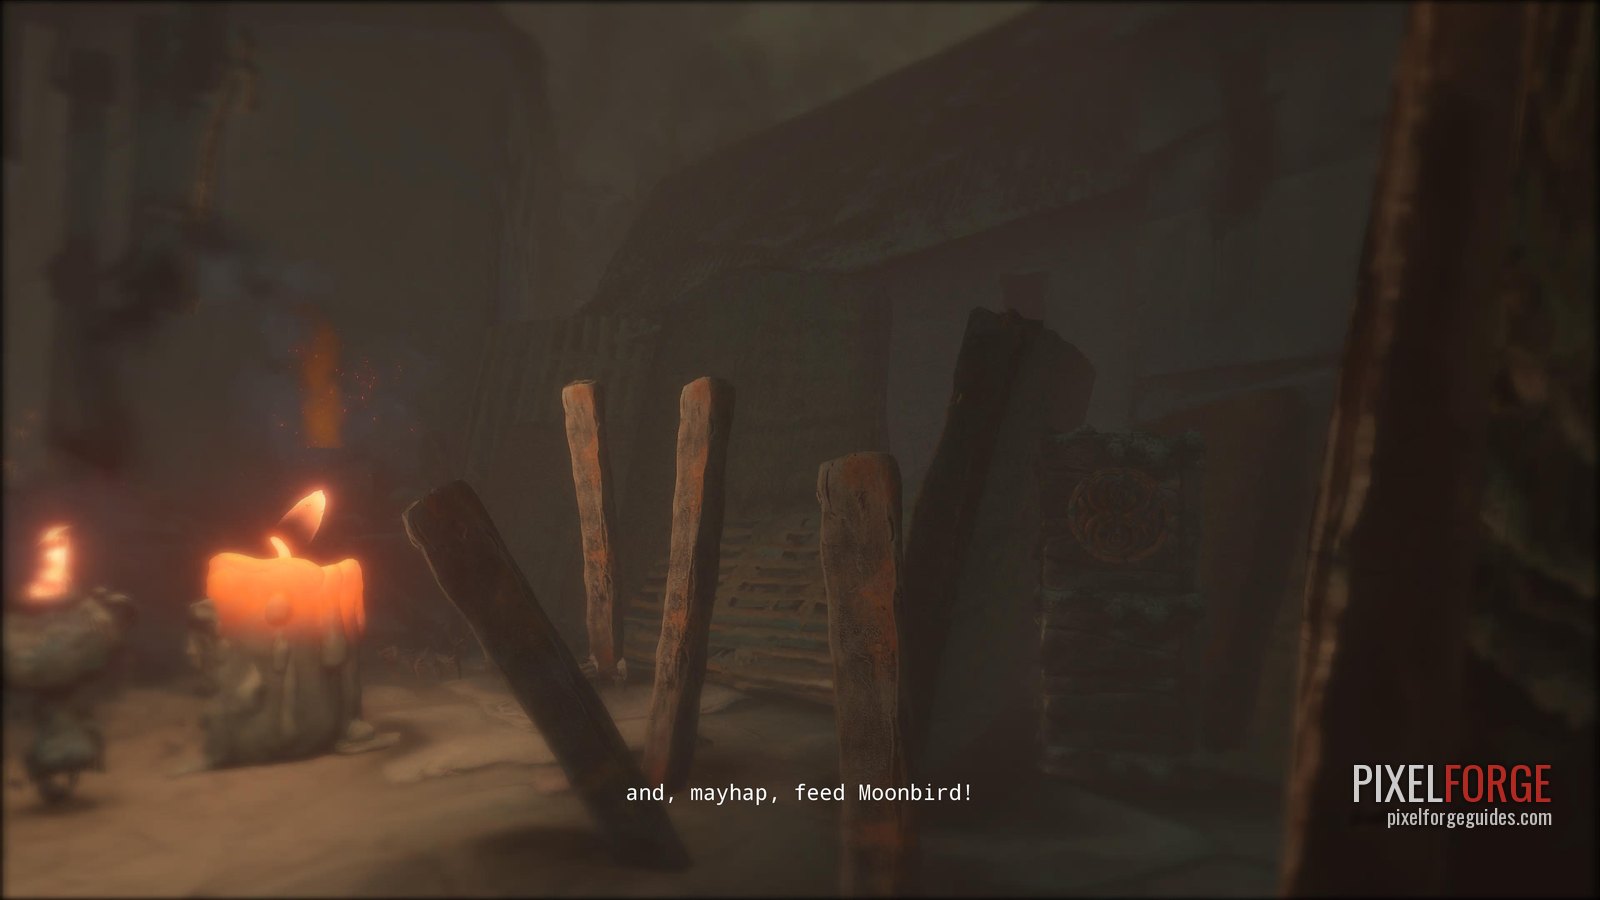
Story Page 12/15 · Chapter 4
The heart and the theatre
- After the Moonbird scene, pop the eye on the wardrobe into the chamber with a giant beating heart. Have Potboy light the first fuse (you can feed him coal here), then take the wardrobe that unlocks on the right of the heart.
- Send Potboy to burn the fuse to the gate and go through. A hunter on a platform wants the Moonbird dead and shoots anything in the open.
- Stay crouched and move when his spotlight is pointing away, to the furnace on the back wall. Stand right at the edge, have Potboy light the furnace: a stage prop slides across, so walk alongside it to the other side. The second time, walk upright.
- Light the next furnace: houses pop up one after another; cross as one goes down and the next comes up. Light the furnace again to make him fire, and sprint across while he reloads (he's quick). The next furnace makes him shoot once more: drop down to the matchbox and refill.
- Shoot the three candles behind the dancer: a door opens under his platform. Crouch up to him and send Potboy into the camera beside him; he comes down. Light the candle in front of the teacup and leave through the door right of the screen.
- 💿 Gramophone Disc 12/17 · Och På Så Vis Skrider Dagarna VidareIn the section where you light furnaces to dodge the hunter after the Moonbird, shoot the three candles at the end to open the underground tunnel. The hatch is inside the tunnel.
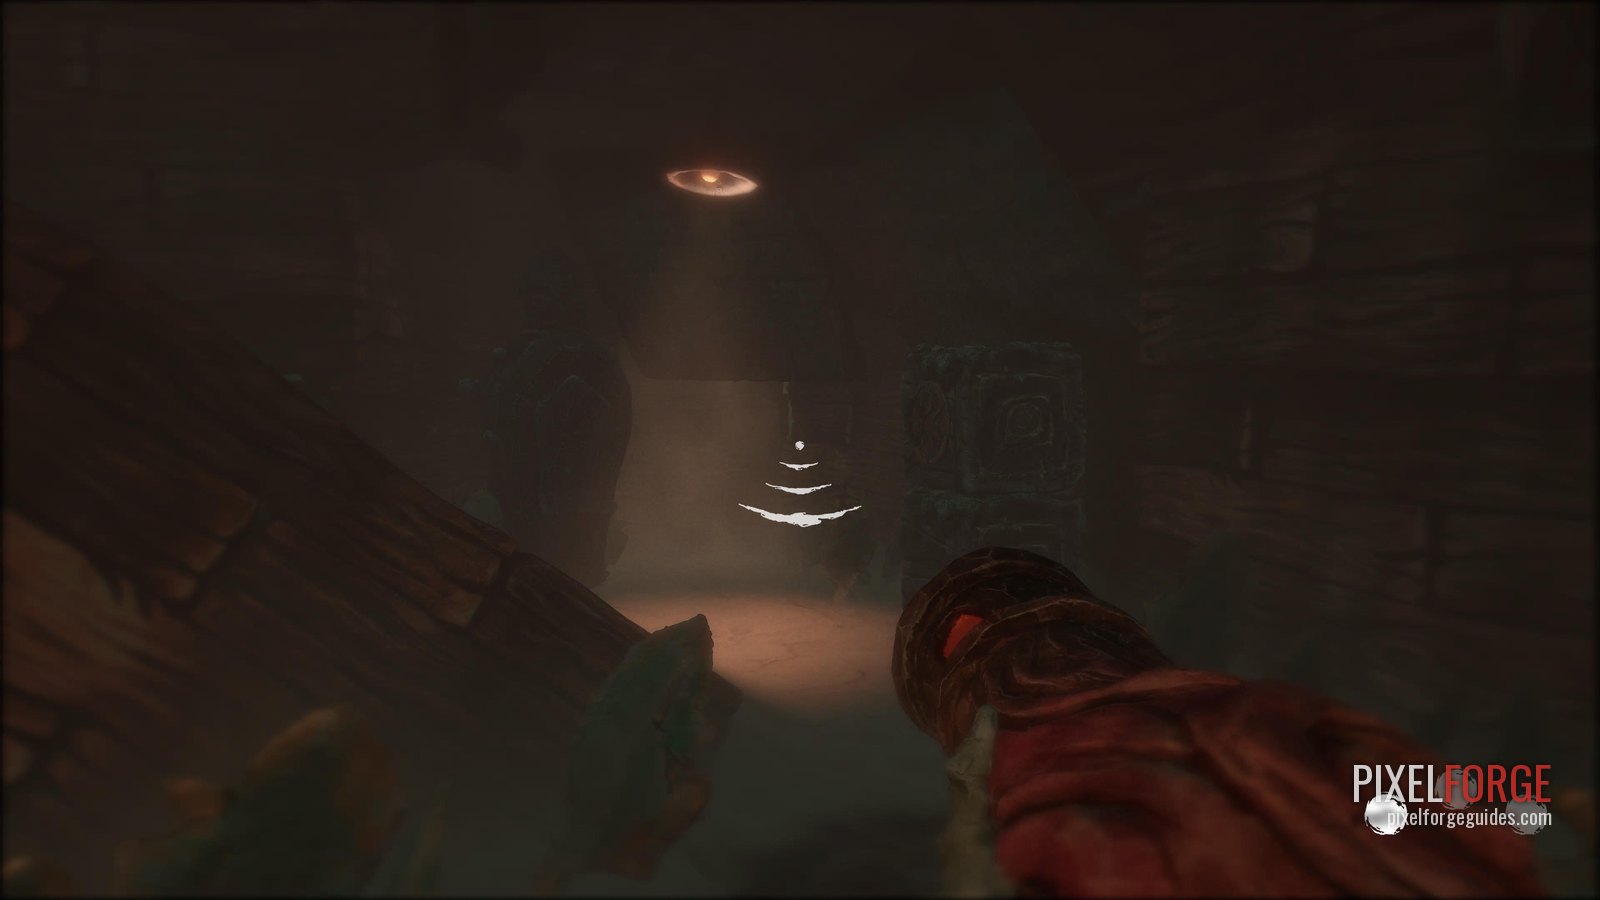
Gramophone Disc 12/17 · Och På Så Vis Skrider Dagarna Vidare · Chapter 4
Projectors and the sewers
- Send Potboy into the first projector and watch the film, then go through the door it opens and drop into the sewers through the open manhole.
- Light a blue match and light the symbol candles to see. Most Grinners down here are dormant: the green rings on the floor in front of them wake them, so walk round. Wardrobes along the way are your escape.
- 💿 Gramophone Disc 13/17 · The Craftsman's HeartAfter the theatre you drop into the sewers. Walk straight past the second blue candle to the end of the path.
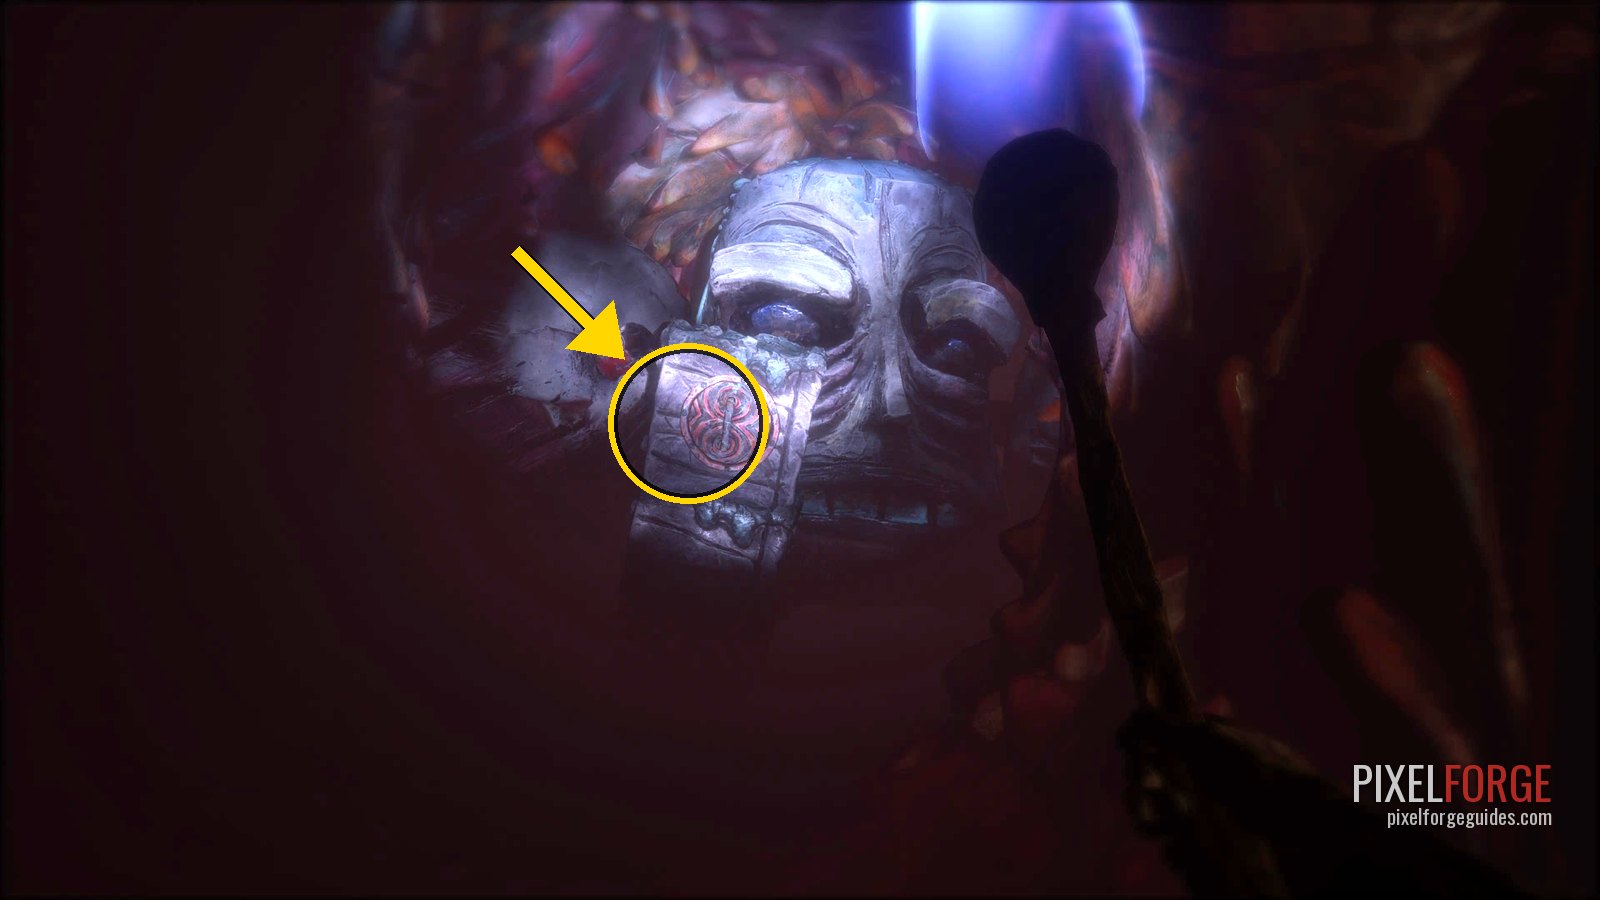
Gramophone Disc 13/17 · The Craftsman's Heart · Chapter 4 - Back outside, have Potboy burn the loose fuse on the right and follow the path round to the second projector.
- 📜 Story Page 13/15In the area with the second projector.
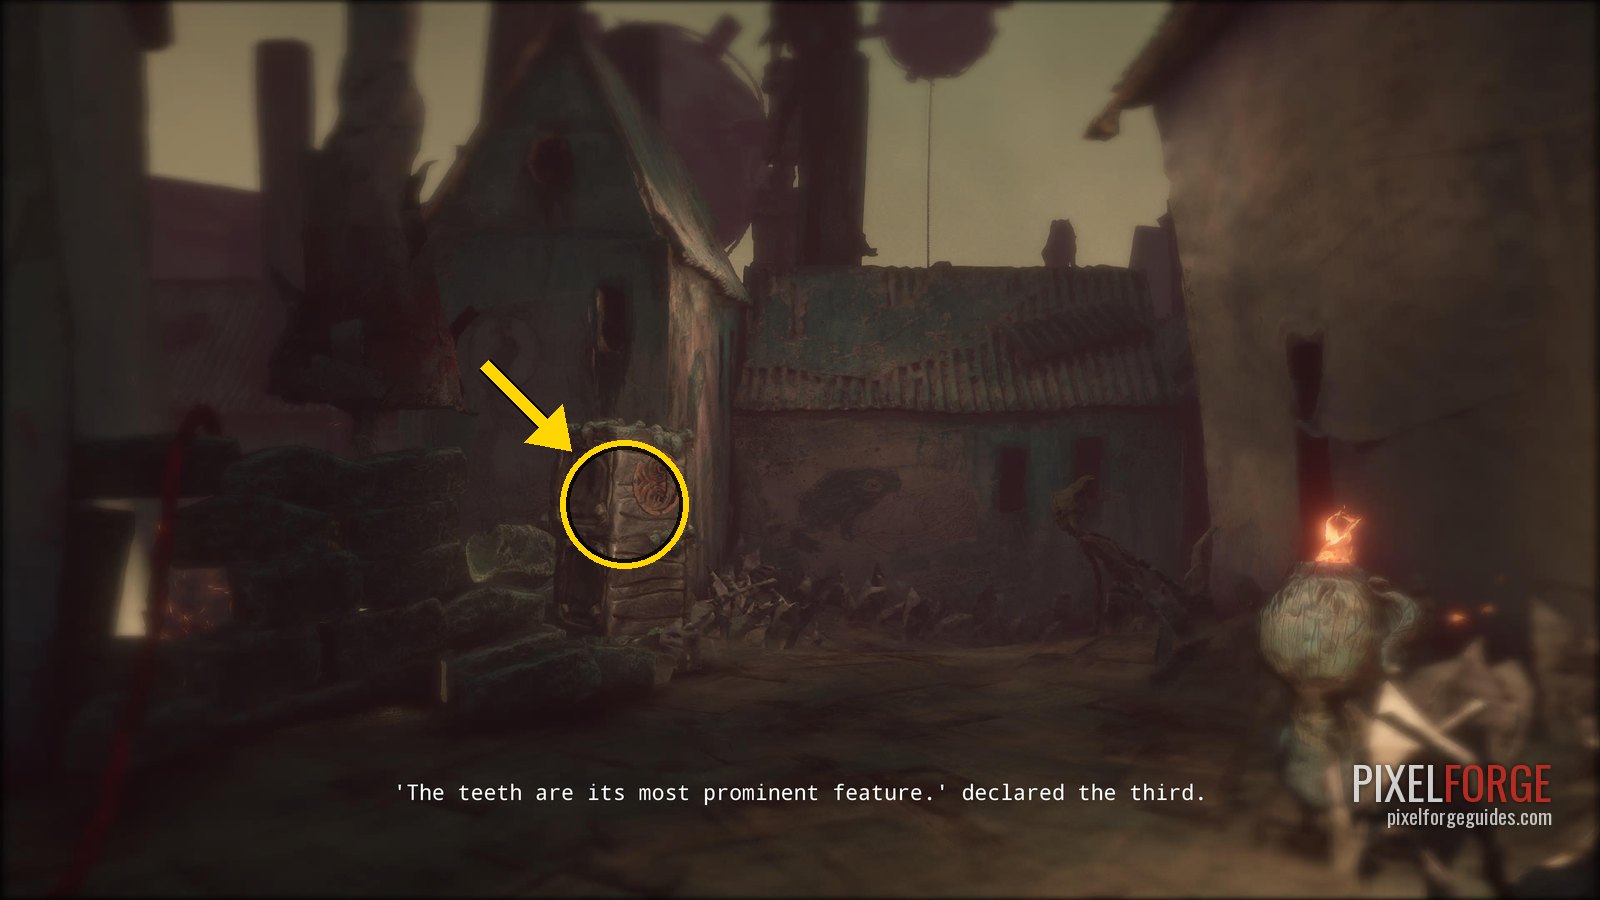
Story Page 13/15 · Chapter 4 - After the film, the next area has Grinners patrolling between four candles. Use the props as cover, keep behind them and crouched. The hollow typewriter in the middle is a safe base with a fuse to light. Light all four candles (they're spread round the edges) to open the door, burn the fuses, and send Potboy into the third projector.
- Follow the tunnel to a wardrobe; the blue candle on the left shows the way. Sprint the next stretch: a Grinner wakes and chases you. Hide in the wardrobe near the end.
- 🗿 Clay Figurine 13/19 · The Ghost of CoalhavenAfter the third projector, in the dark tunnel with the blue candles and the Grinners: at the second wardrobe take the path on your right.
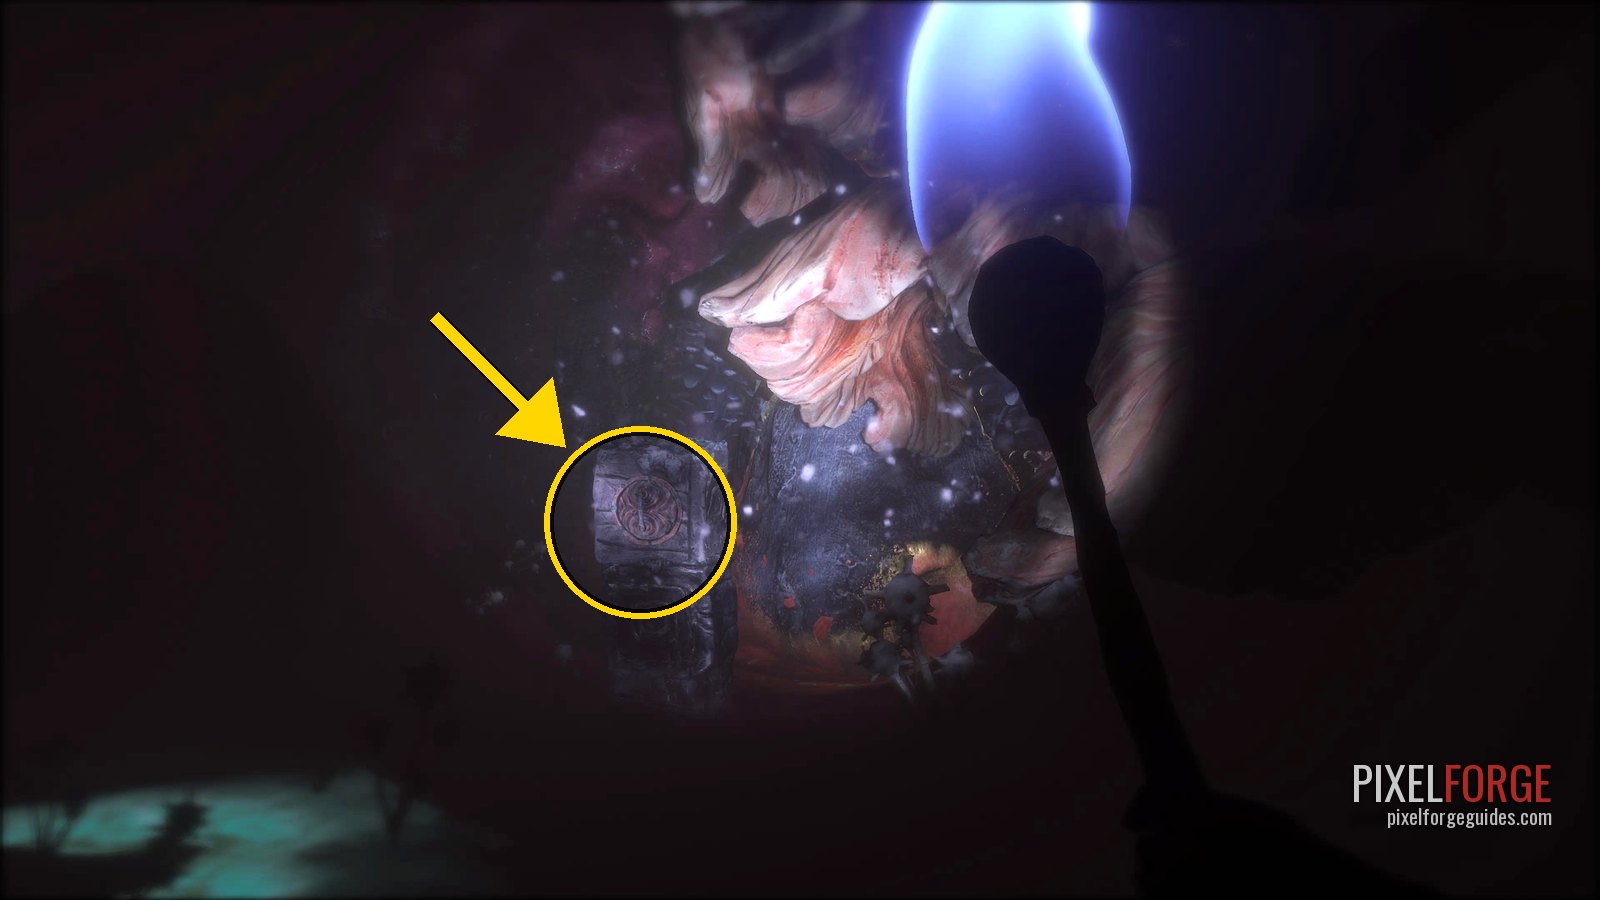
Clay Figurine 13/19 · The Ghost of Coalhaven · Chapter 4 - At the T-junction, all three ways are blocked: pop the blue eye above the right one. In the next chamber there's no wardrobe: pop the blue eye on the statue in the middle and a figure starts pointing. Pop the blue eyes in the order it points; get the order wrong and a Grinner comes for you.
- 🐚 Shellphone 21/25Through the slimy tunnel to the room with three switches: on the far side of the room.
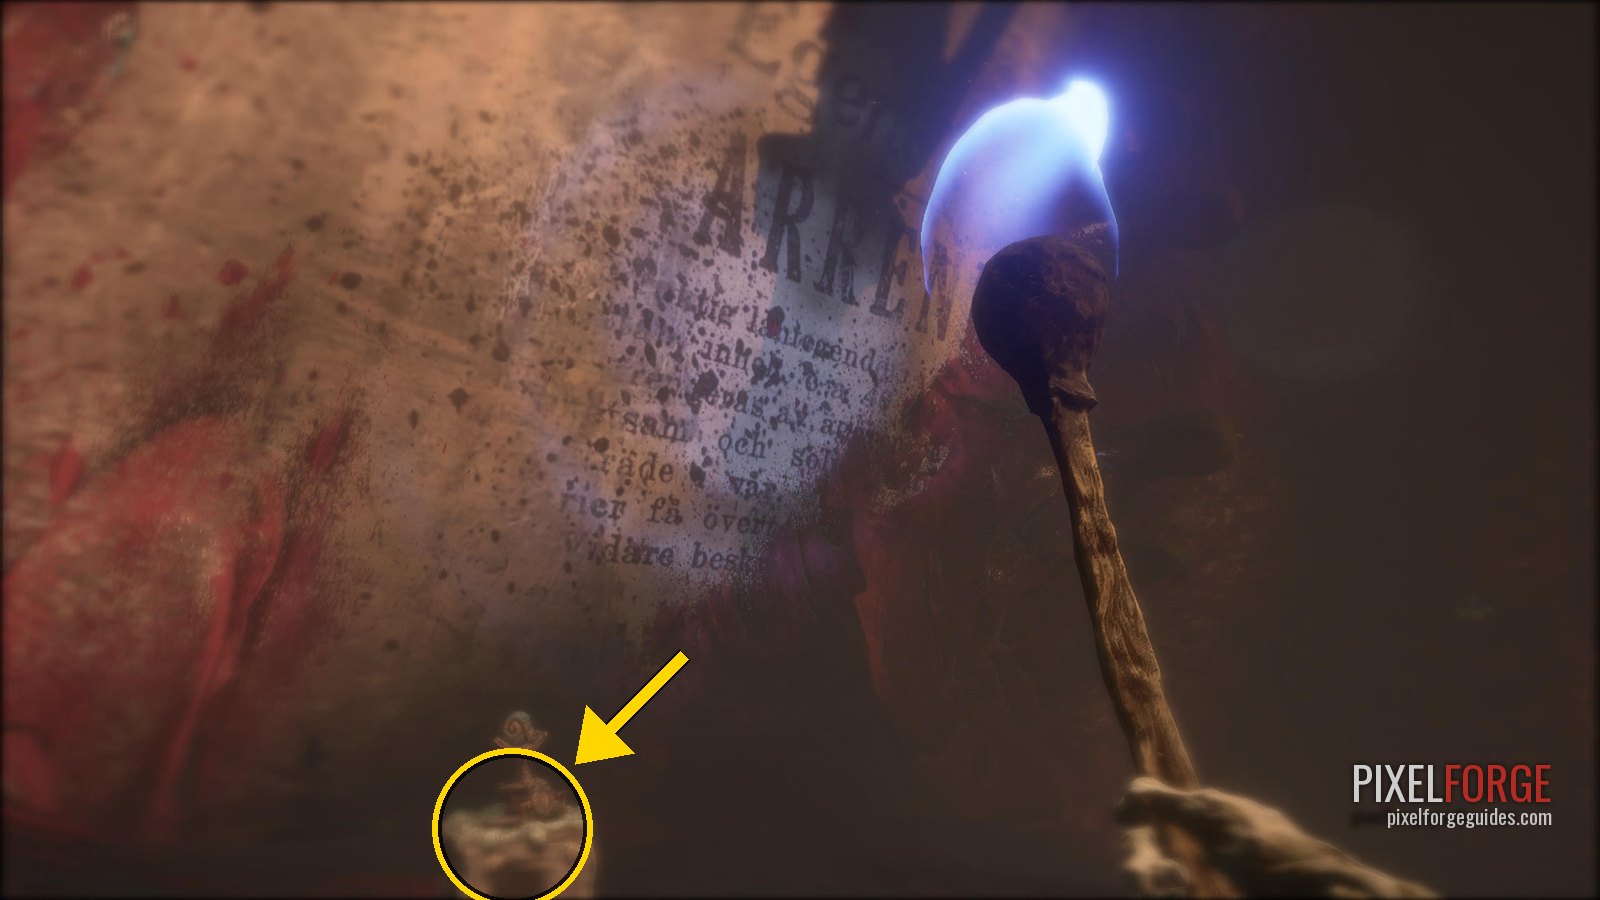
Shellphone 21/25 · Chapter 4 - Silhouette puzzle: three switches turn the figures on the console. Line them up so the left shadow is a candle with a star on top and the right one is a creature pointing (the Craftsman's hand reaching towards the other figure, her arms hidden). Get the candle right and the other falls into place.
- When Potboy drops back down, ride the flying machine out of the sewers.
- 🗿 Clay Figurine 14/19 · The GroundskeeperYou leave the tunnels on a flying contraption into an area with another projector. Left side, in the shadows near a red door.
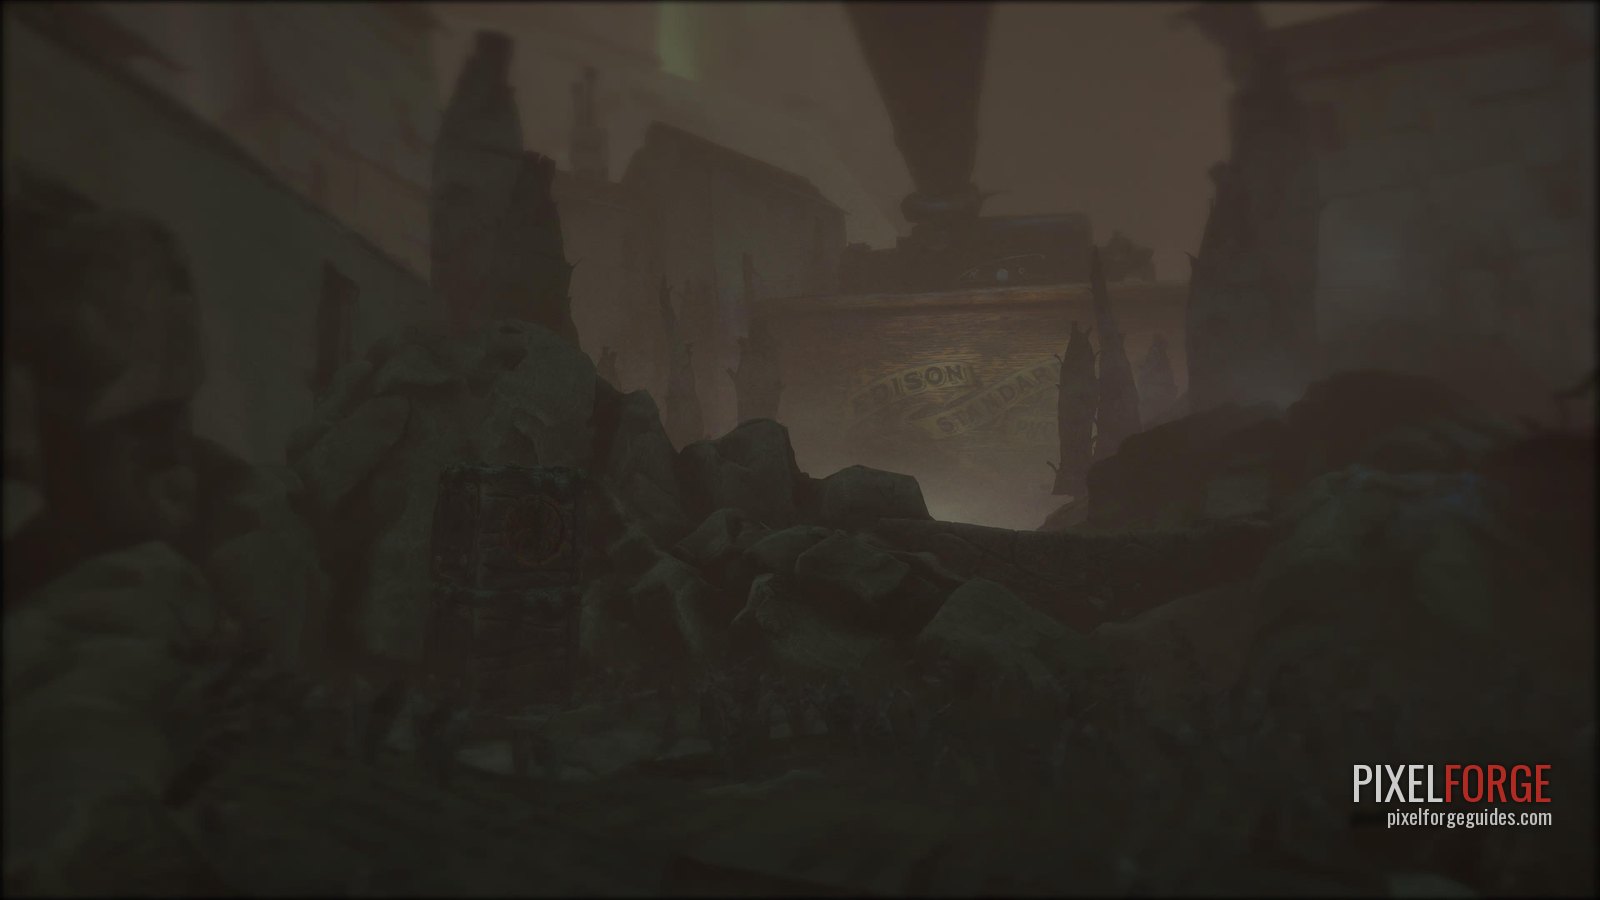
Clay Figurine 14/19 · The Groundskeeper · Chapter 4
Lighting the heart
- Burn the fuse and send Potboy into the fourth projector, then take the wardrobe behind the door it opens: you're back at the heart. Burn the last fuse and have Potboy pump fire into the heart (Square three times).
- Drop down the gap into the wardrobe, back to the big square. The giant sets Housy back down; step out of Housy. 🏆 The Tale Of The Craftsman's Heart
Chapter 5: The Tale of the Dark 11 collectibles · 3 figurines · 4 discs · 2 shellphones · 2 story pages
The walk through the dark with the Soothsayer, the candle gate, Potboy at the cliff edge, the camp, the tent and the sandy path with the boats. The last disc and the last story page are here.
The road to Candle Alley
- 🐚 Shellphone 22/25Right at the start, on the right of the path under a swinging lamp.
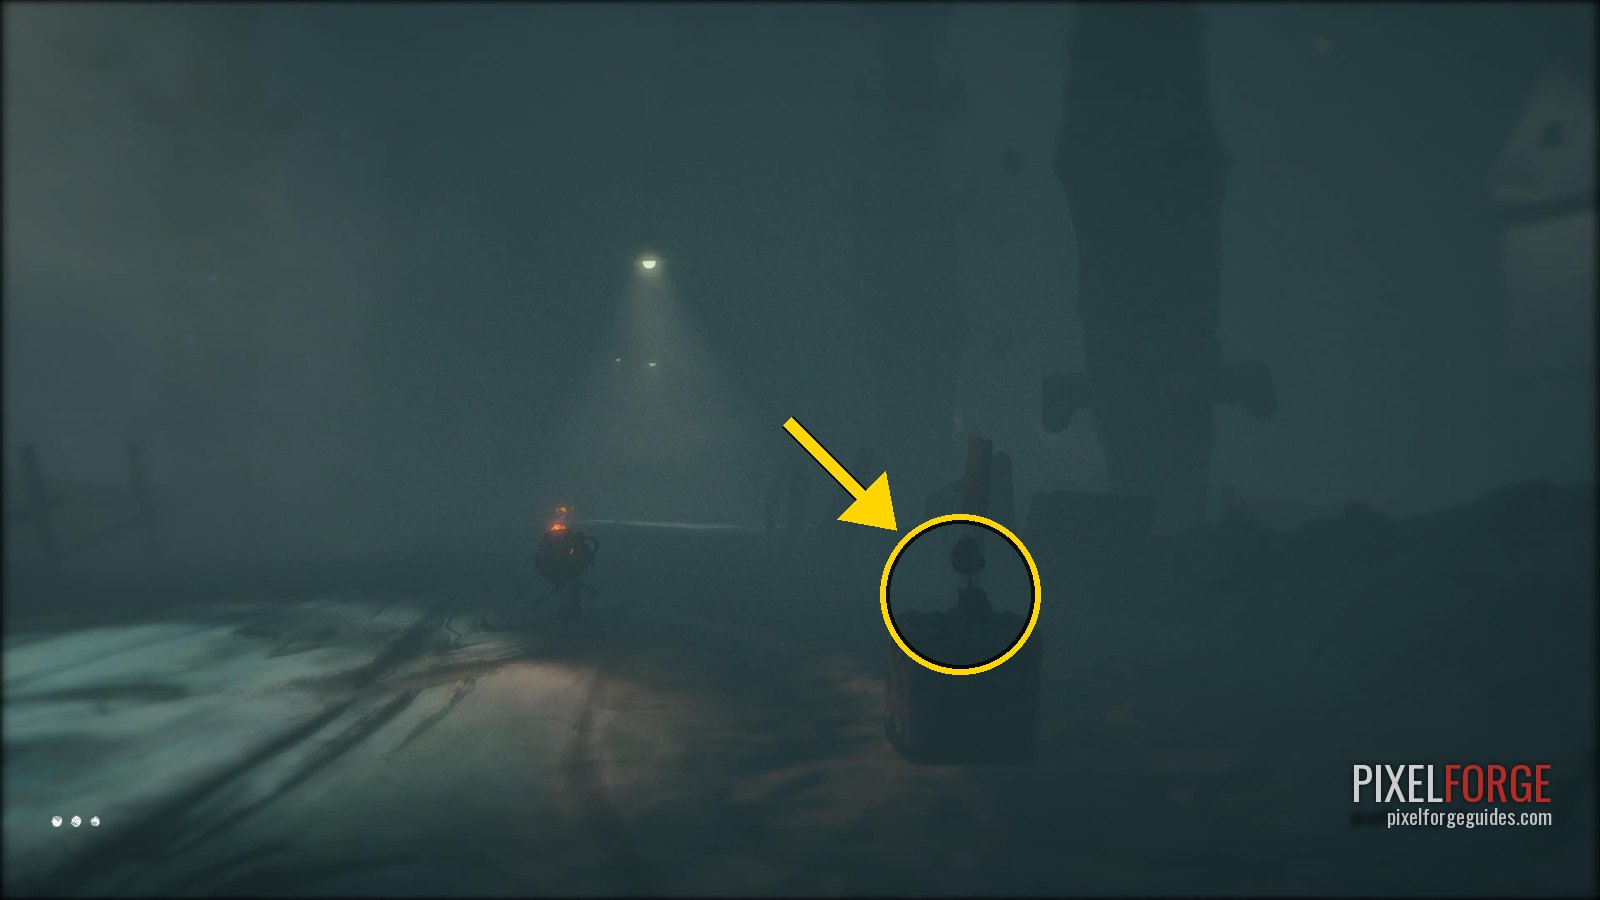
Shellphone 22/25 · Chapter 5 - 📜 Story Page 14/15Just after the chapter title, on the left of the path.
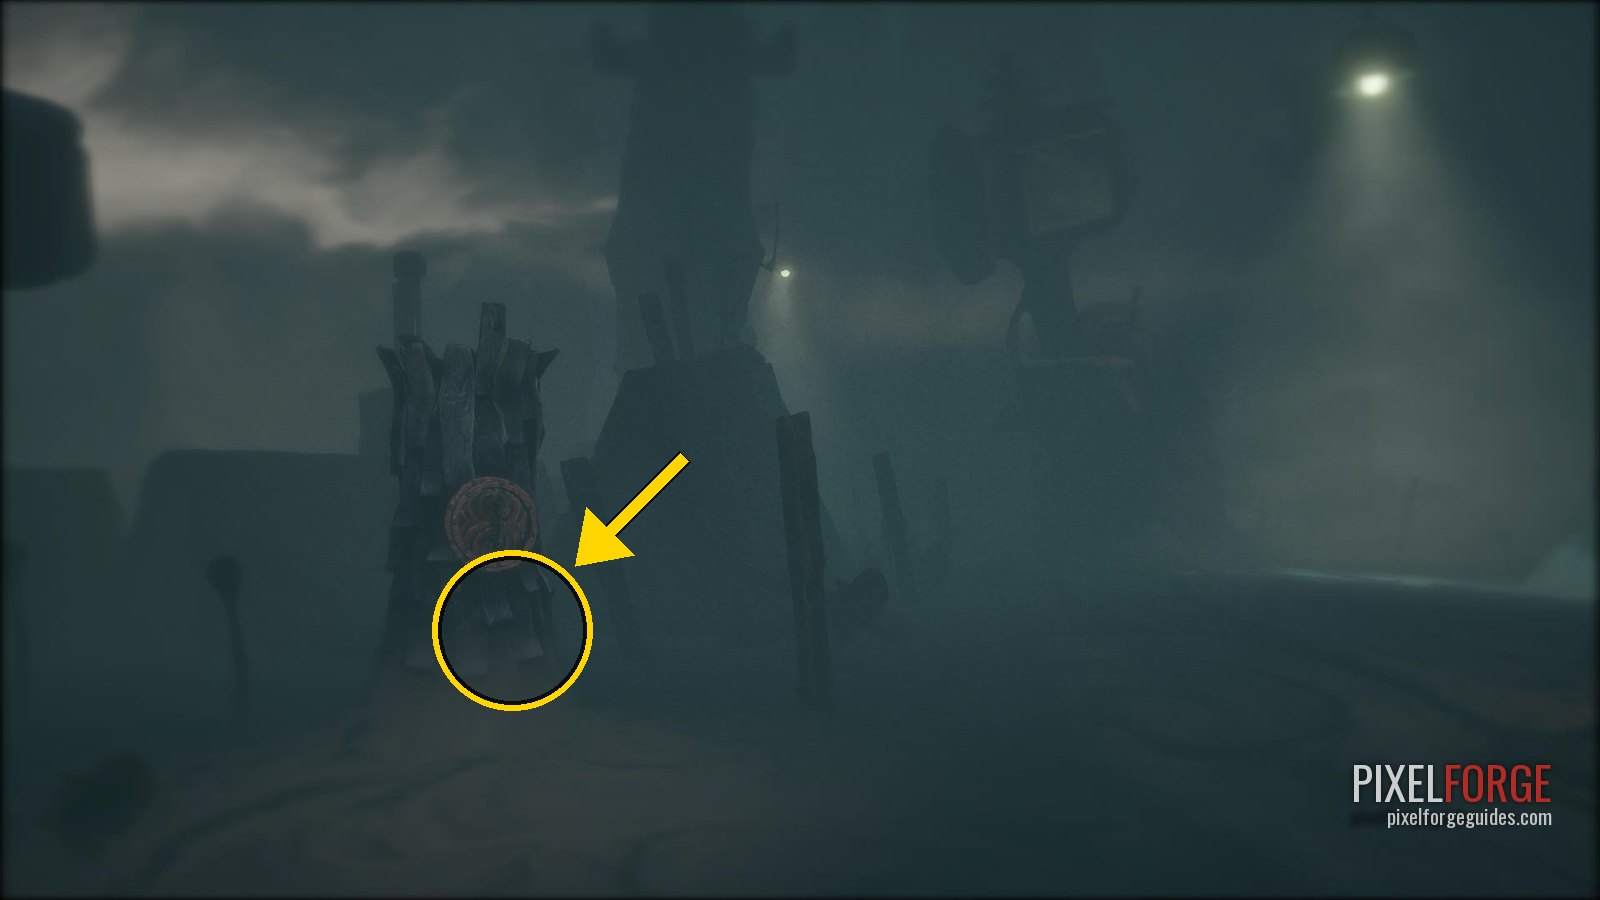
Story Page 14/15 · Chapter 5 - The road winds round to the right to the Soothsayer waiting at the end.
- 💿 Gramophone Disc 14/17 · The Midnight WalkAfter talking to the Soothsayer again, turn right towards the candles you can light: a hatch on your left near them.
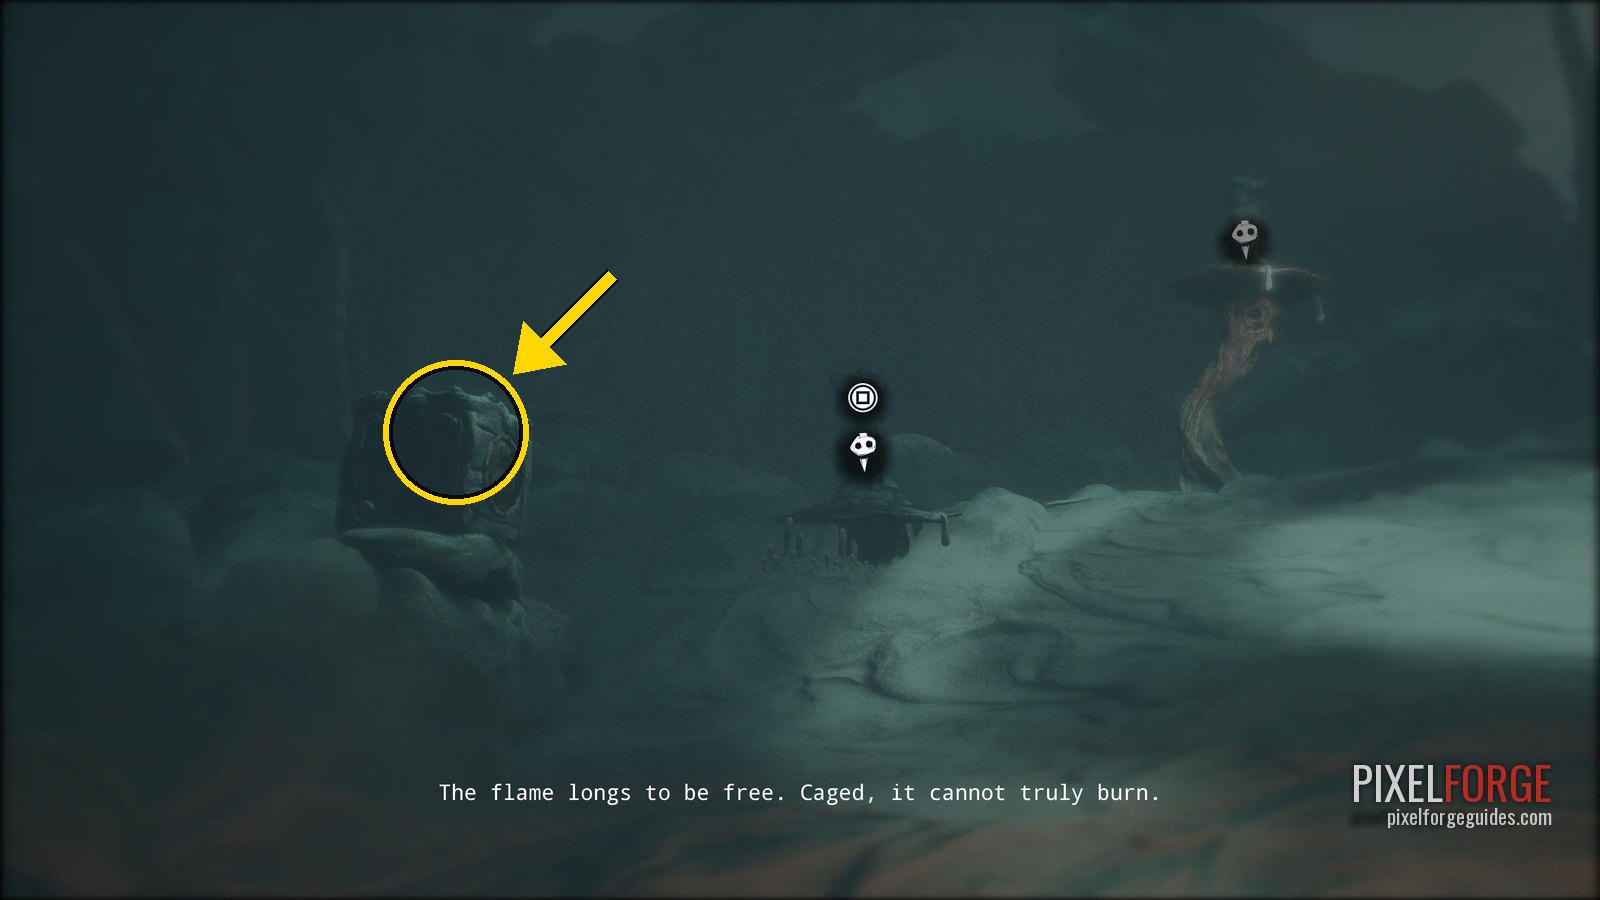
Gramophone Disc 14/17 · The Midnight Walk · Chapter 5 - At the locked door, send Potboy onto the two matchboxes either side of it to light the candles. In the scene he lights a whole valley of candles.
- 💿 Gramophone Disc 15/17 · Natten Är Nog Det Finaste HärThrough the gate that needs lots of candles, go straight: a hatch on a trunk on the right of the path.
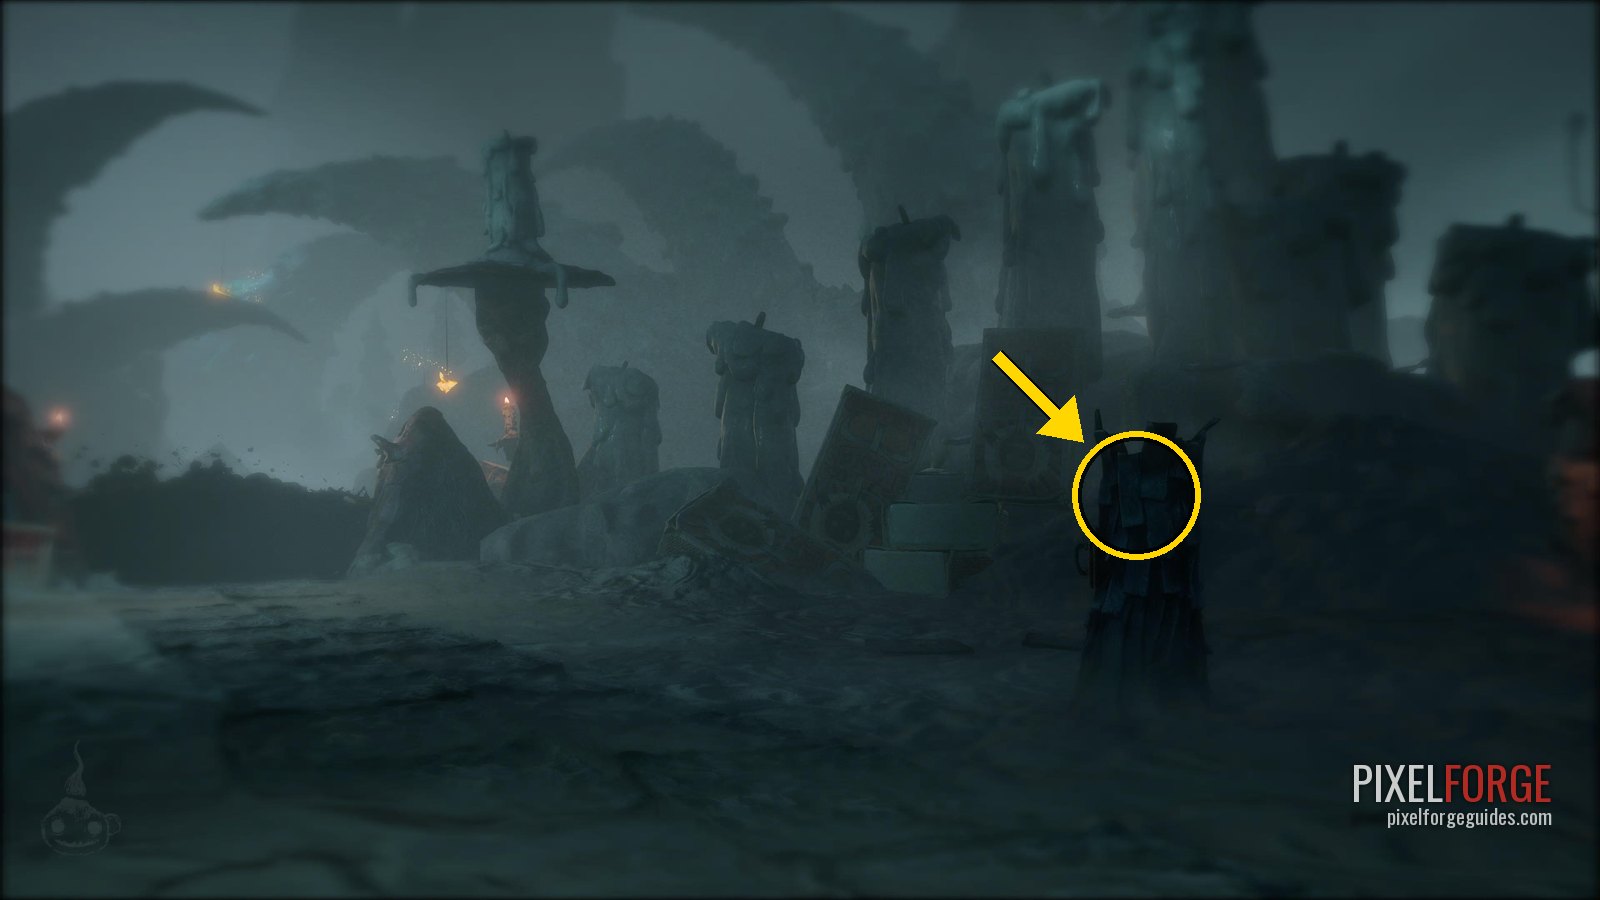
Gramophone Disc 15/17 · Natten Är Nog Det Finaste Här · Chapter 5 - 💿 Gramophone Disc 16/17 · Att Skåda Himlen Om NattenAfter the Potboy and Housy scene, Potboy waits at the cliff edge. The hatch is to his left, before you head down the hill.
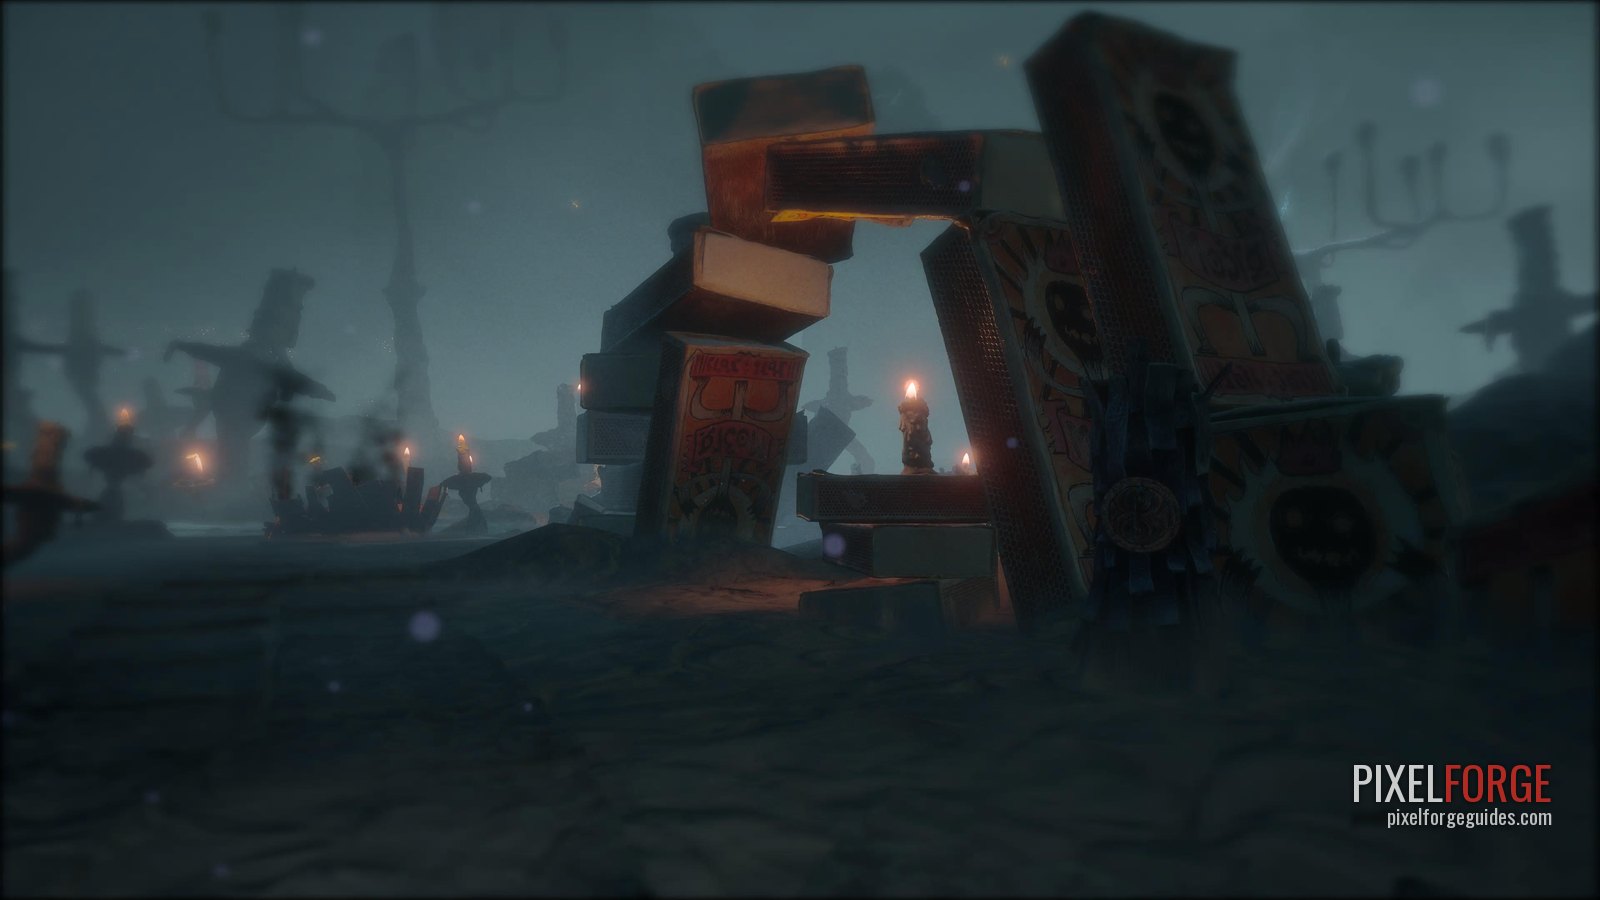
Gramophone Disc 16/17 · Att Skåda Himlen Om Natten · Chapter 5
Potboy's broken piece
- Potboy sits on the cliff edge, sad: a piece of him has broken off and fallen into the pit. Go down the hill on the left; as you get near the middle, the piece is tossed back up to you.
- 🐚 Shellphone 23/25Go down the hill to fetch what you need: it's in plain view at the bottom.
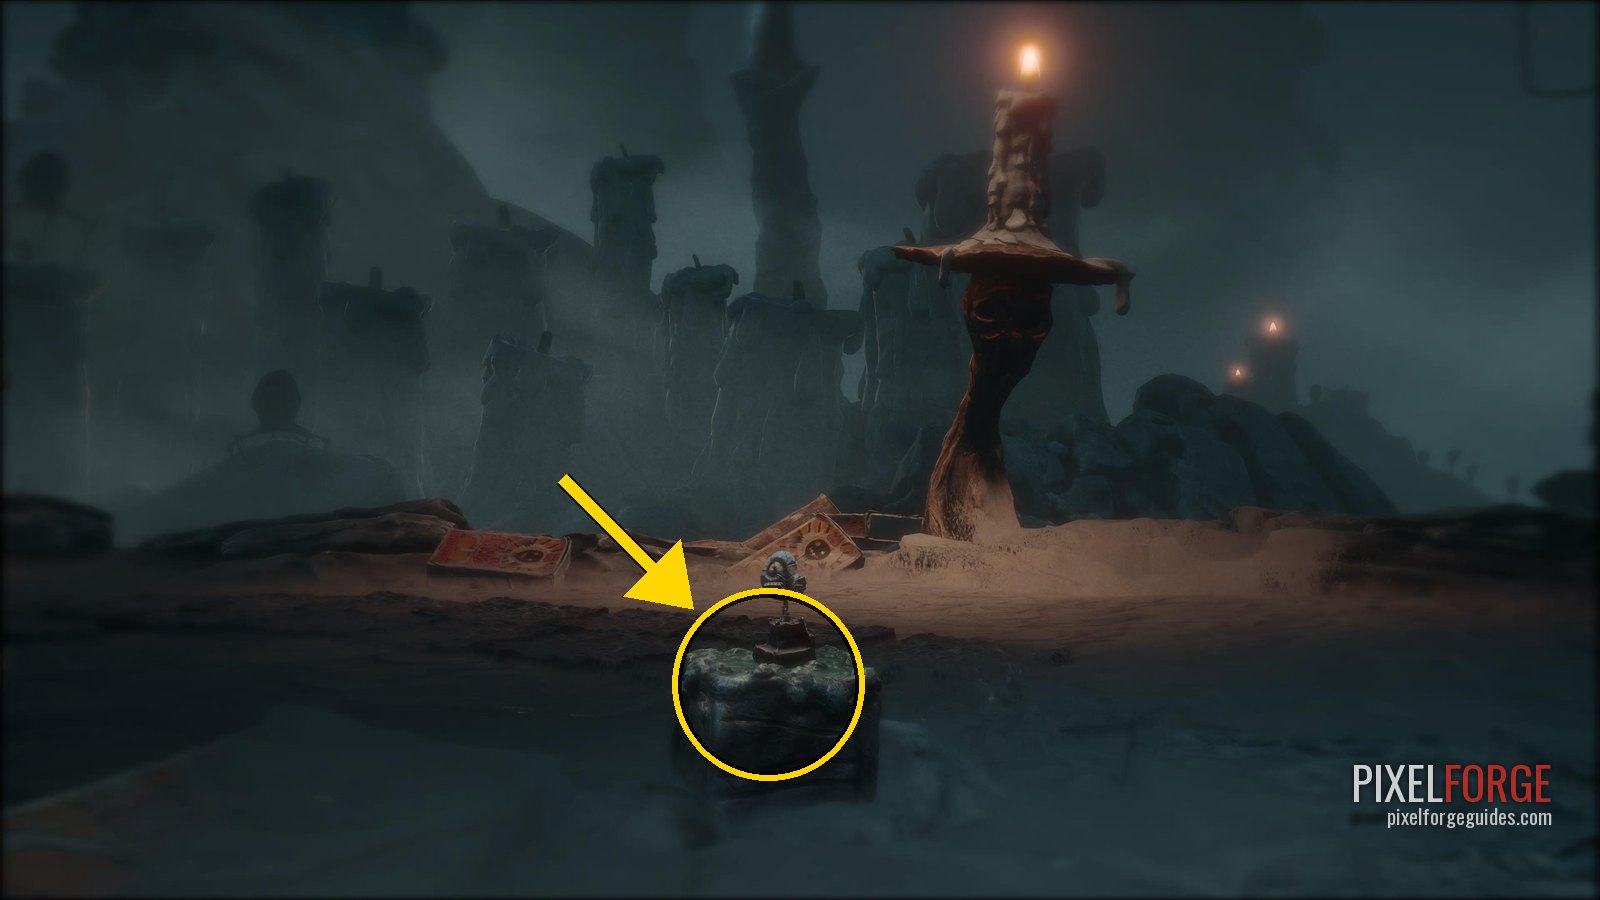
Shellphone 23/25 · Chapter 5 - 🗿 Clay Figurine 15/19 · The ThiefSame area: a hatch on the tree trunk by the cliff.
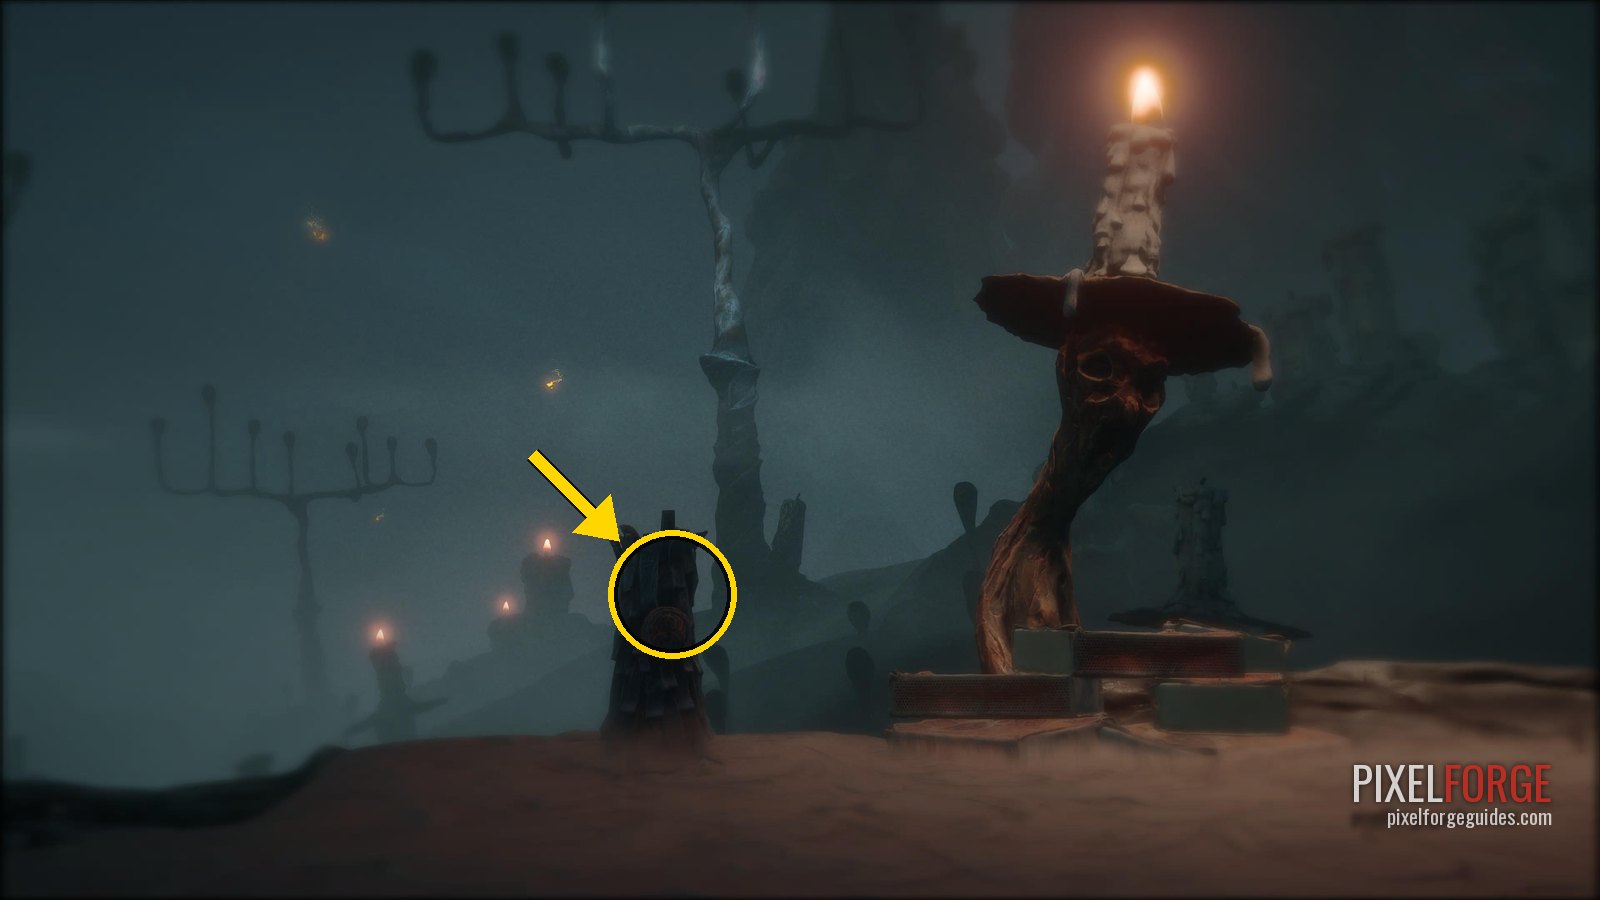
Clay Figurine 15/19 · The Thief · Chapter 5 - Climb back up and give Potboy his piece. He springs back to life and leads you to the gate of shadow, which lets you through now. Follow him to the Soulfisher at his camp and listen to his story.
- 🗿 Clay Figurine 16/19 · A CraftsmanWhen you meet the character at his camp again, there's a pier to the left of the camp. It's at the end of the pier.
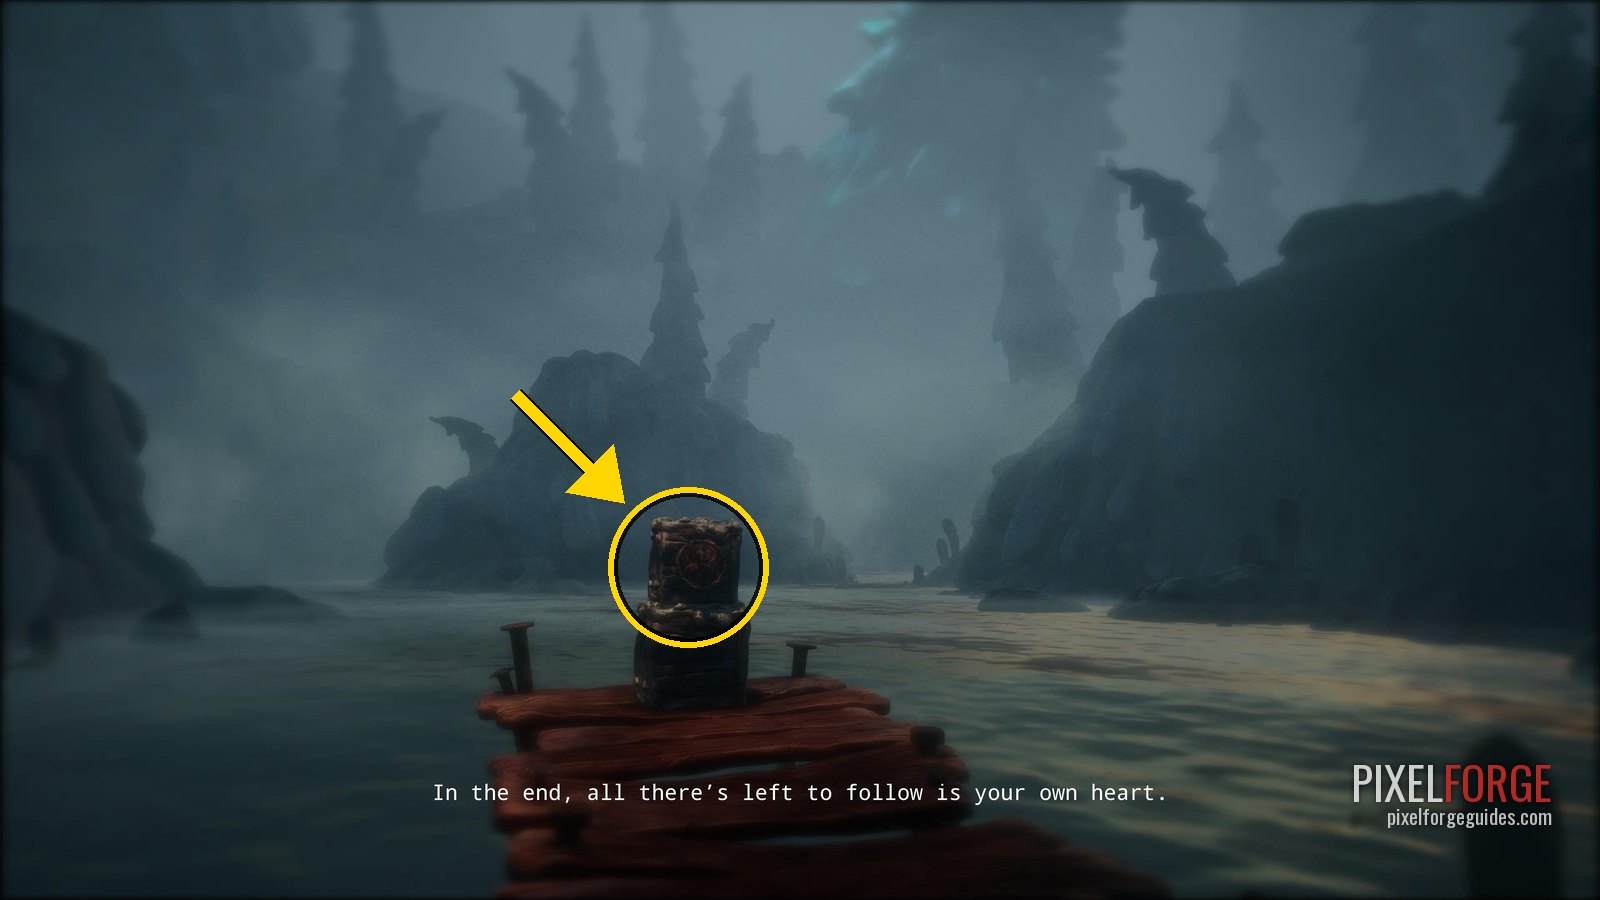
Clay Figurine 16/19 · A Craftsman · Chapter 5 - 💿 Gramophone Disc 17/17 · Candle ValleyA hatch to the right of the character in the tent. Last disc: There Is Always Music In The Air.
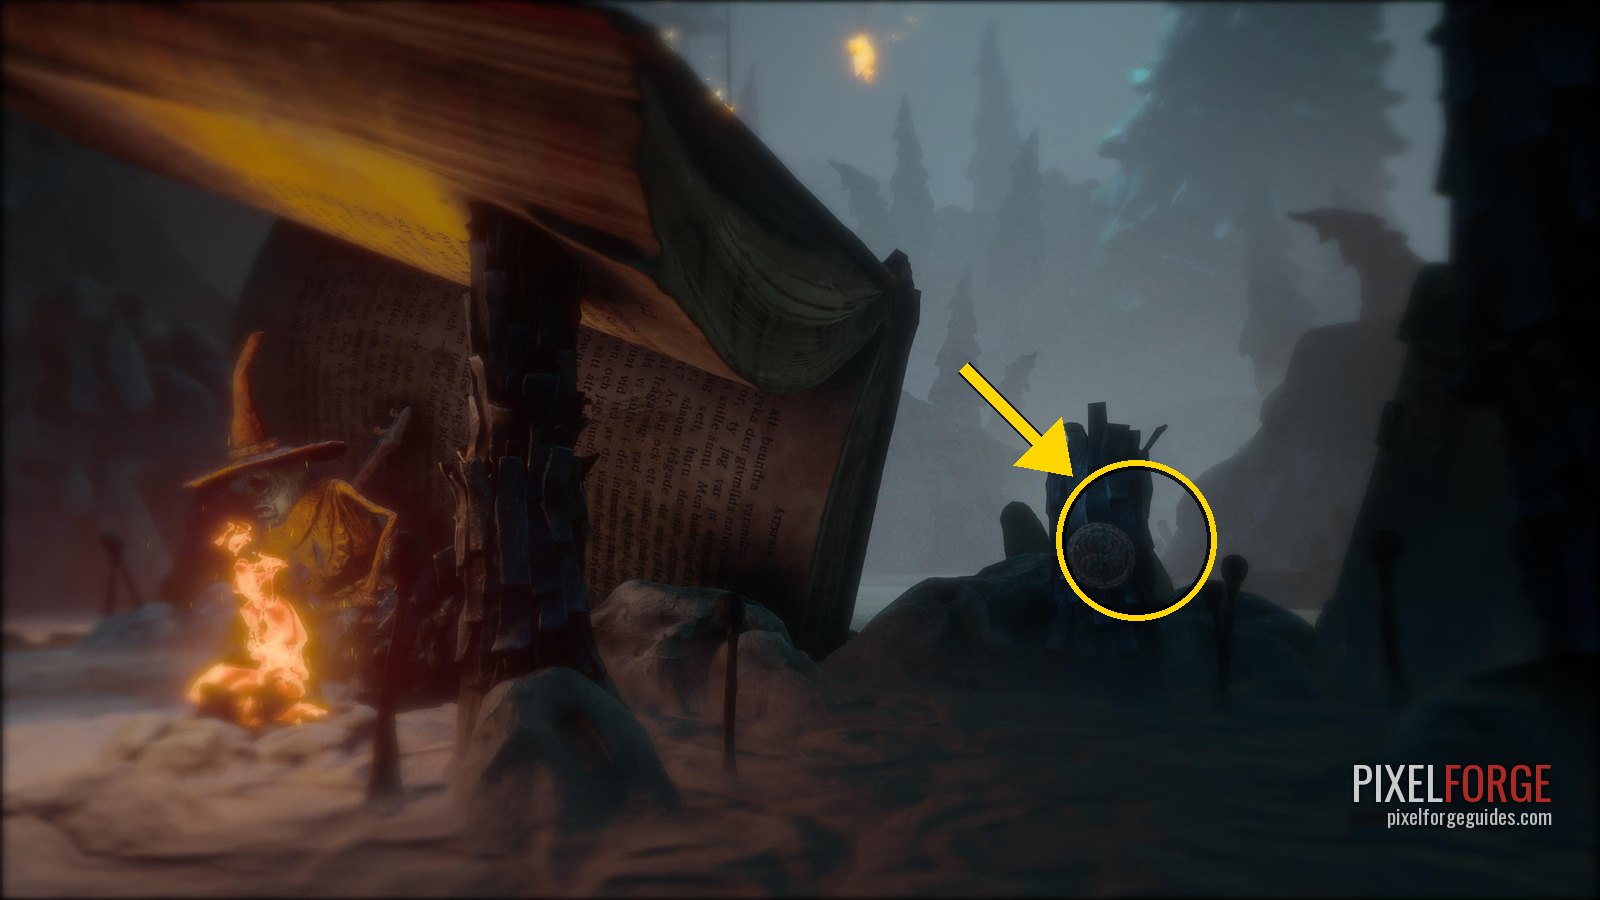
Gramophone Disc 17/17 · Candle Valley · Chapter 5 - Pick these two up before you move on: this part closes behind you.
The ship graveyard
- Walk on into the sand, the beached ships and the huge anchors.
- 📜 Story Page 15/15Follow the sandy path with the boats and the three lights in the distance. Stay on the path: a hatch on some boxes on your left. Last page: Who Took The Sun Away?
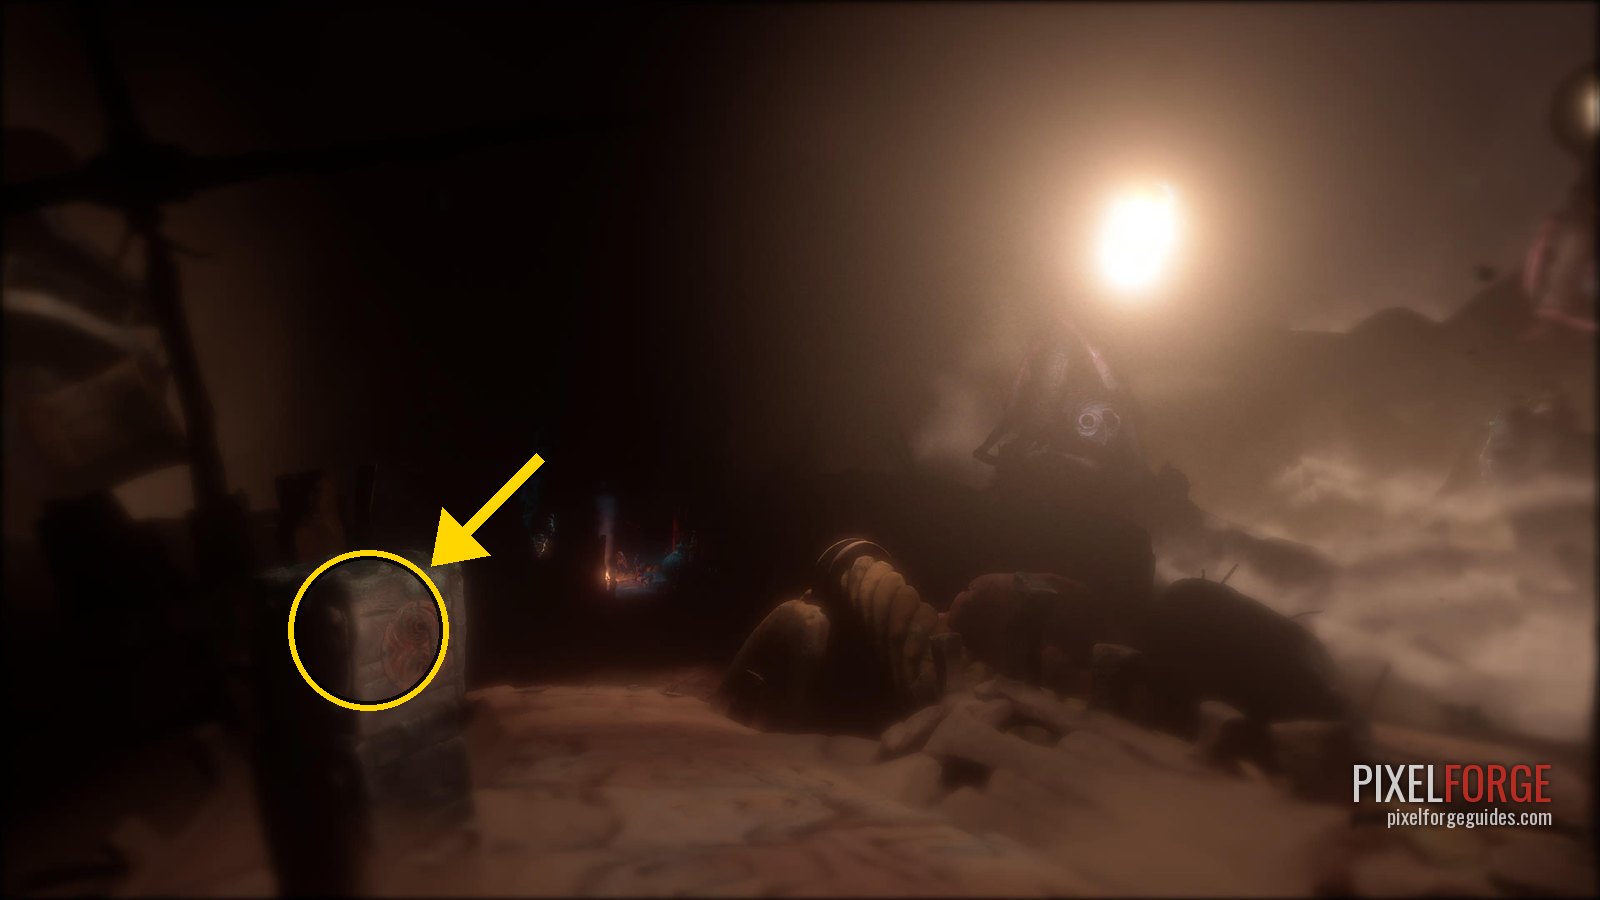
Story Page 15/15 · Chapter 5 - At the bonfire, Potboy is talking to the Murkle at her camp.
- 🗿 Clay Figurine 17/19 · Housy the HouseAt the bonfire where Potboy talks to another character: a hatch to the left of the fire.
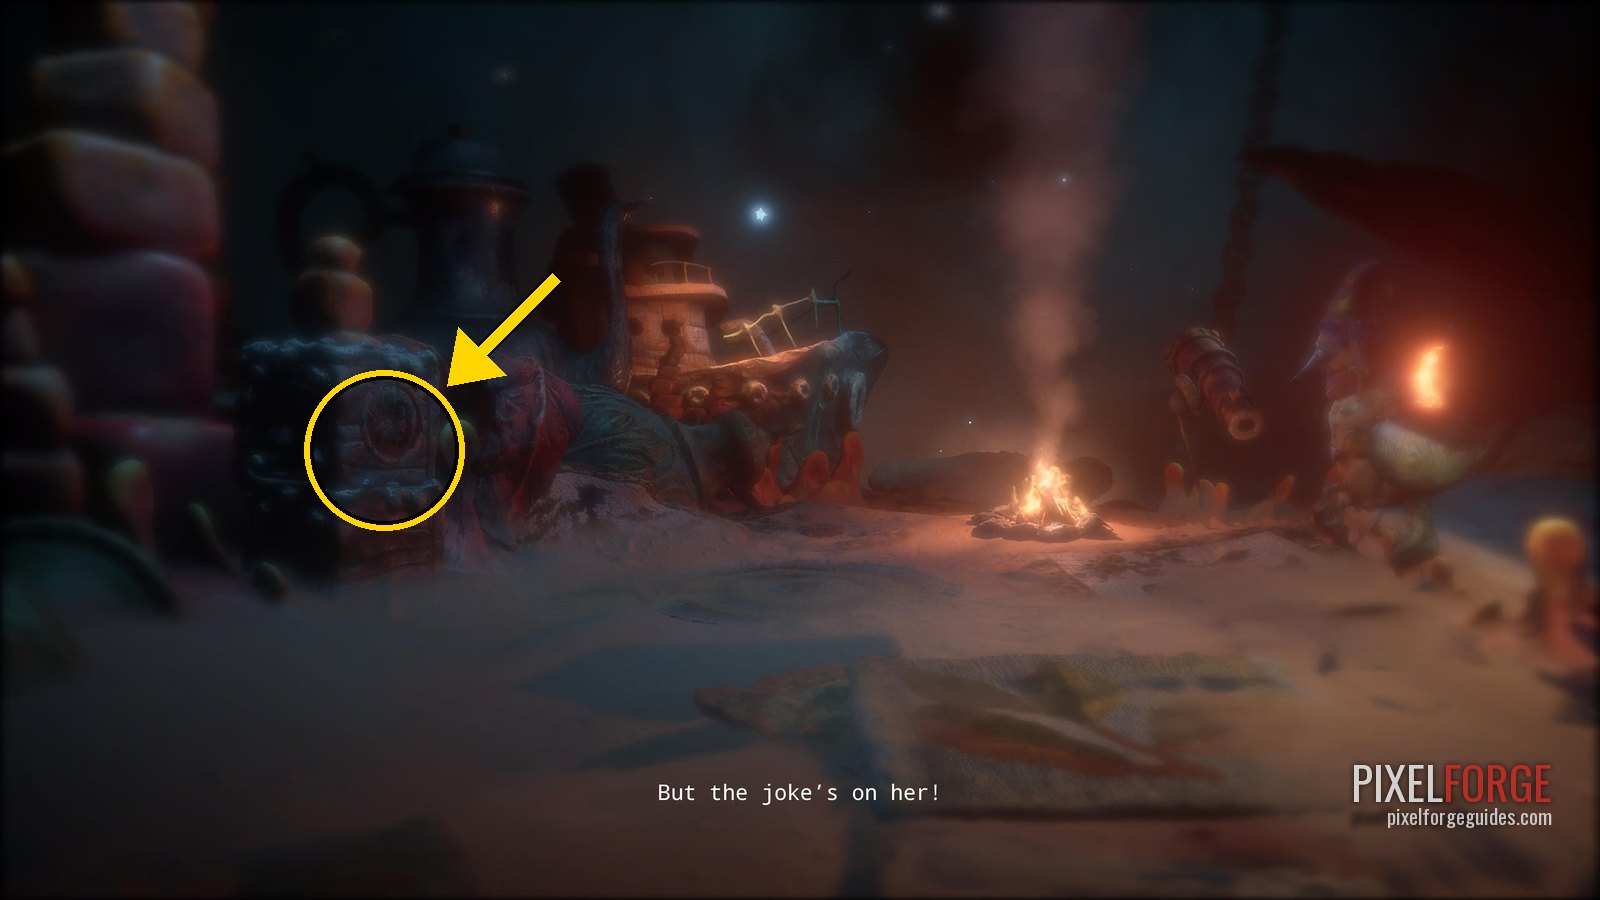
Clay Figurine 17/19 · Housy the House · Chapter 5 - Circle round to the right and follow Potboy into the caves. Light the candles one after another while the story so far is told back to you; the last step is lighting Potboy again. The darkness lifts and the final chapter begins.
Chapter 6: The Tale of Moon Mountain 4 collectibles · 2 figurines · 0 discs · 2 shellphones · 0 story pages
Moon Mountain: the Grinner at the start, the climb against the wind and the cave, then the top of the mountain and the final choice.
Up Moon Mountain
- Follow Potboy up the road to the Soothsayers.
- 🗿 Clay Figurine 18/19 · The GrinnerRight at the start of the chapter, next to the character there.
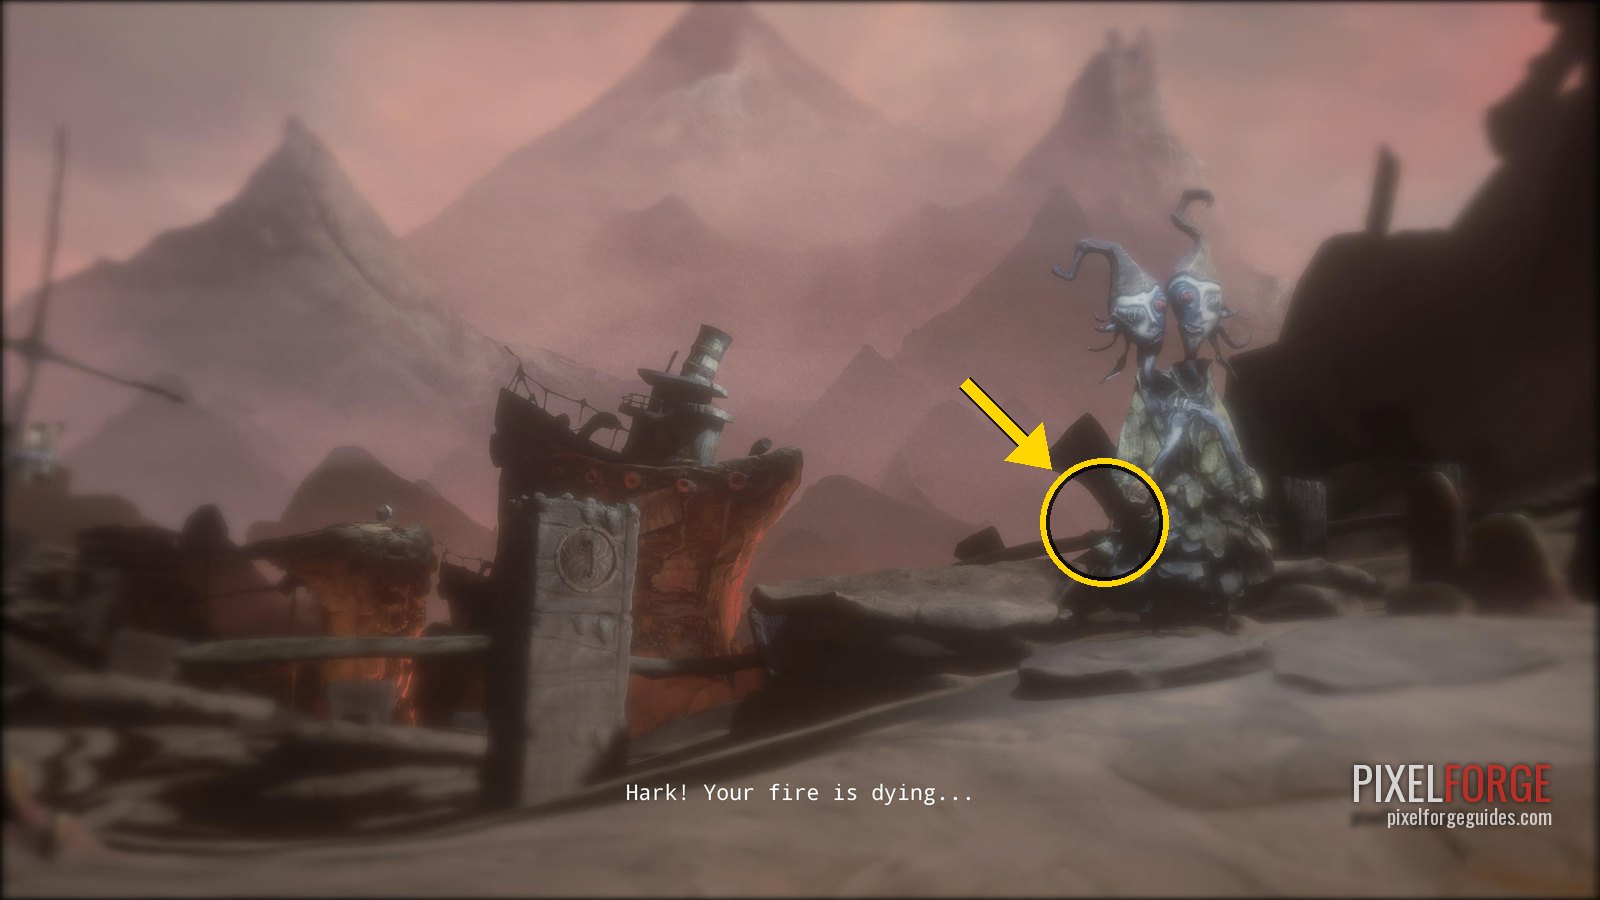
Clay Figurine 18/19 · The Grinner · Chapter 6 - The monsters here have big glowing eyes: close yours at their eyes to make them vanish. The big cliff face can't be fallen off, so sprint.
- 🐚 Shellphone 24/25Stay on the main path; it's just after the first few enemies.
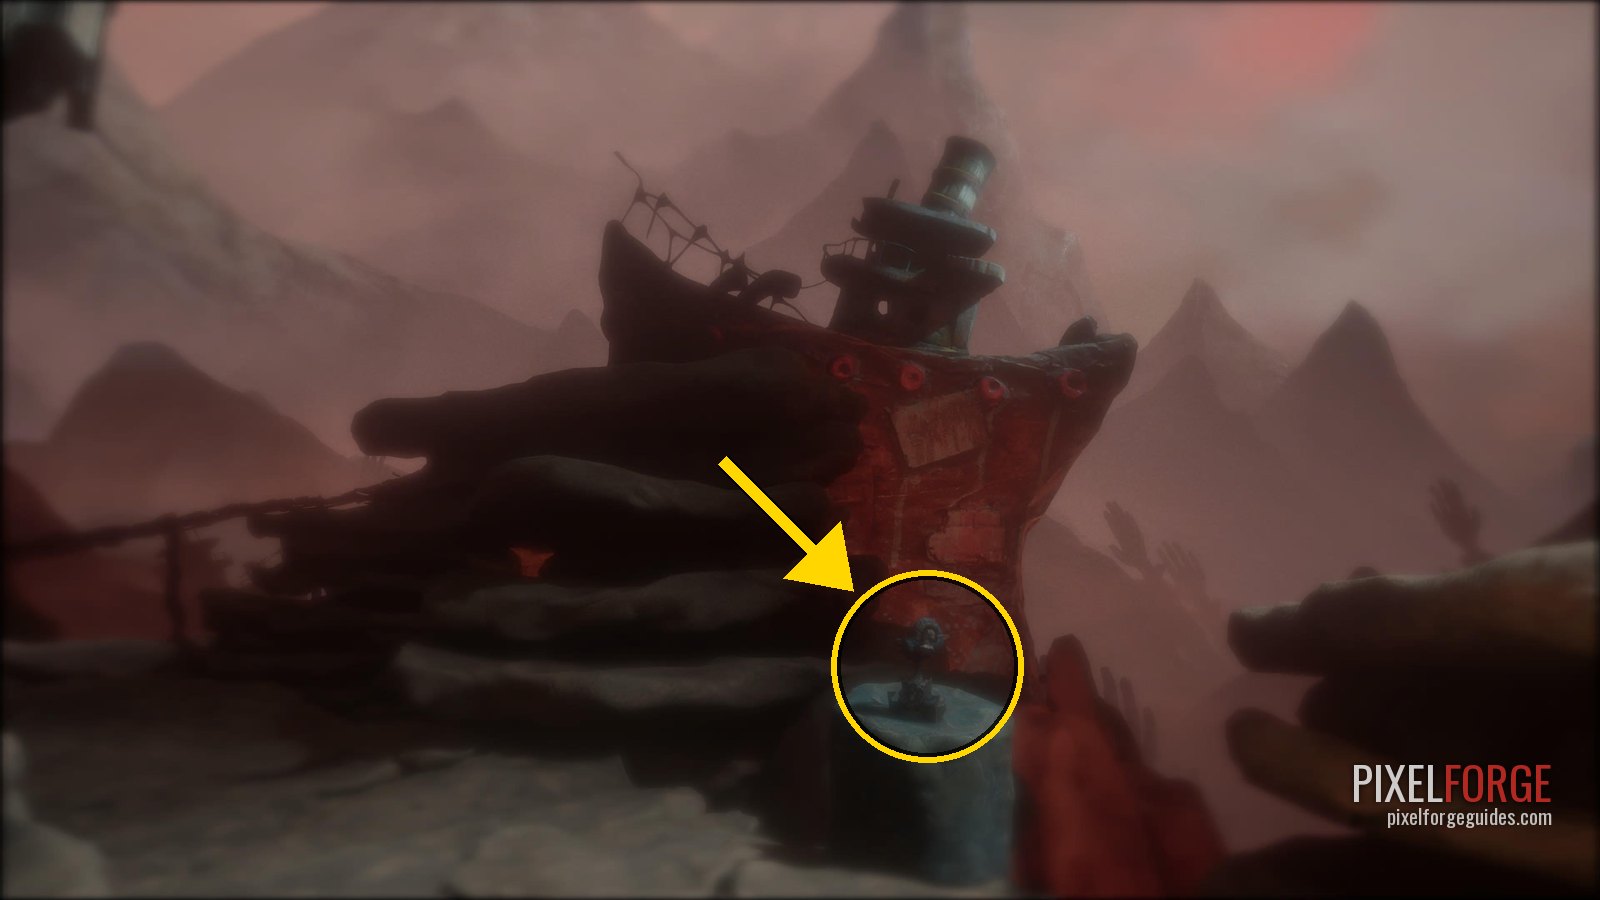
Shellphone 24/25 · Chapter 6 - After the flying machine, two Grinners in the cave: pop their blue eyes the same way. Cross the wooden bridge and guide Potboy through the wind from shelter to shelter.
- 🐚 Shellphone 25/25Once you're in the cave after dodging the winds, in plain view. Last shellphone: Who's There?
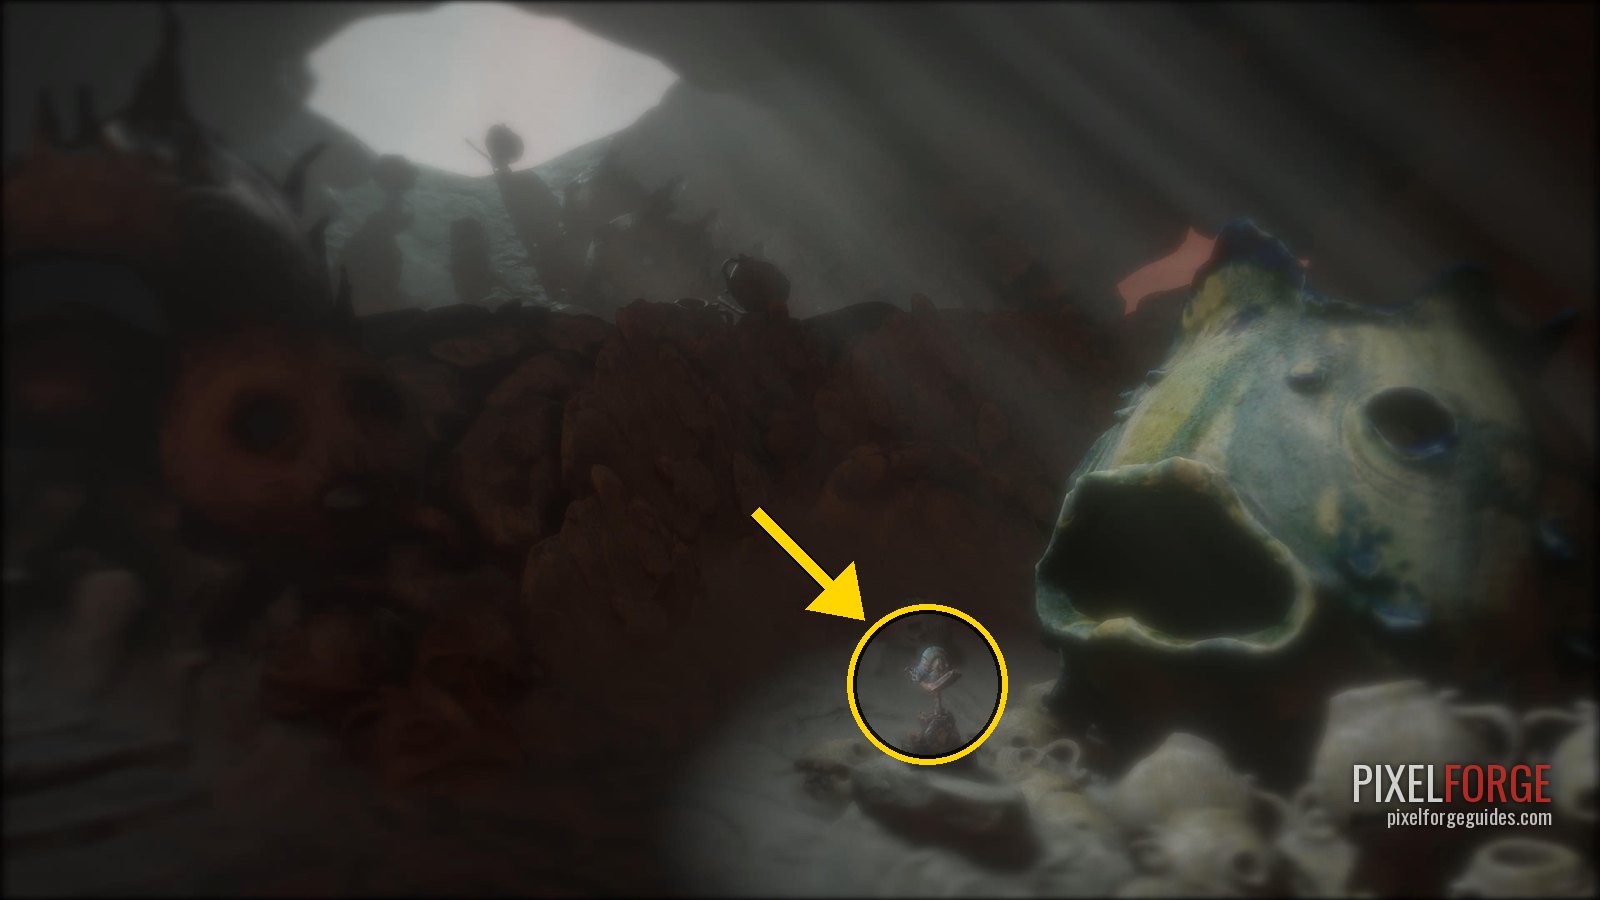
Shellphone 25/25 · Chapter 6 - After the next flying machine comes the long climb against the icy wind. Move in the lulls from cover to cover and carry a lit match: if Potboy goes out and you have no flame, the cold kills you.
The top of the mountain · the ending
- Potboy runs ahead into a wide open space; the screen fades to white and you're at the top.
- 🗿 Clay Figurine 19/19 · PotboyAt the top of the mountain after the long climb against the wind, when the screen fades to white, look left. Last figurine: Mad God.
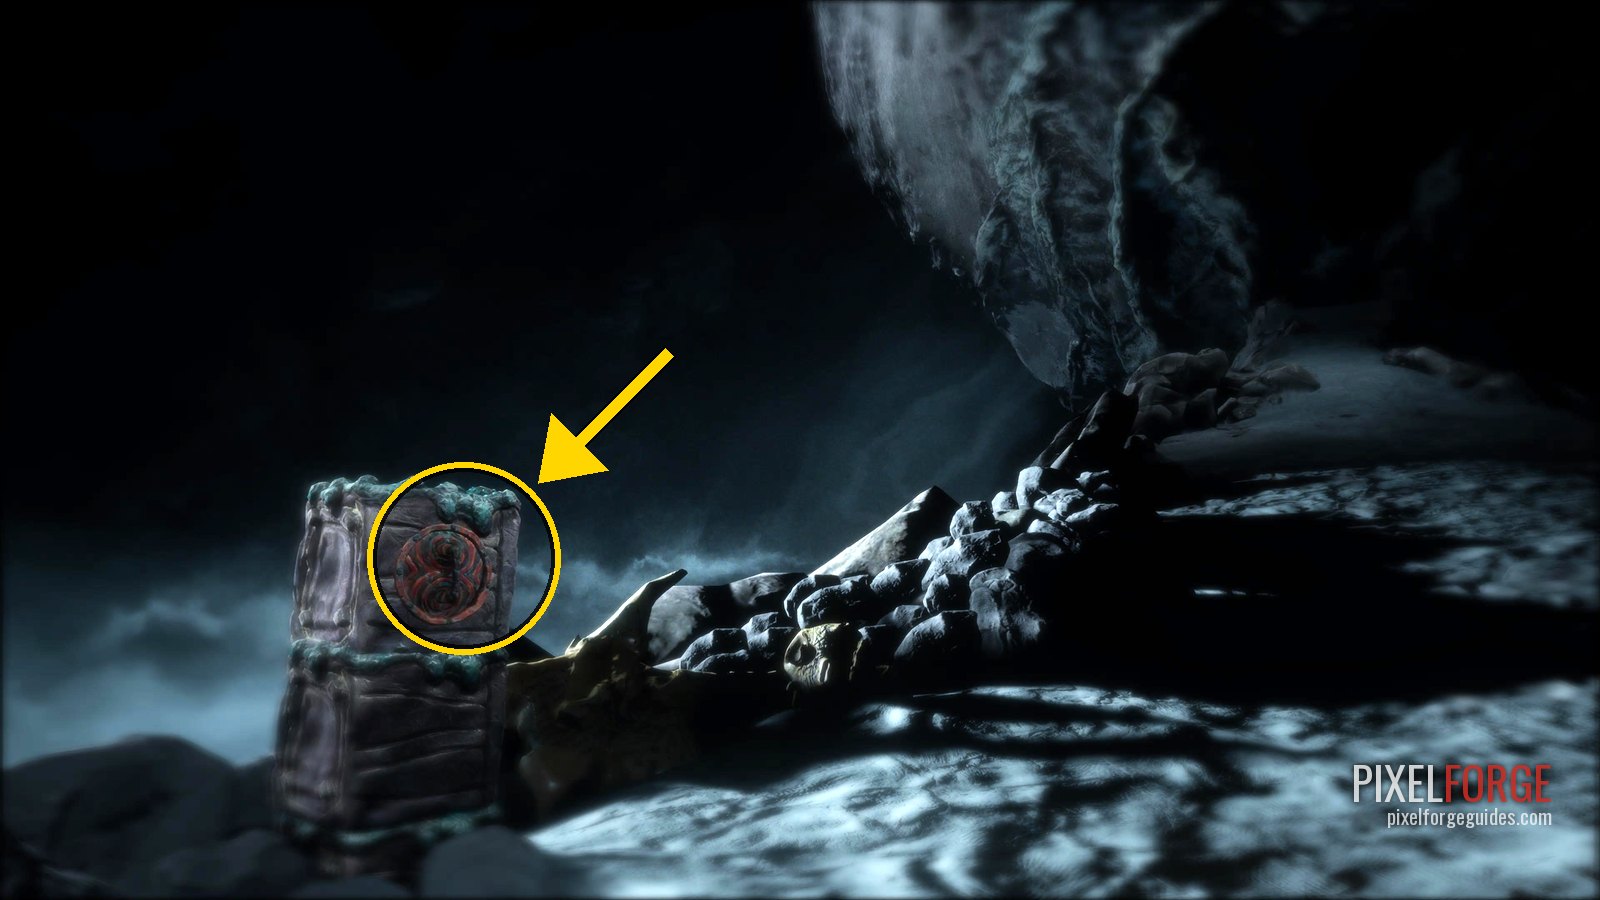
Clay Figurine 19/19 · Potboy · Chapter 6 - Walk into the moon and watch the scene closely. Send Potboy up to burn it (Square); after a couple of blasts you're asked to choose.
- Press X for Burn. 🏆 Burn Out
- The game autosaves just before the choice. After the ending, choose Resume (Continue) from the main menu, go back in, and press Circle for Stop. 🏆 Fade Away
- Then Story → Visit Housy and idle for ten minutes if you haven't already. Platinum. 🏆 Home Is Where The Heart Is 🏆 Burn Baby Burn!
FAQ
Can you miss collectibles in The Midnight Walk?
Not for good. Chapter select lets you replay any chapter, and Housy keeps track of what you've found in each one.
Why do some guides say 18 figurines and 16 discs?
Two items share a number in some lists. The game has 19 clay figurines and 17 gramophone discs; the trophies pop on the last one in Chapter 6 (Potboy) and Chapter 5 (Candle Valley).