The Midnight Walk · Collectibles
All Collectibles
Every The Midnight Walk collectible location grouped by type, on our own screenshots: 19 clay figurines, 25 shellphones, 17 gramophone discs and 15 story pages. Each type has its own gold trophy. Playing through? Use the walkthrough, which has all 76 in the order you reach them.
Per chapter
Chapter 1: 11 · Chapter 2: 19 · Chapter 3: 21 · Chapter 4: 10 · Chapter 5: 11 · Chapter 6: 4. Nothing is missable: chapter select (through Housy) lets you replay any chapter, and Housy's cupboards show what's still missing in each.
Clay figurines (Mad God) 19
| Collectible | Exactly where | Our screenshot |
|---|---|---|
| Clay Figurine 1/19 · The Ragdoll Chapter 1: The Tale of the Burnt One | In the cave the three candles open: a round hatch on the stone blocks, right in your path. | 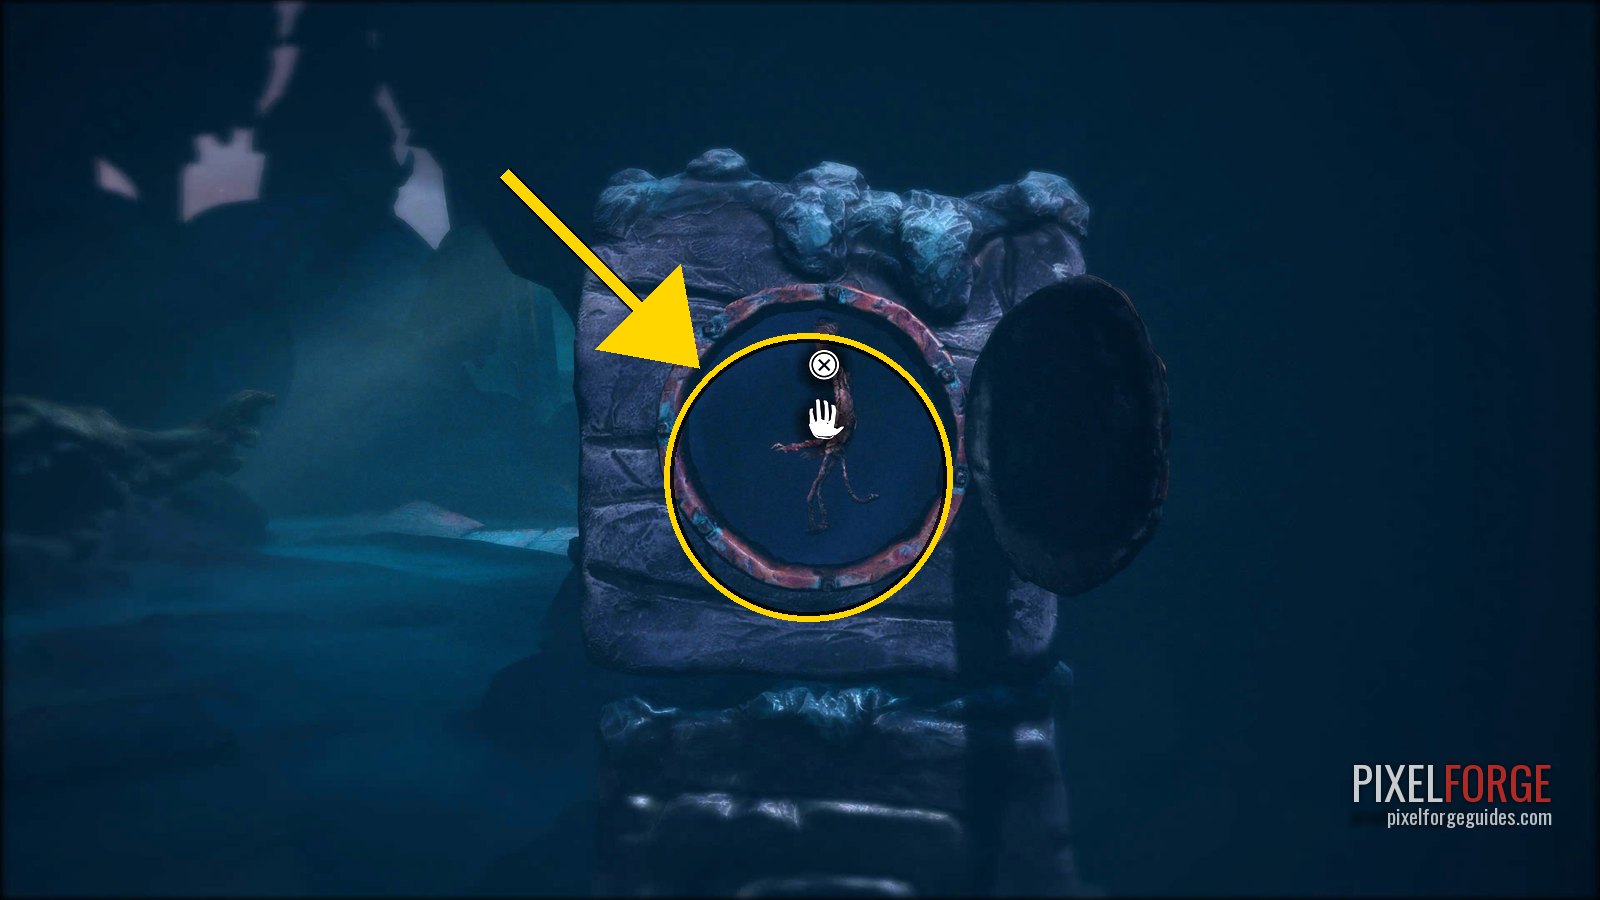 |
| Clay Figurine 2/19 · The Daughter Chapter 1: The Tale of the Burnt One | After the cave where you stare at the eye and then close your eyes, you reach a matchbox. Walk down the slope to its left: the hatch is beside a candle. | 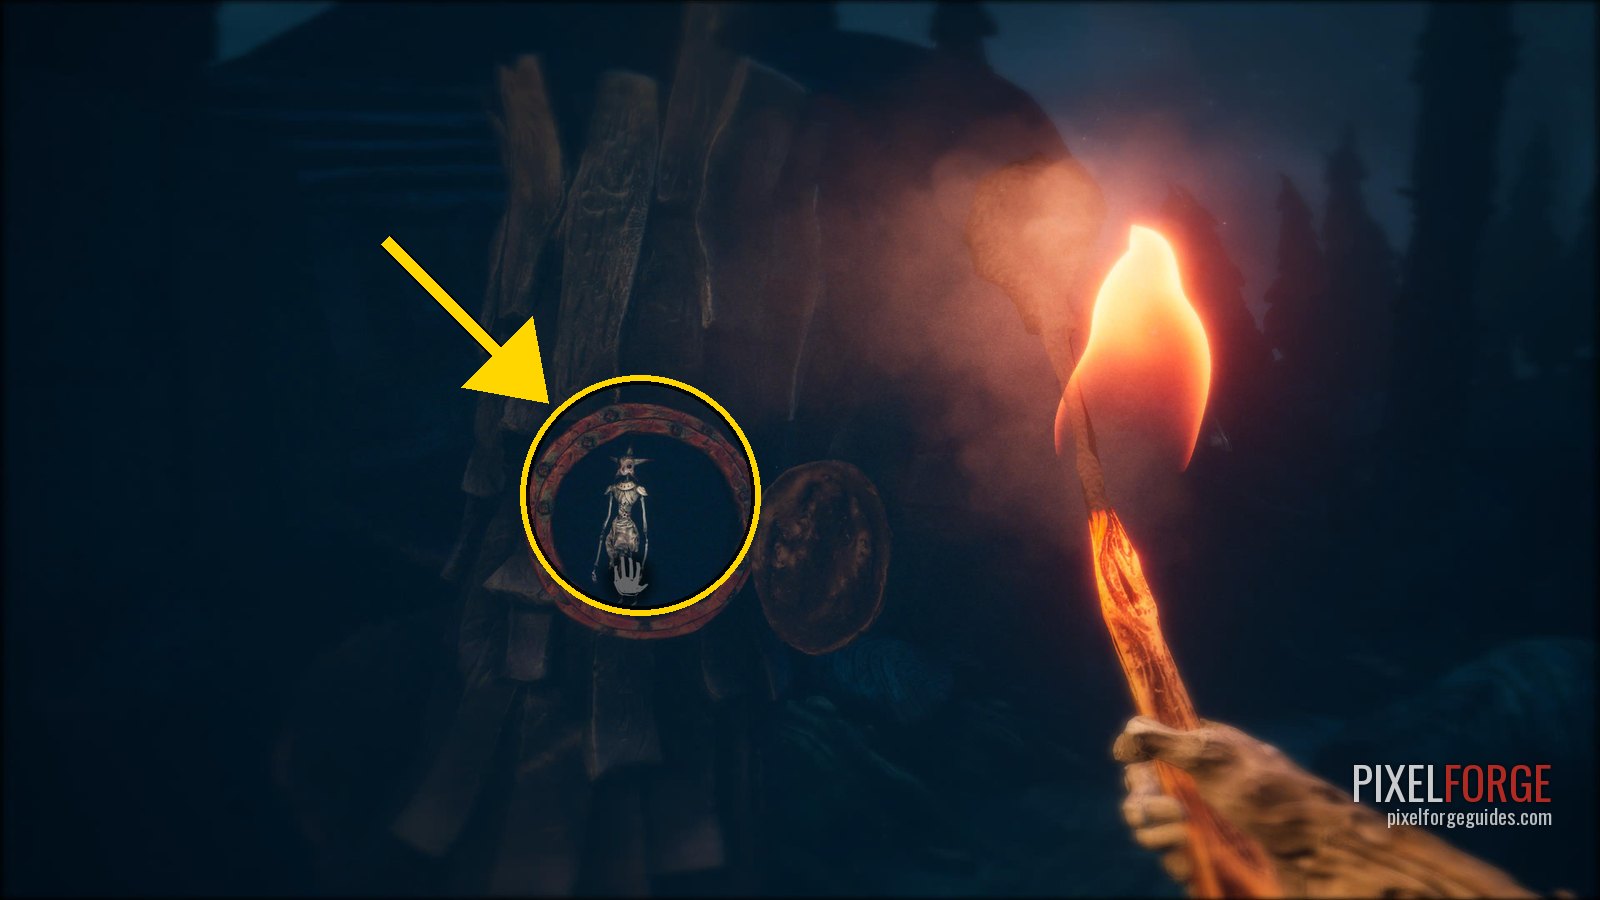 |
| Clay Figurine 3/19 · The Soothsayers Chapter 1: The Tale of the Burnt One | You drop down into a wood and the music changes. Turn right as soon as you land: the hatch is on a tree. | 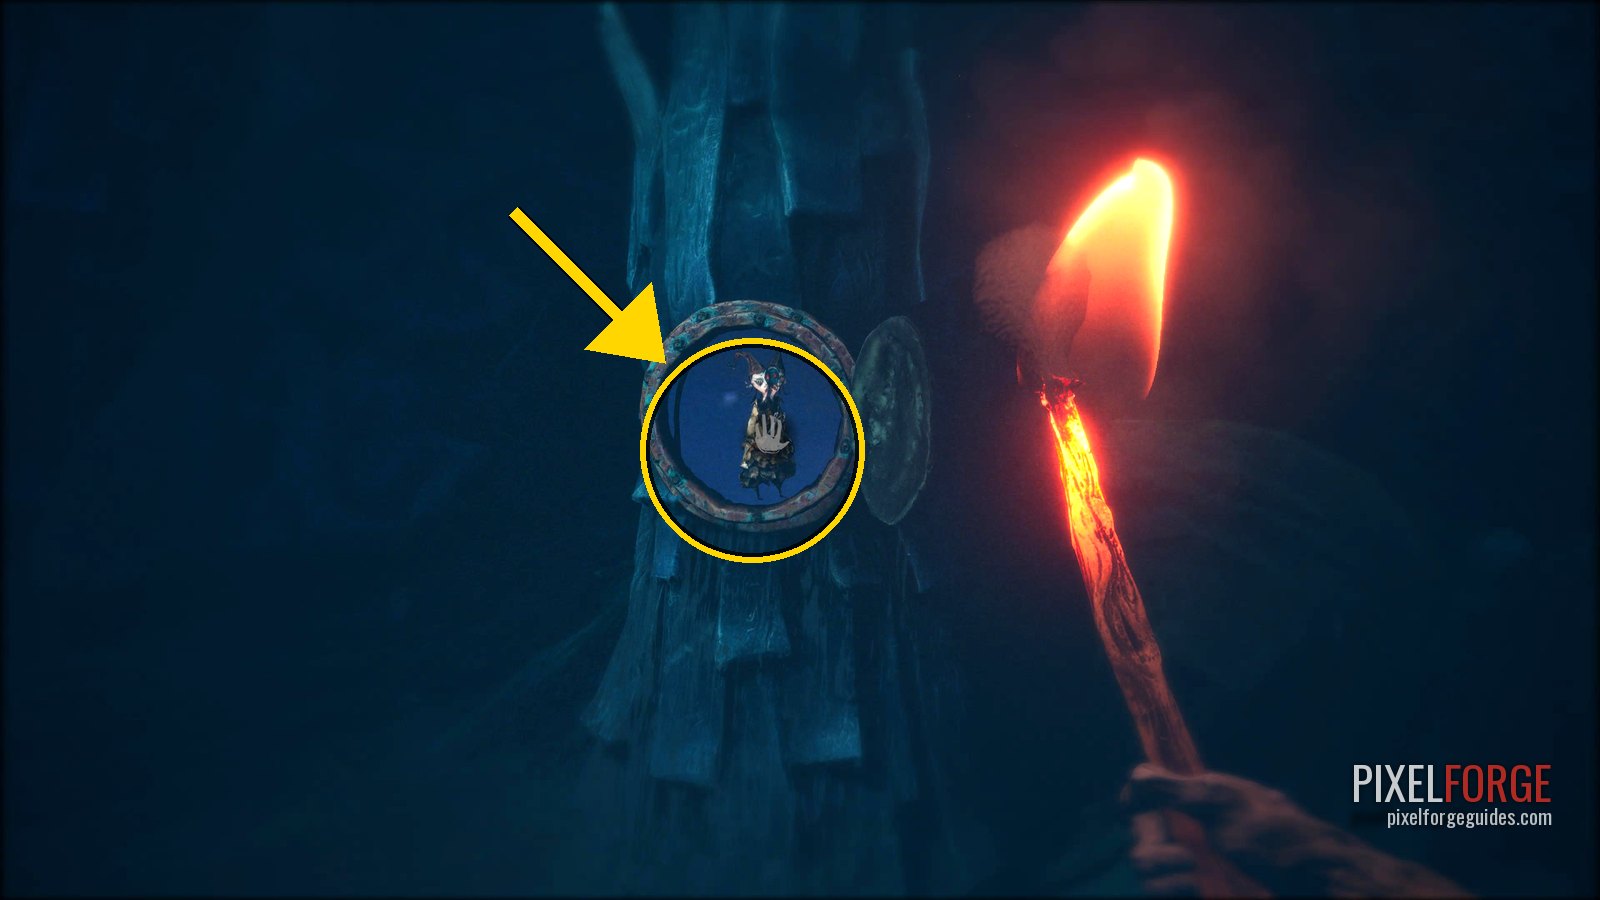 |
| Clay Figurine 4/19 · Body Chapter 1: The Tale of the Burnt One | To the right of the door that opens with four candles, by the first wardrobe you can hide in. |  |
| Clay Figurine 5/19 · The Headmaster Chapter 2: The Tale of the Loathsome Molgrim | After the chapter title, the villagers mock you as a “limb tree”. It's on the left of the path, in front of them. | 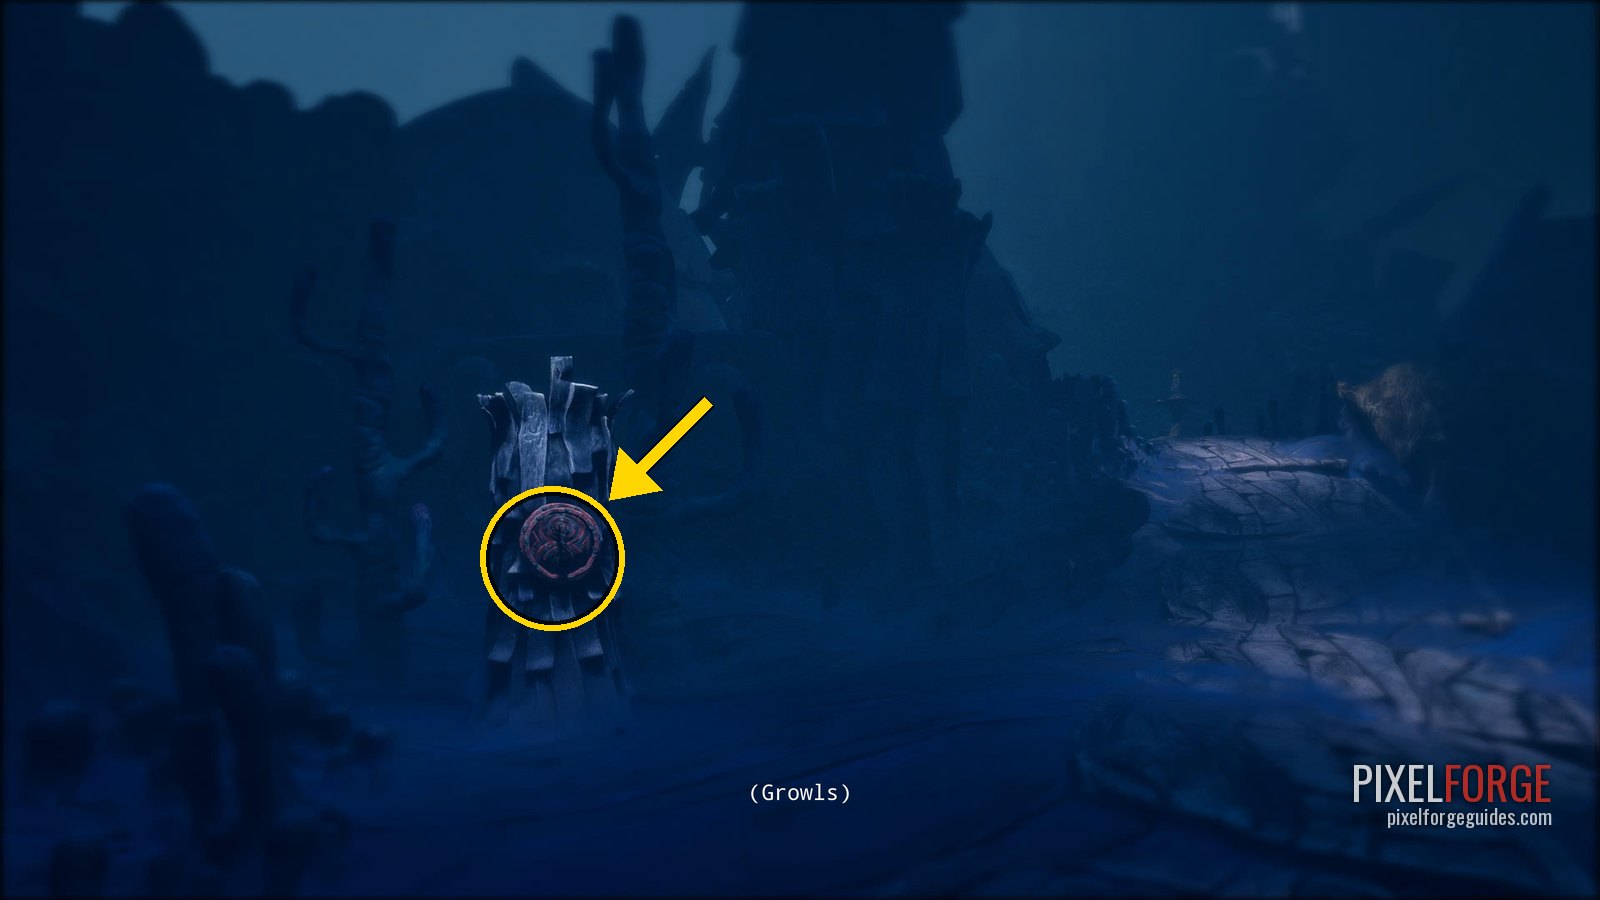 |
| Clay Figurine 6/19 · The Old Man Chapter 2: The Tale of the Loathsome Molgrim | Back in the swamp after the monster cave, there are three blue candles that show the routes to the three fragments. Take the path to the left of them first: a hatch in the next area. | 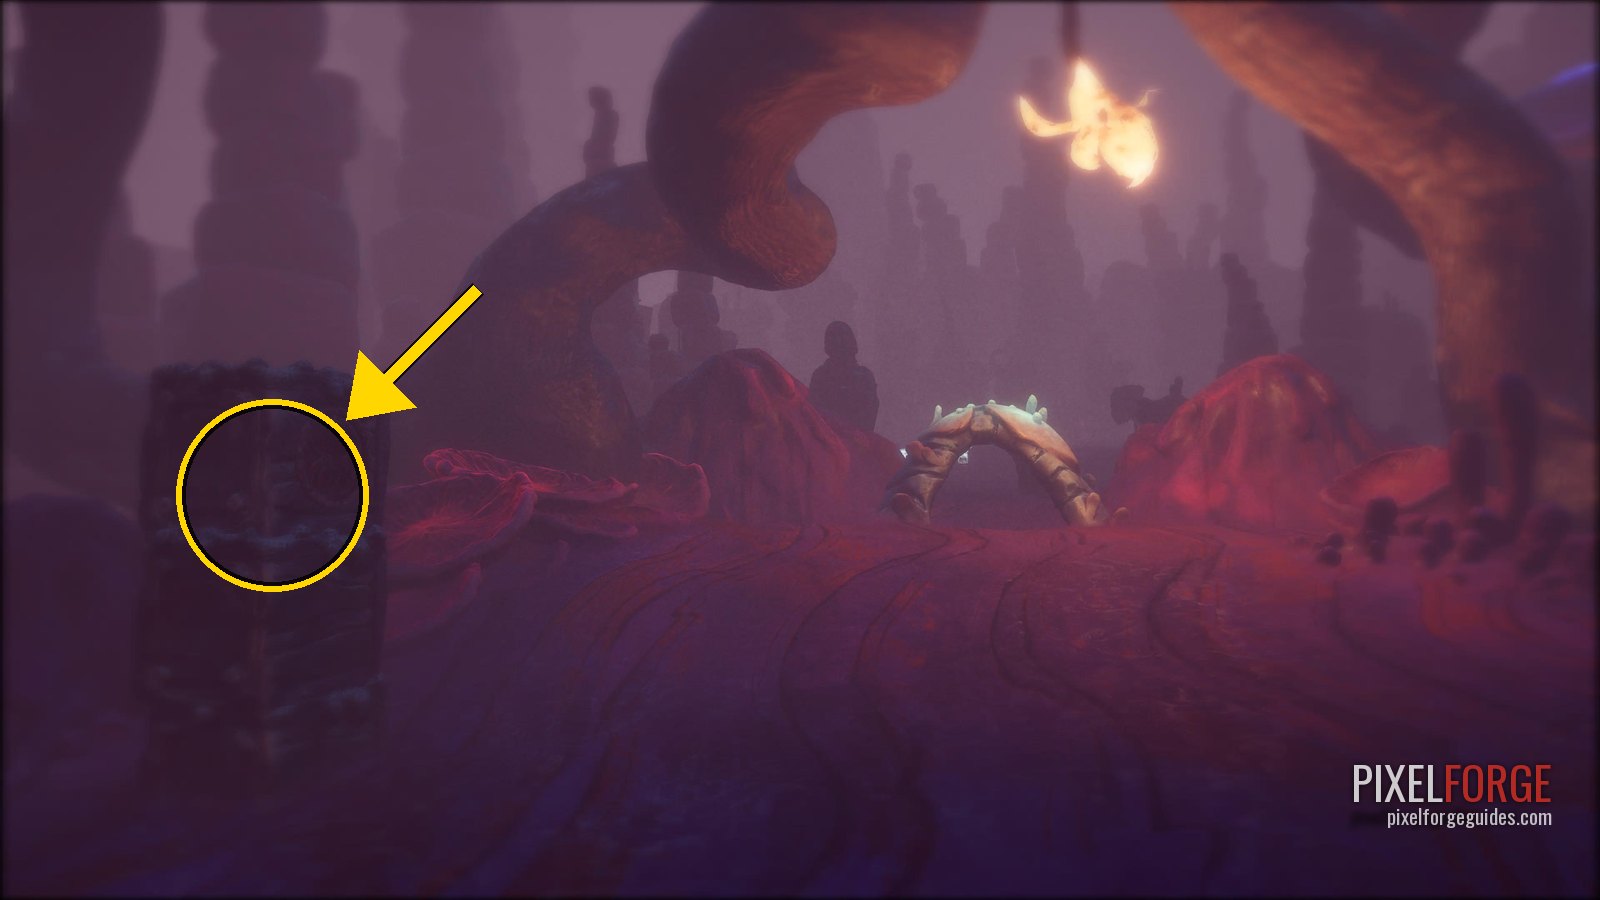 |
| Clay Figurine 7/19 · The Molgrim Chapter 2: The Tale of the Loathsome Molgrim | In the open area with the villager just after Shellphone 11: a hatch in plain view. | 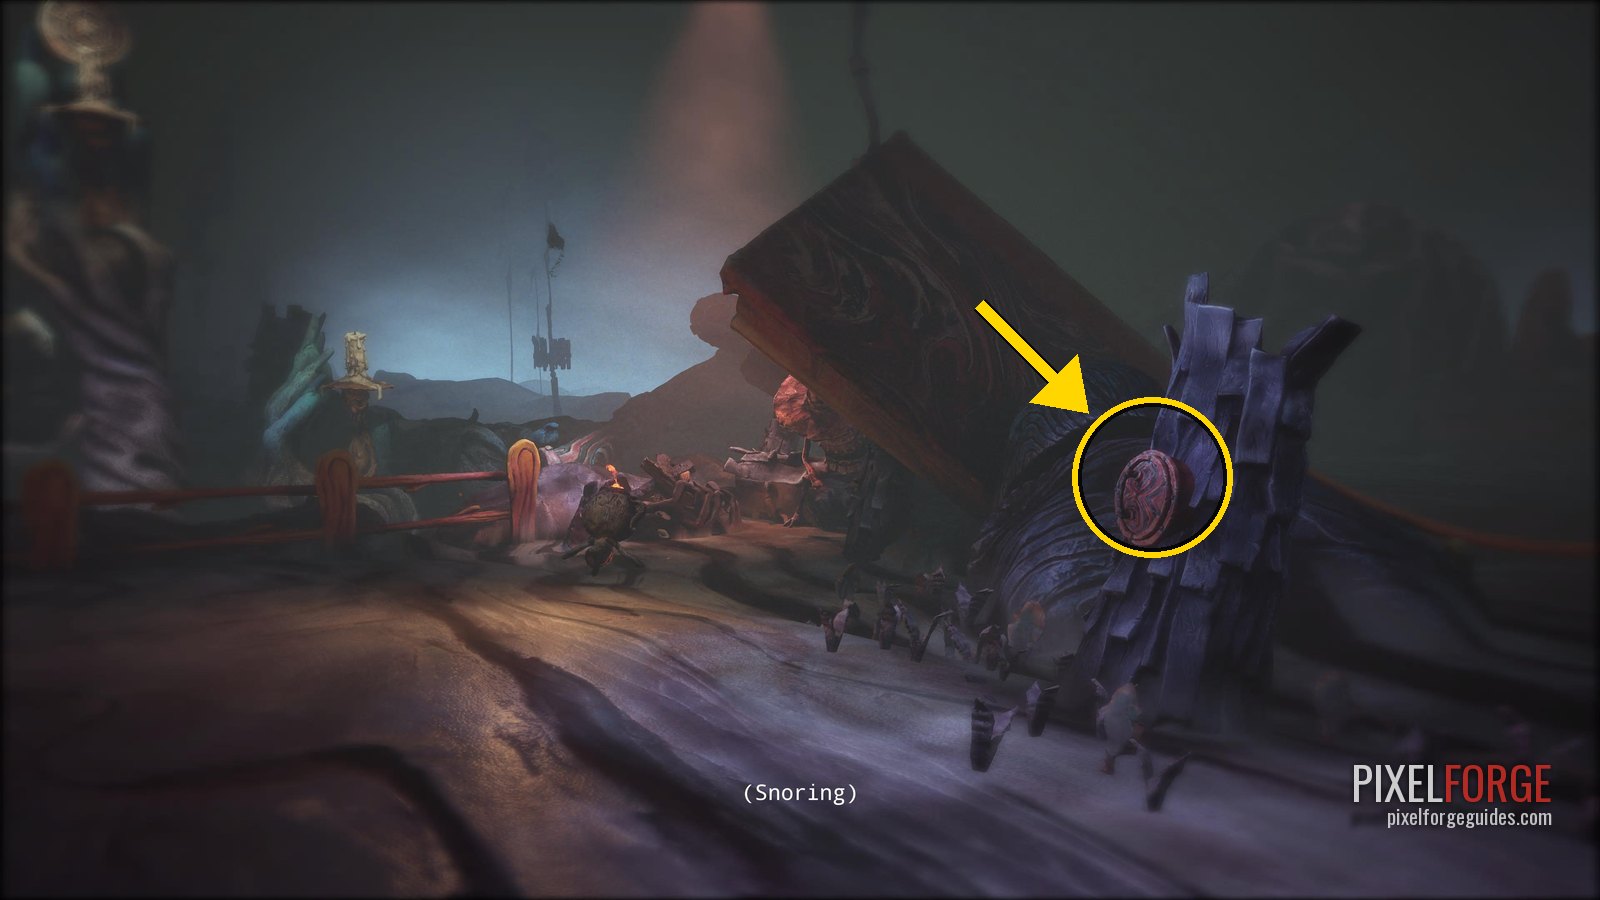 |
| Clay Figurine 8/19 · The Moonbird Chapter 3: The Tale of Coalhaven | Keep following the dark tracks to the next split and take the right-hand tracks again to a hatch. | 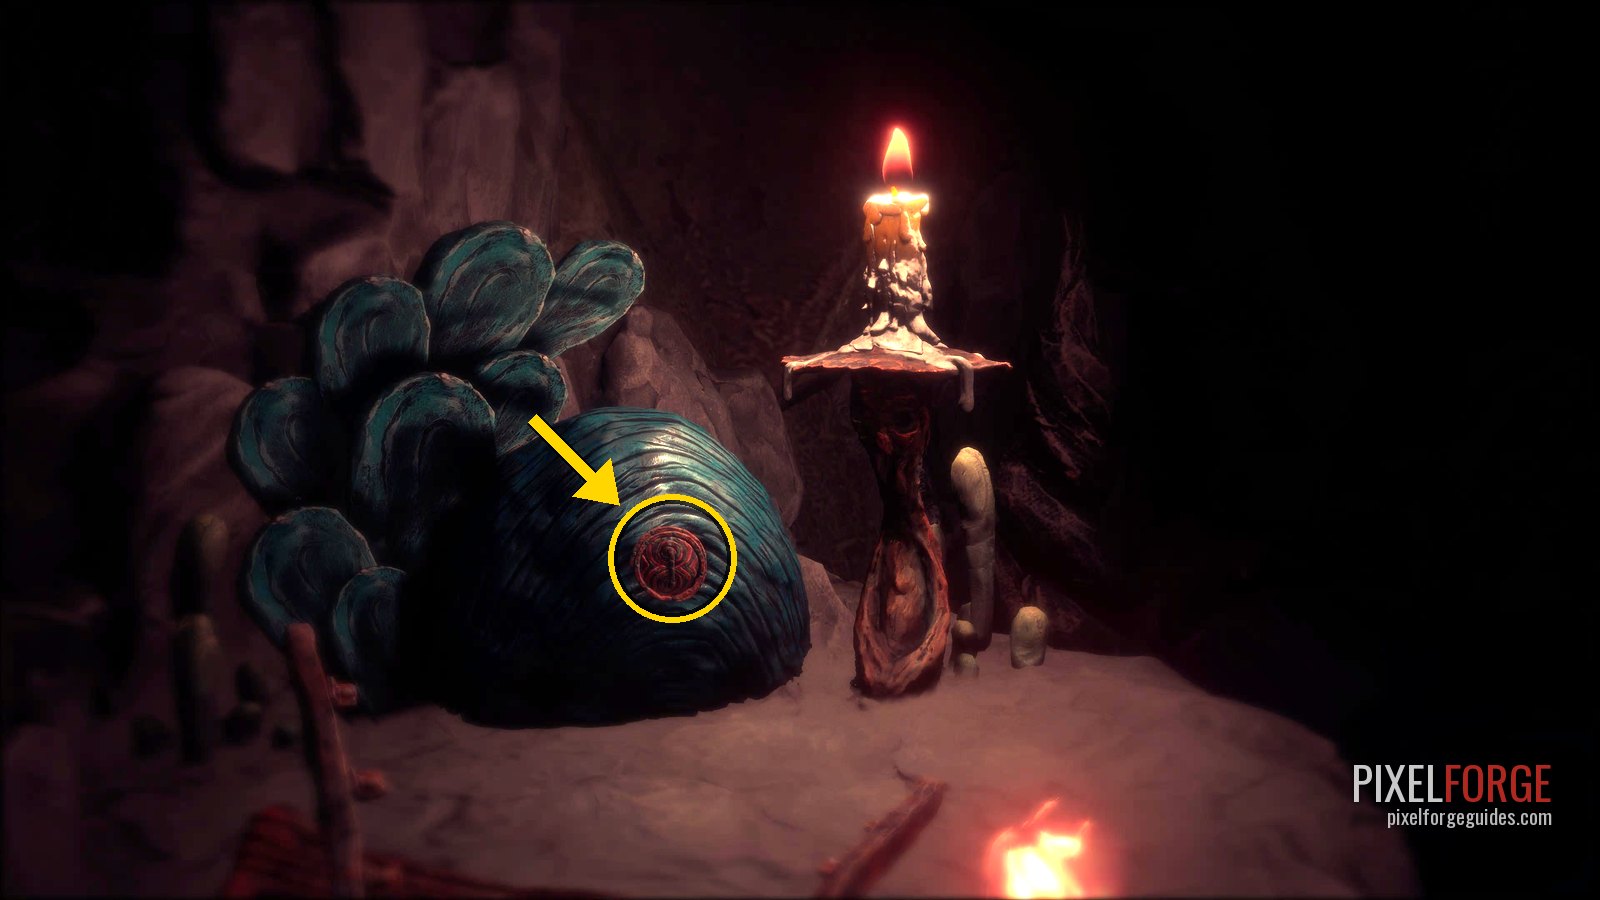 |
| Clay Figurine 9/19 · The Soulfisher Chapter 3: The Tale of Coalhaven | Take the path left of Shellphone 16, go under the small bridge, and climb the stairs on your right just past it. | 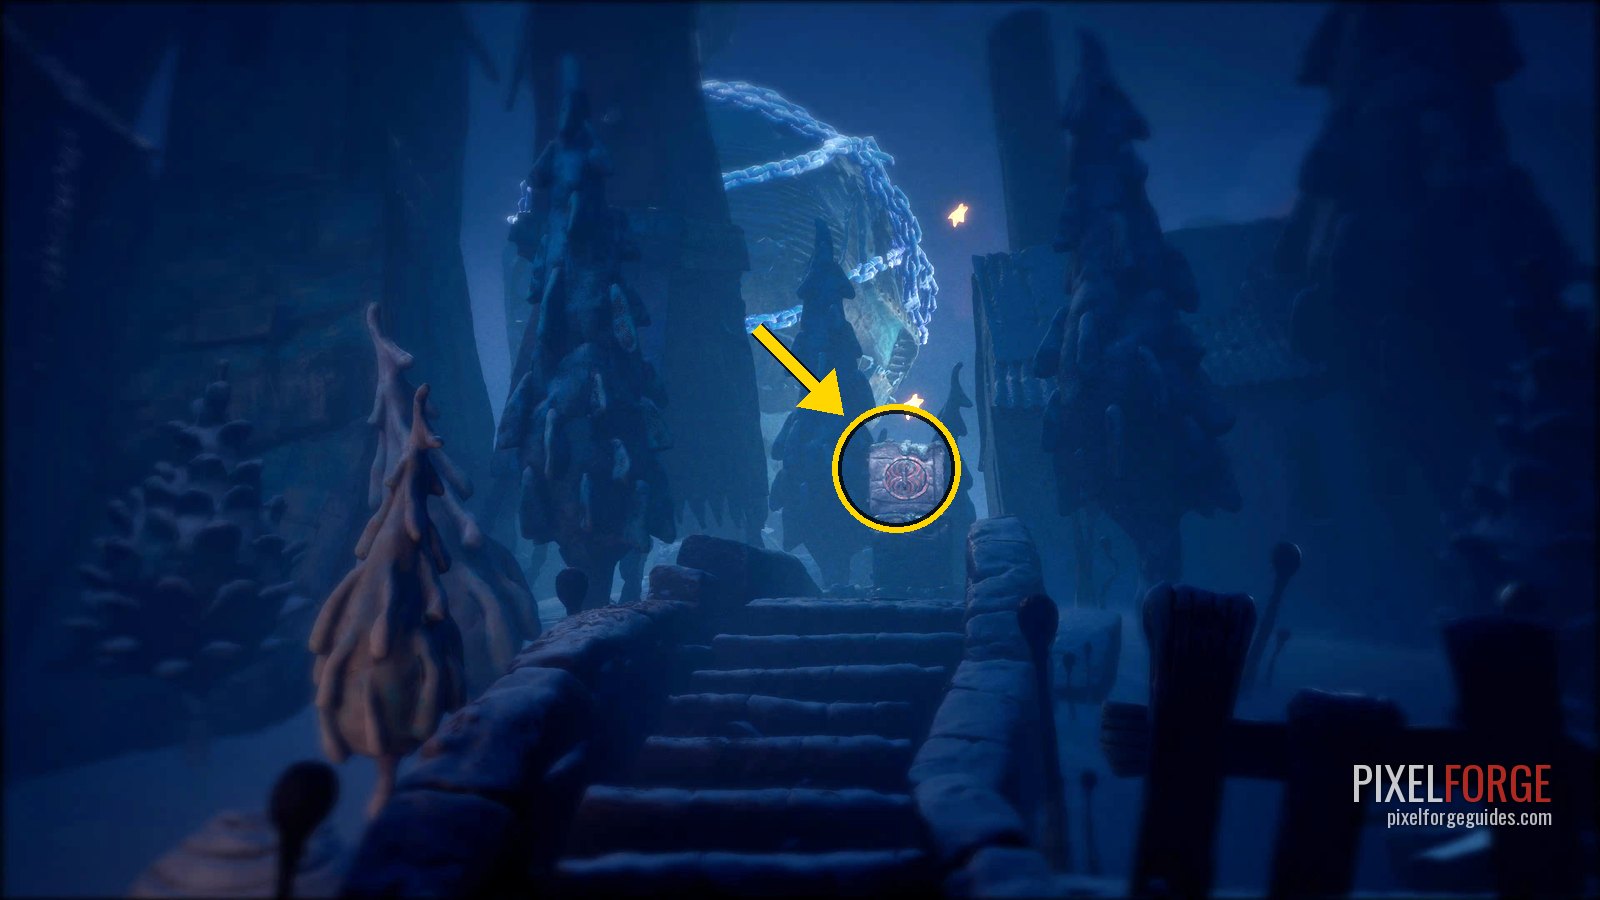 |
| Clay Figurine 10/19 · A Nameless Creature Chapter 3: The Tale of Coalhaven | Back in the open area, cross the middle bridge over the frozen lake, go left to two flights of stairs and climb the right-hand one. | 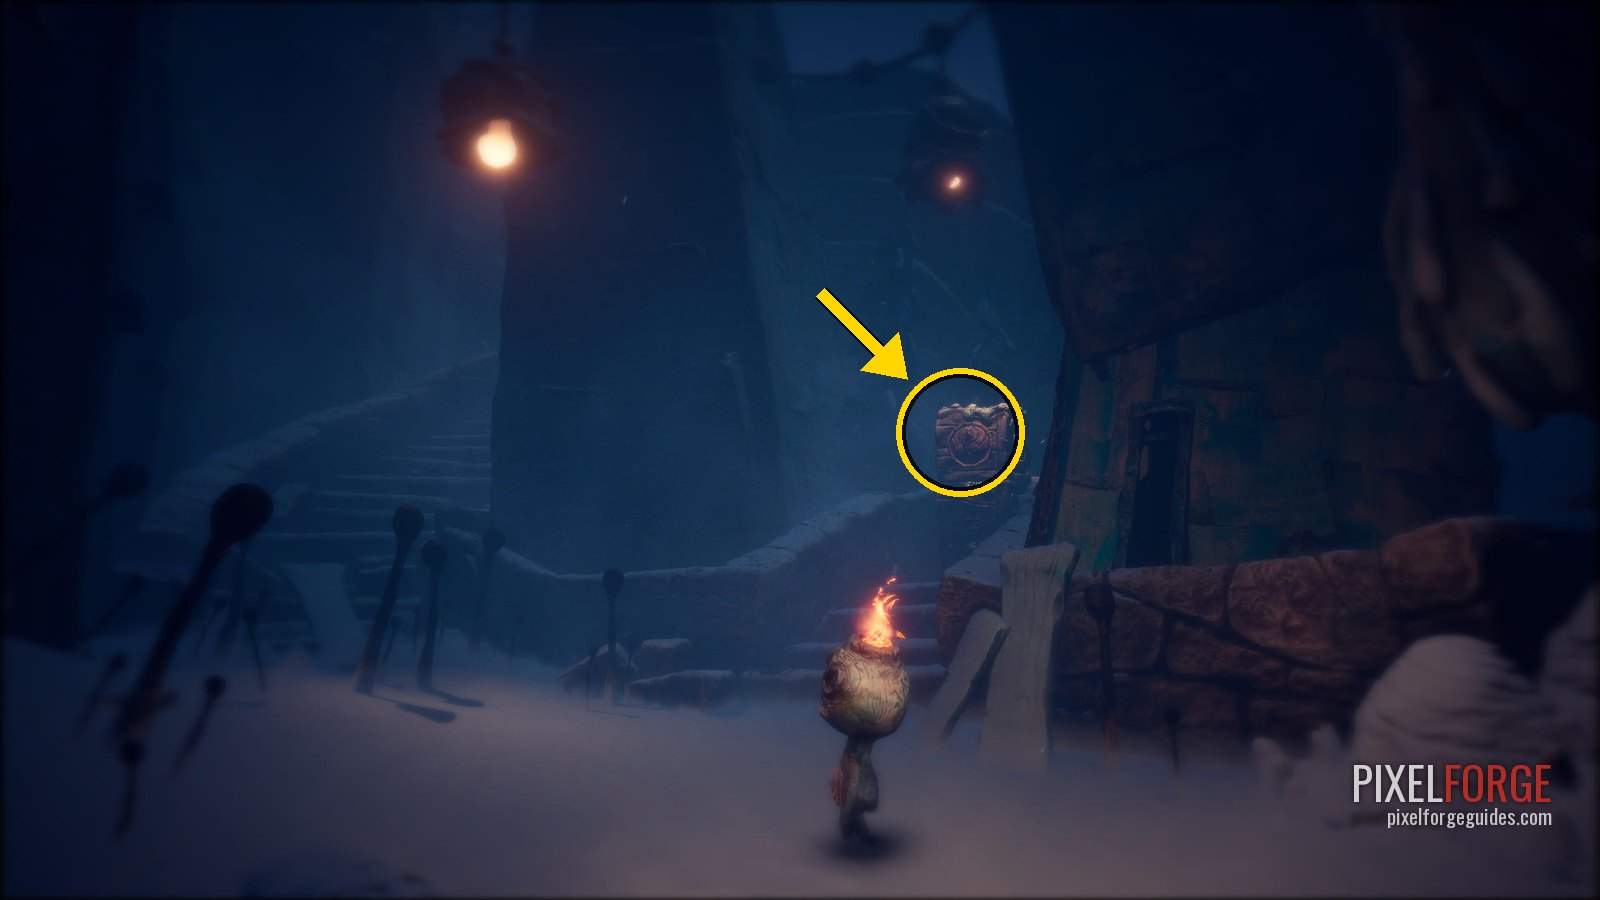 |
| Clay Figurine 11/19 · The Crawler Chapter 3: The Tale of Coalhaven | In the village with the house on the hill, sneak past the crawlers and take the house key. Follow the main path: a hatch in plain view. | 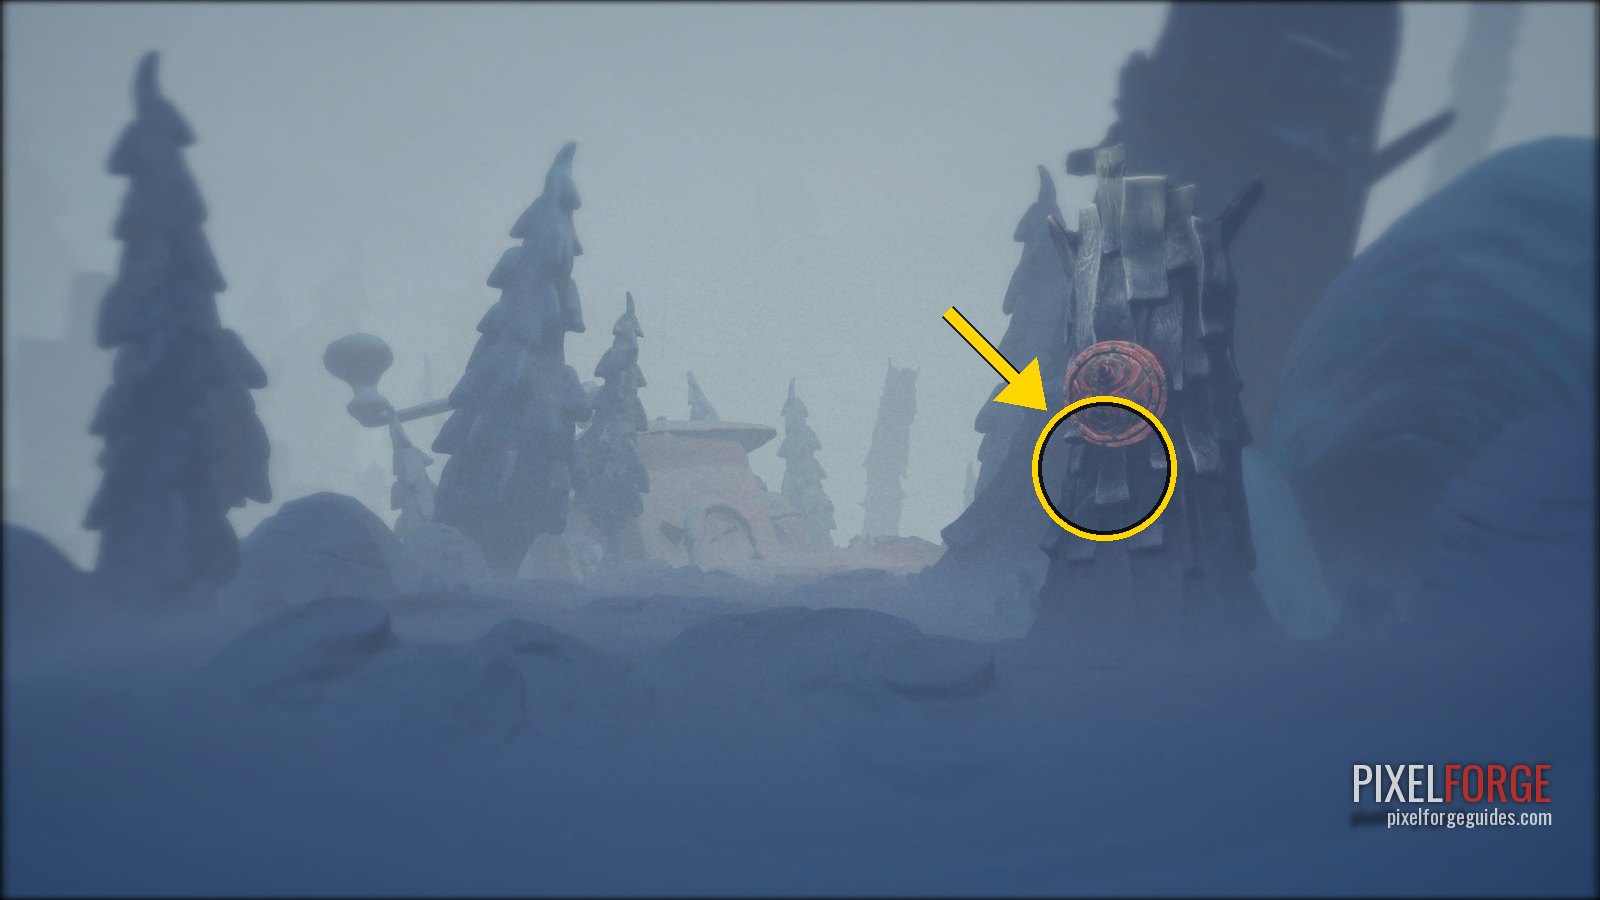 |
| Clay Figurine 12/19 · Auntie Murkle Chapter 3: The Tale of Coalhaven | Put the left arm in the grave to open the last path. Go through the door and look right: a hatch. | 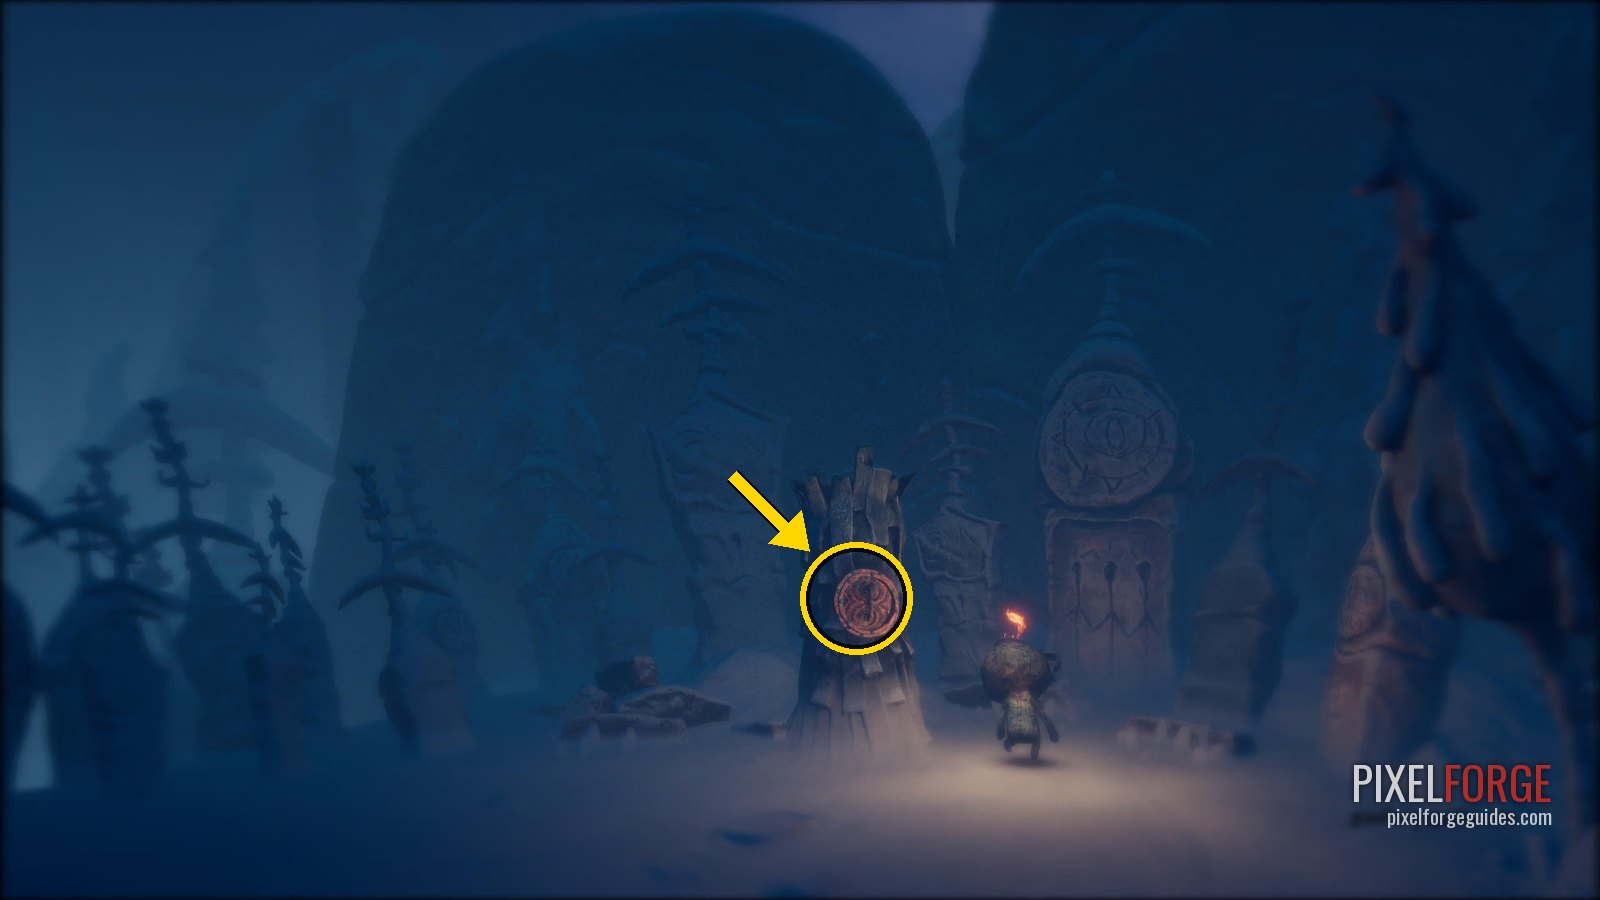 |
| Clay Figurine 13/19 · The Ghost of Coalhaven Chapter 4: The Tale of the Craftsman's Heart | After the third projector, in the dark tunnel with the blue candles and the Grinners: at the second wardrobe take the path on your right. | 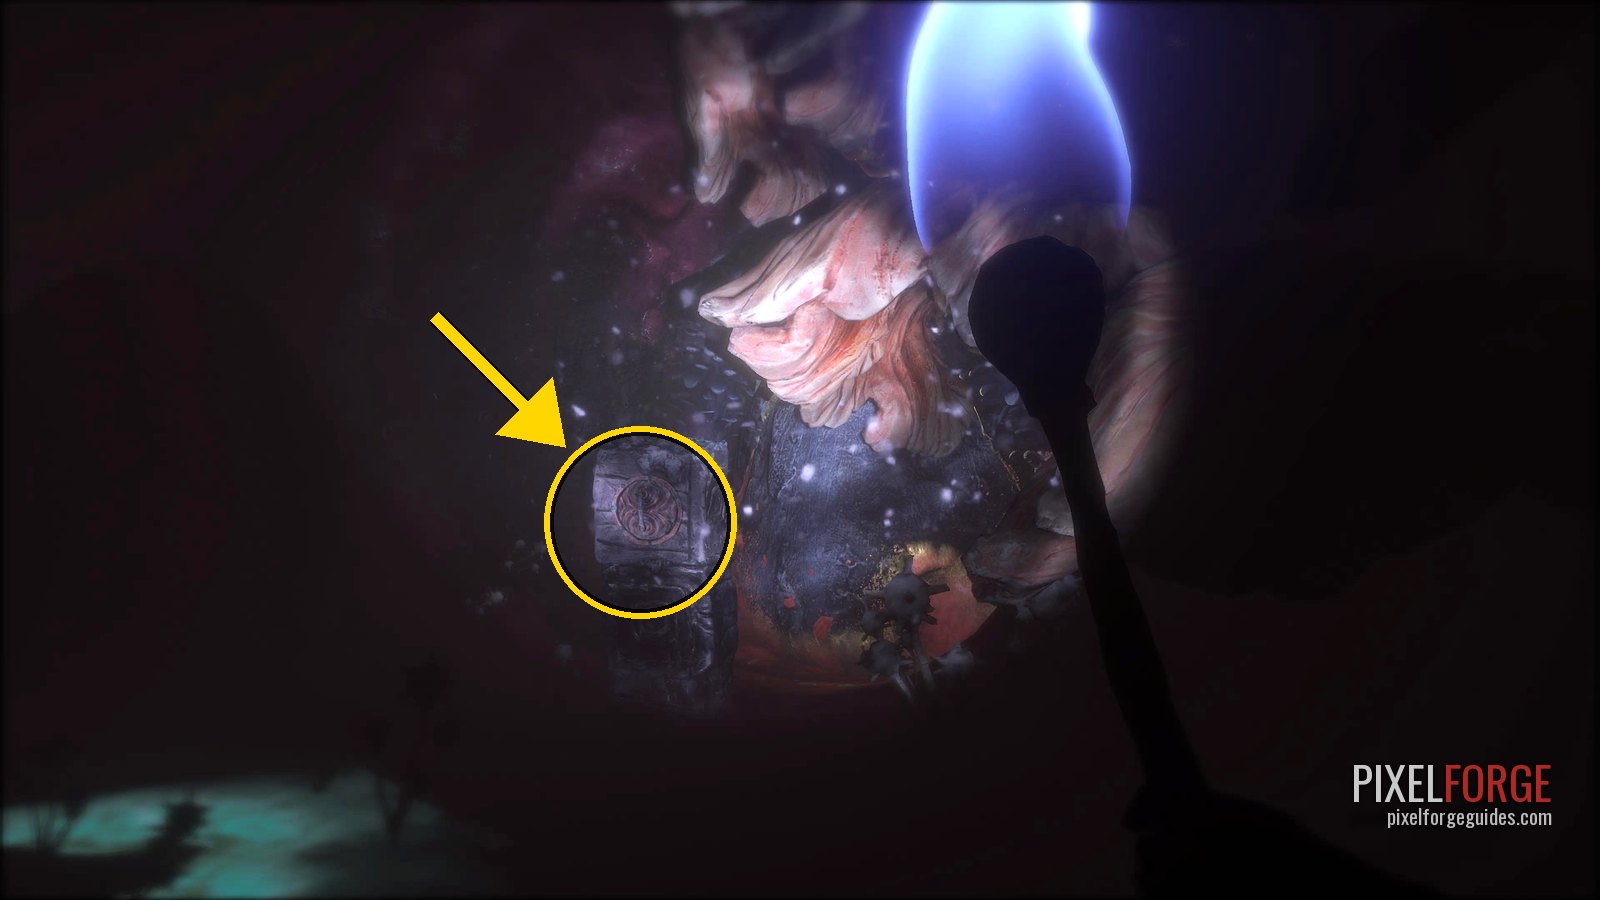 |
| Clay Figurine 14/19 · The Groundskeeper Chapter 4: The Tale of the Craftsman's Heart | You leave the tunnels on a flying contraption into an area with another projector. Left side, in the shadows near a red door. | 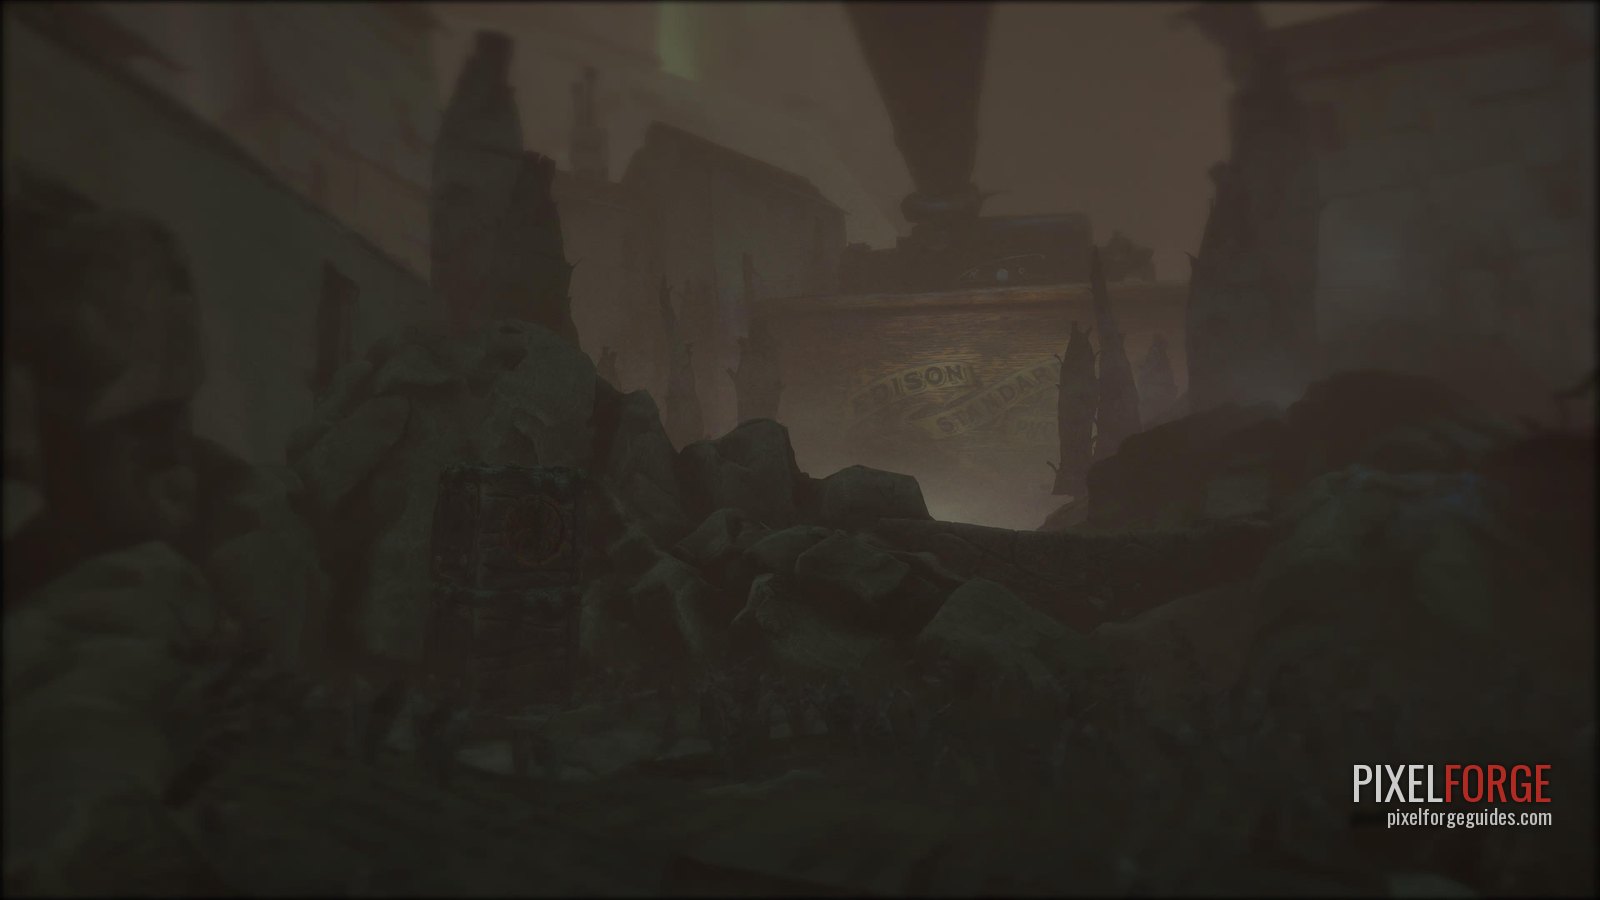 |
| Clay Figurine 15/19 · The Thief Chapter 5: The Tale of the Dark | Same area: a hatch on the tree trunk by the cliff. | 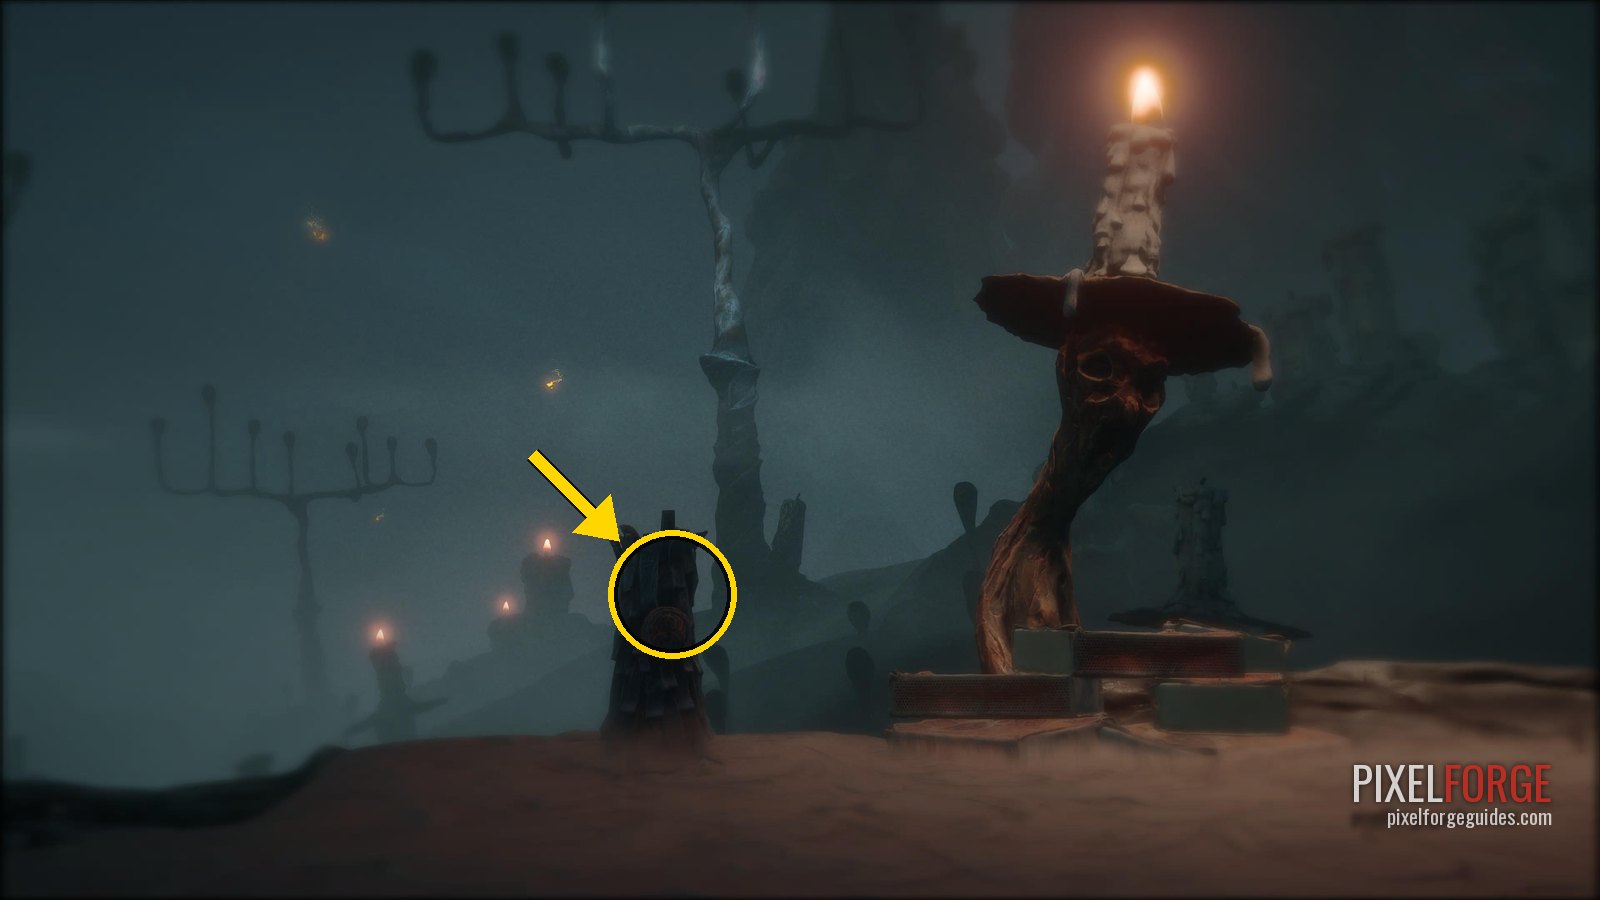 |
| Clay Figurine 16/19 · A Craftsman Chapter 5: The Tale of the Dark | When you meet the character at his camp again, there's a pier to the left of the camp. It's at the end of the pier. | 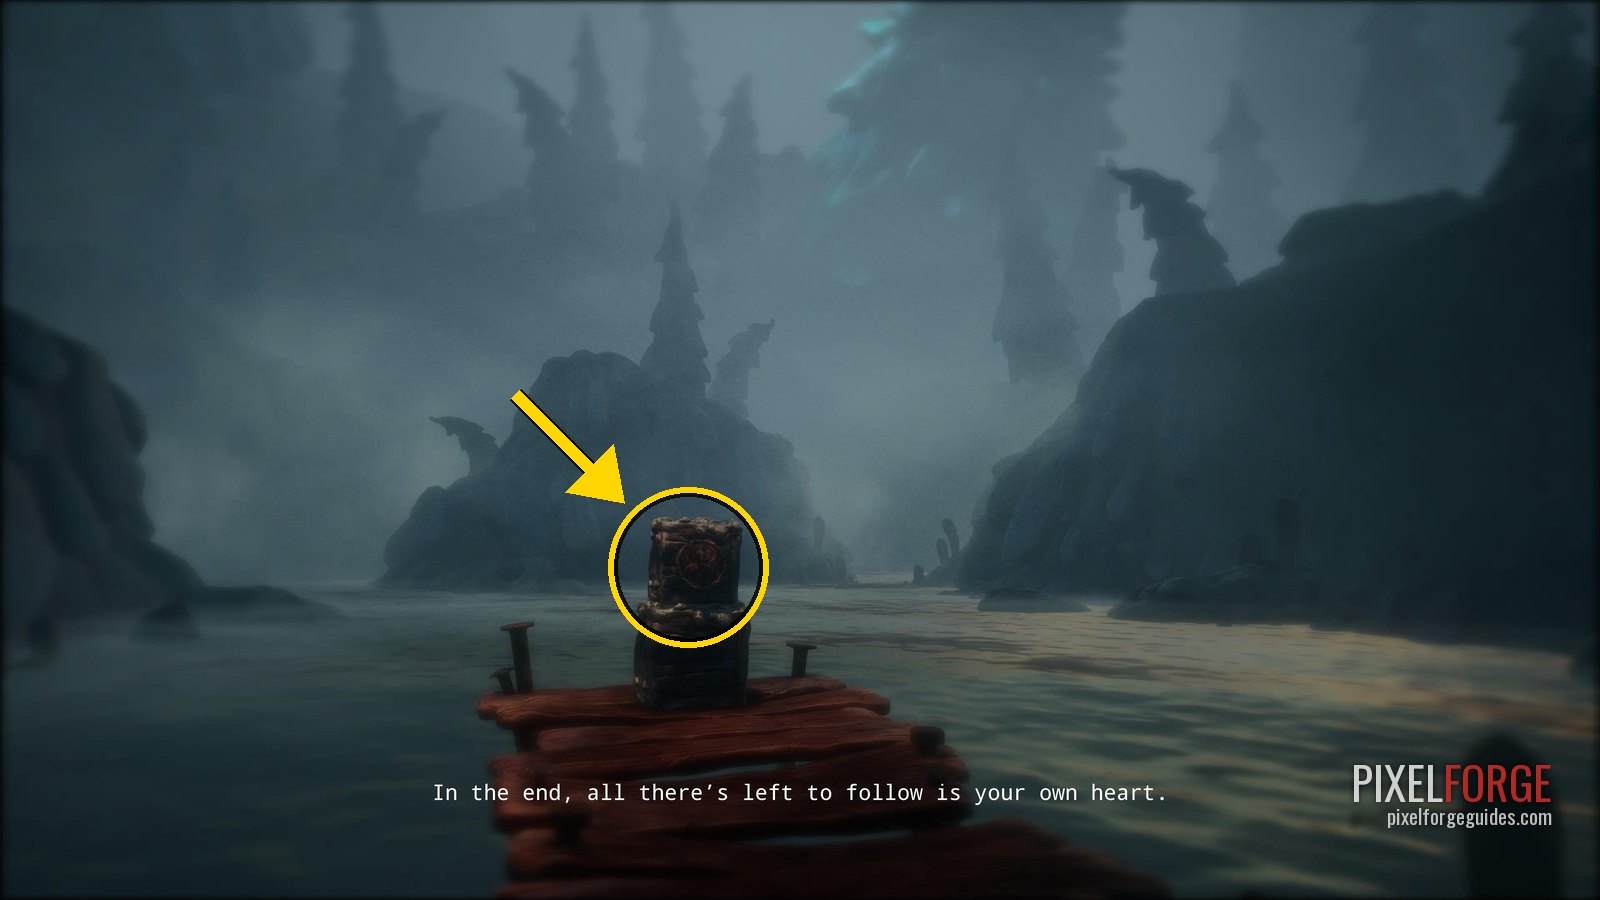 |
| Clay Figurine 17/19 · Housy the House Chapter 5: The Tale of the Dark | At the bonfire where Potboy talks to another character: a hatch to the left of the fire. | 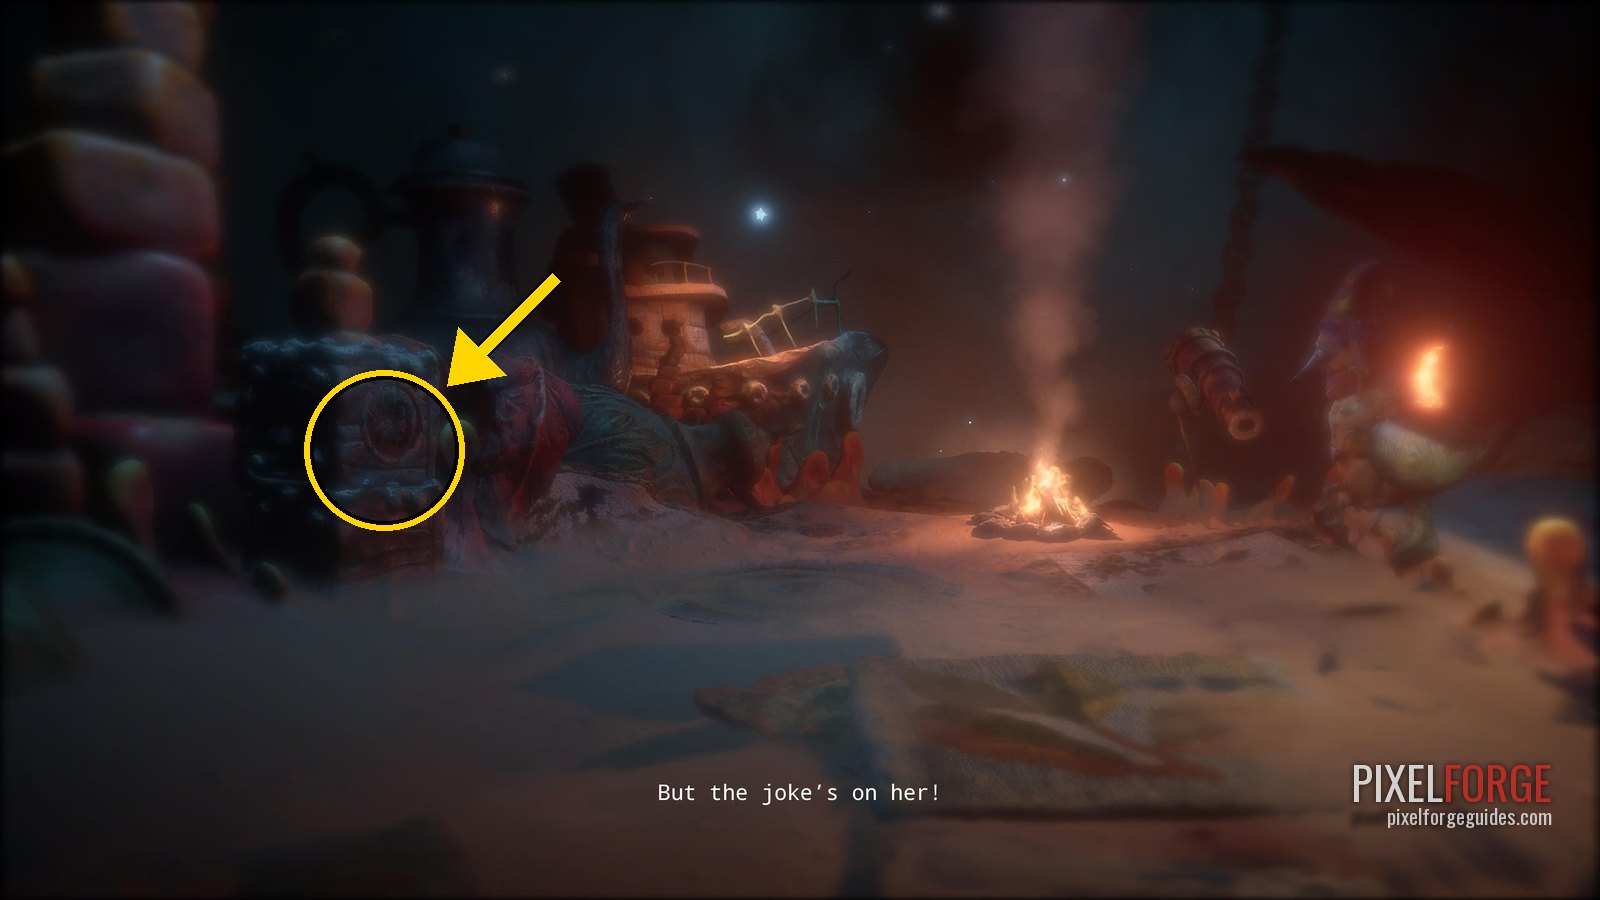 |
| Clay Figurine 18/19 · The Grinner Chapter 6: The Tale of Moon Mountain | Right at the start of the chapter, next to the character there. | 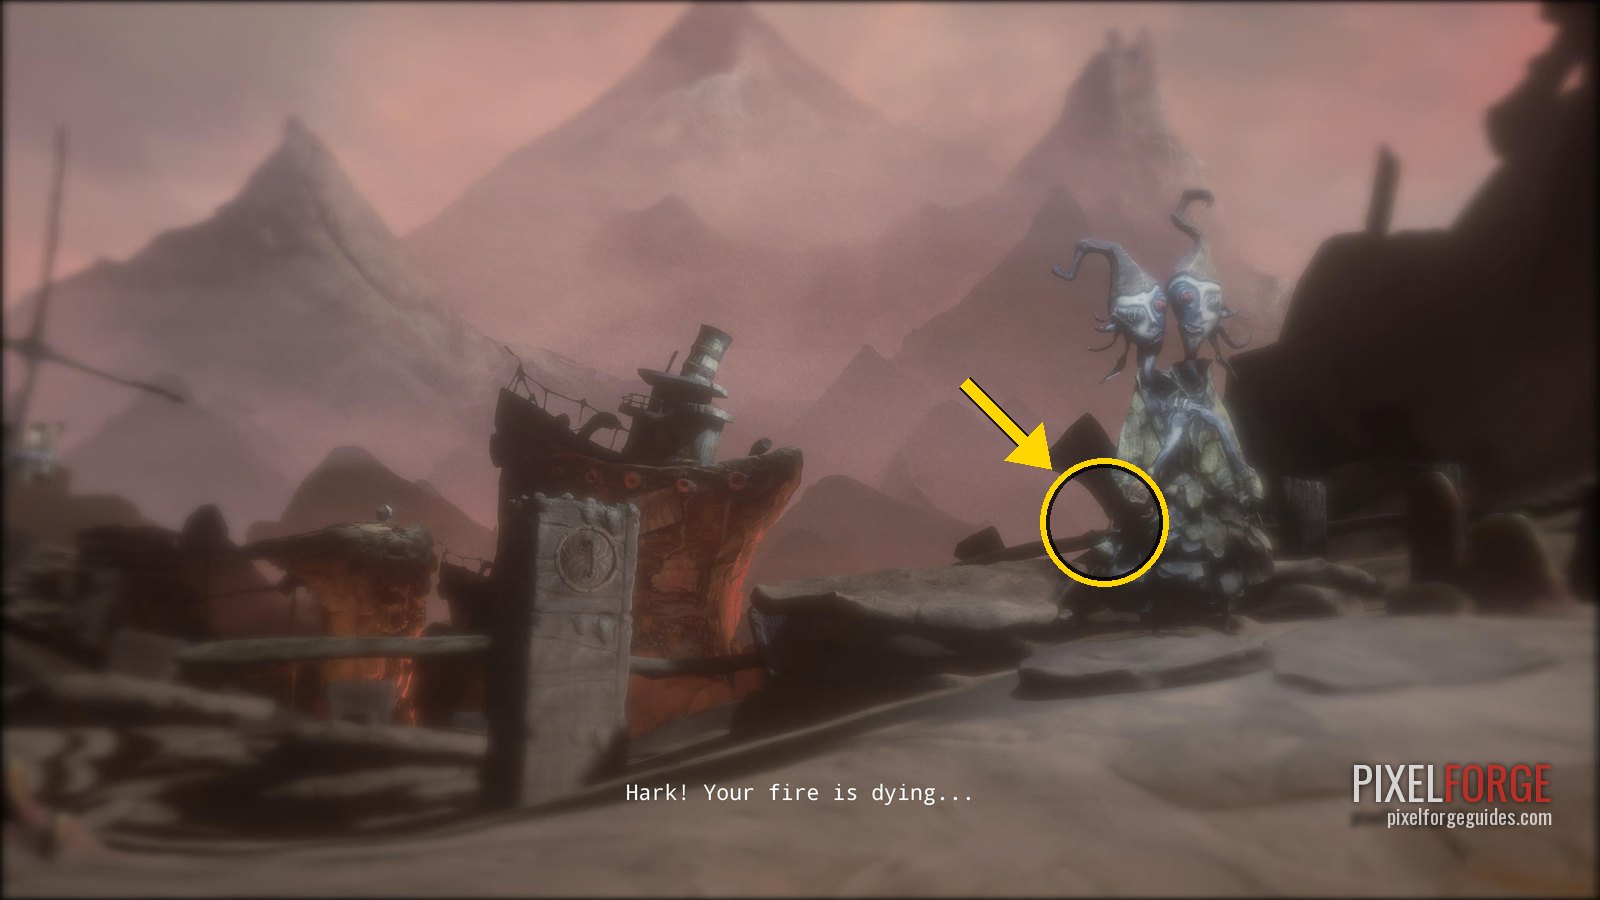 |
| Clay Figurine 19/19 · Potboy Chapter 6: The Tale of Moon Mountain | At the top of the mountain after the long climb against the wind, when the screen fades to white, look left. Last figurine: Mad God. | 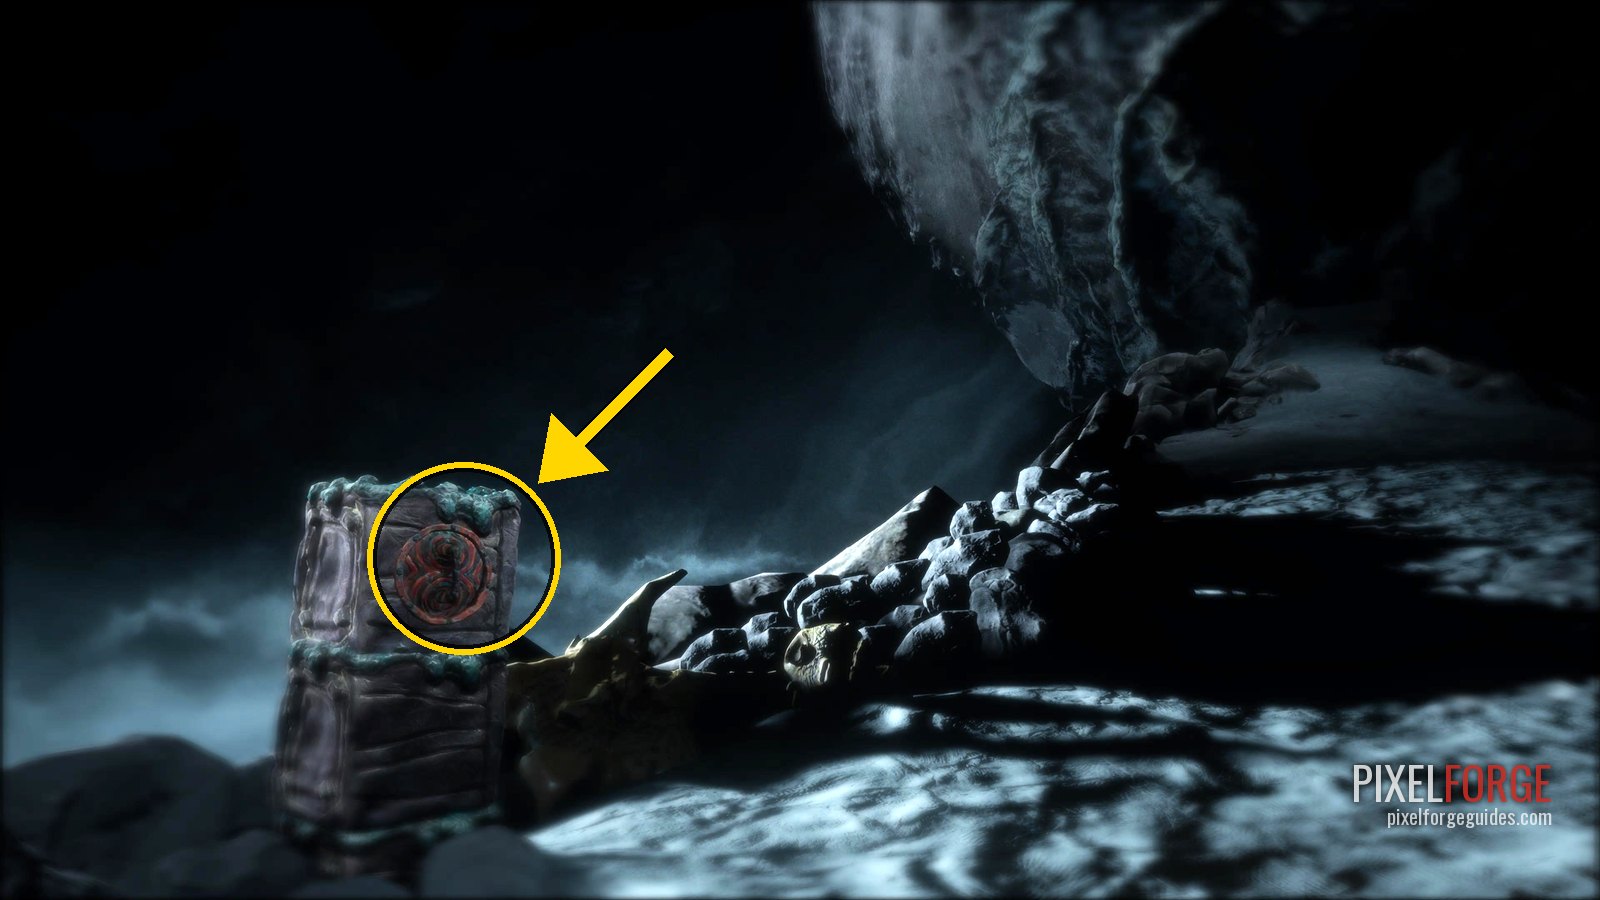 |
Shellphones (Who's There?) 25
| Collectible | Exactly where | Our screenshot |
|---|---|---|
| Shellphone 1/25 Chapter 1: The Tale of the Burnt One | Just before the first door that opens after you light three candles, step onto the wooden walkway on the left. | 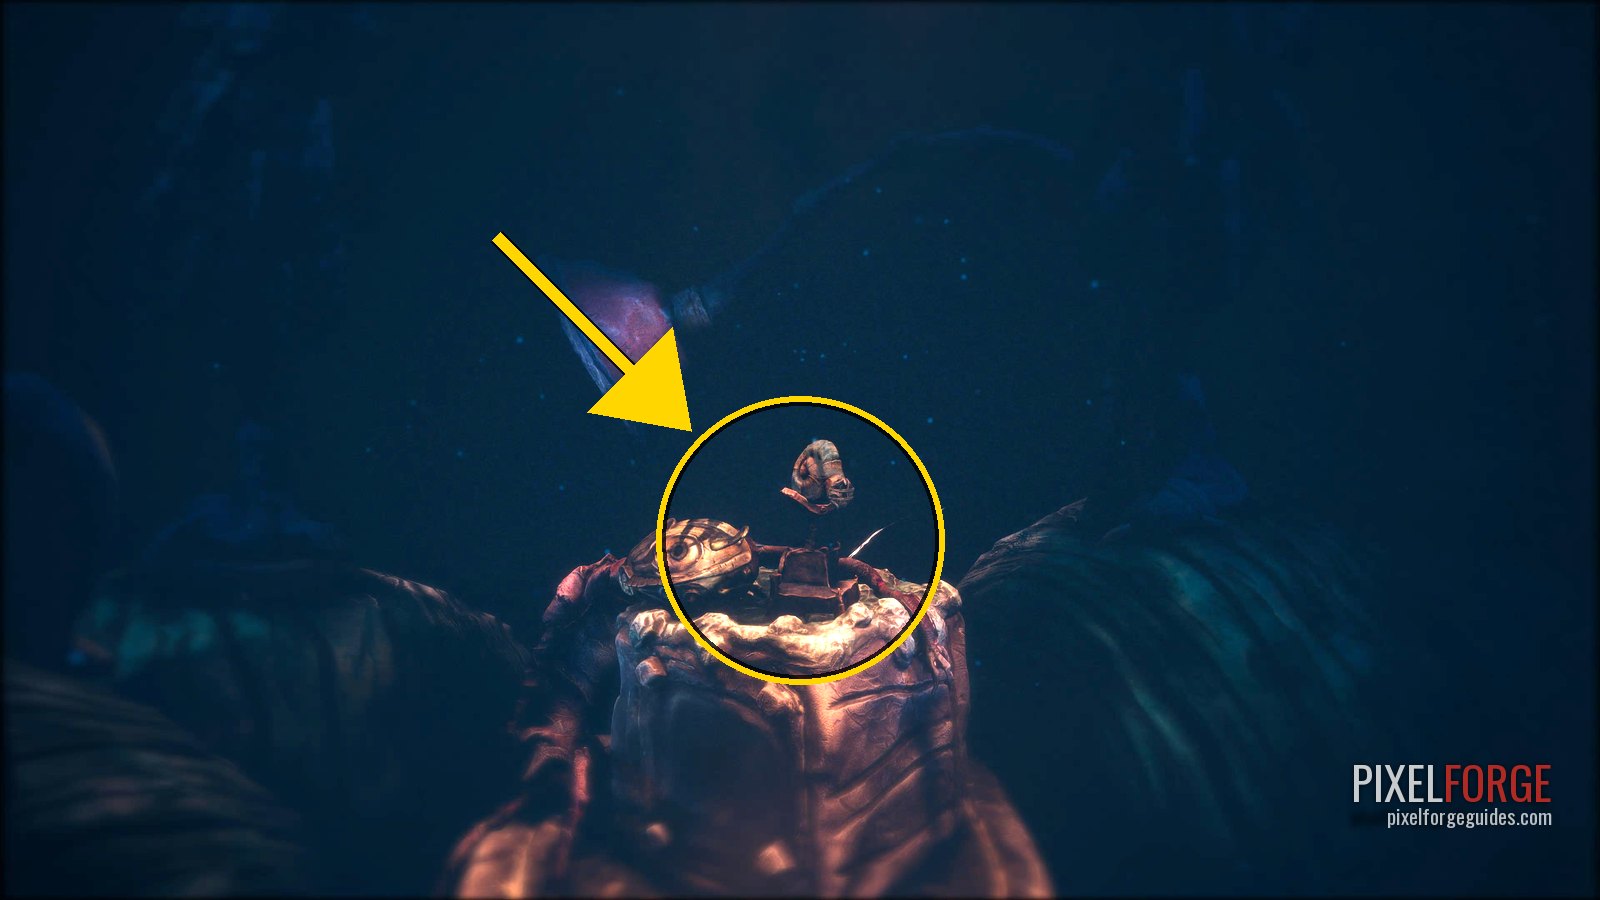 |
| Shellphone 2/25 Chapter 1: The Tale of the Burnt One | Right after you send Potboy through the pipe to drop the bridge over the gap, it's on the right of the path. | 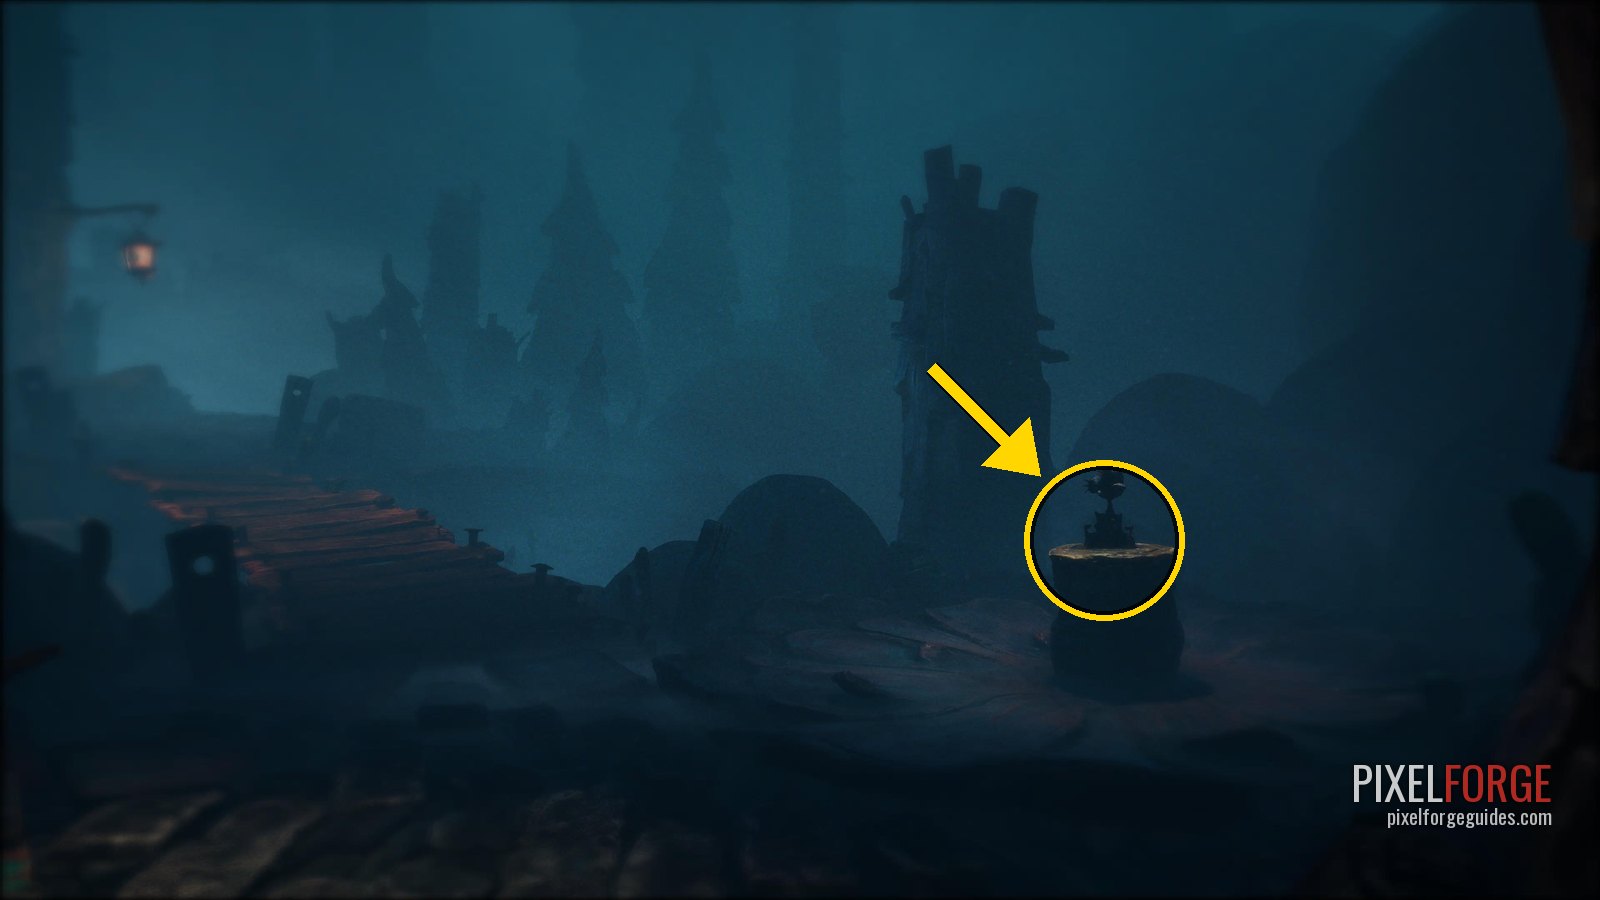 |
| Shellphone 3/25 Chapter 1: The Tale of the Burnt One | After the cave door that needs three candles, on the left of the path. | 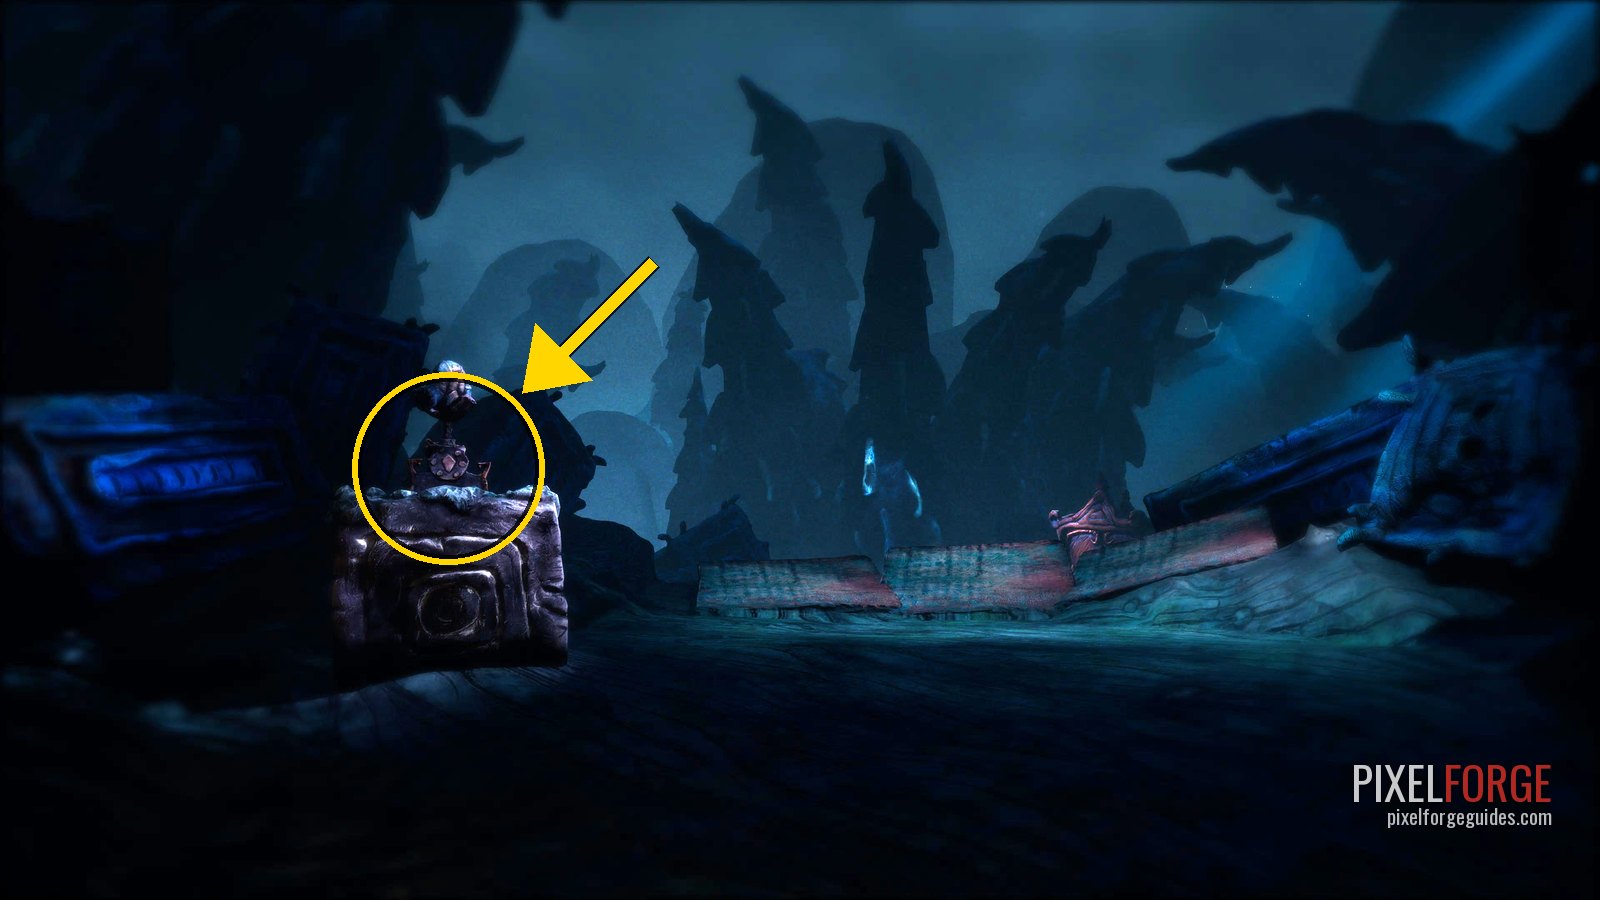 |
| Shellphone 4/25 Chapter 2: The Tale of the Loathsome Molgrim | On the main path, right after you turn left. | 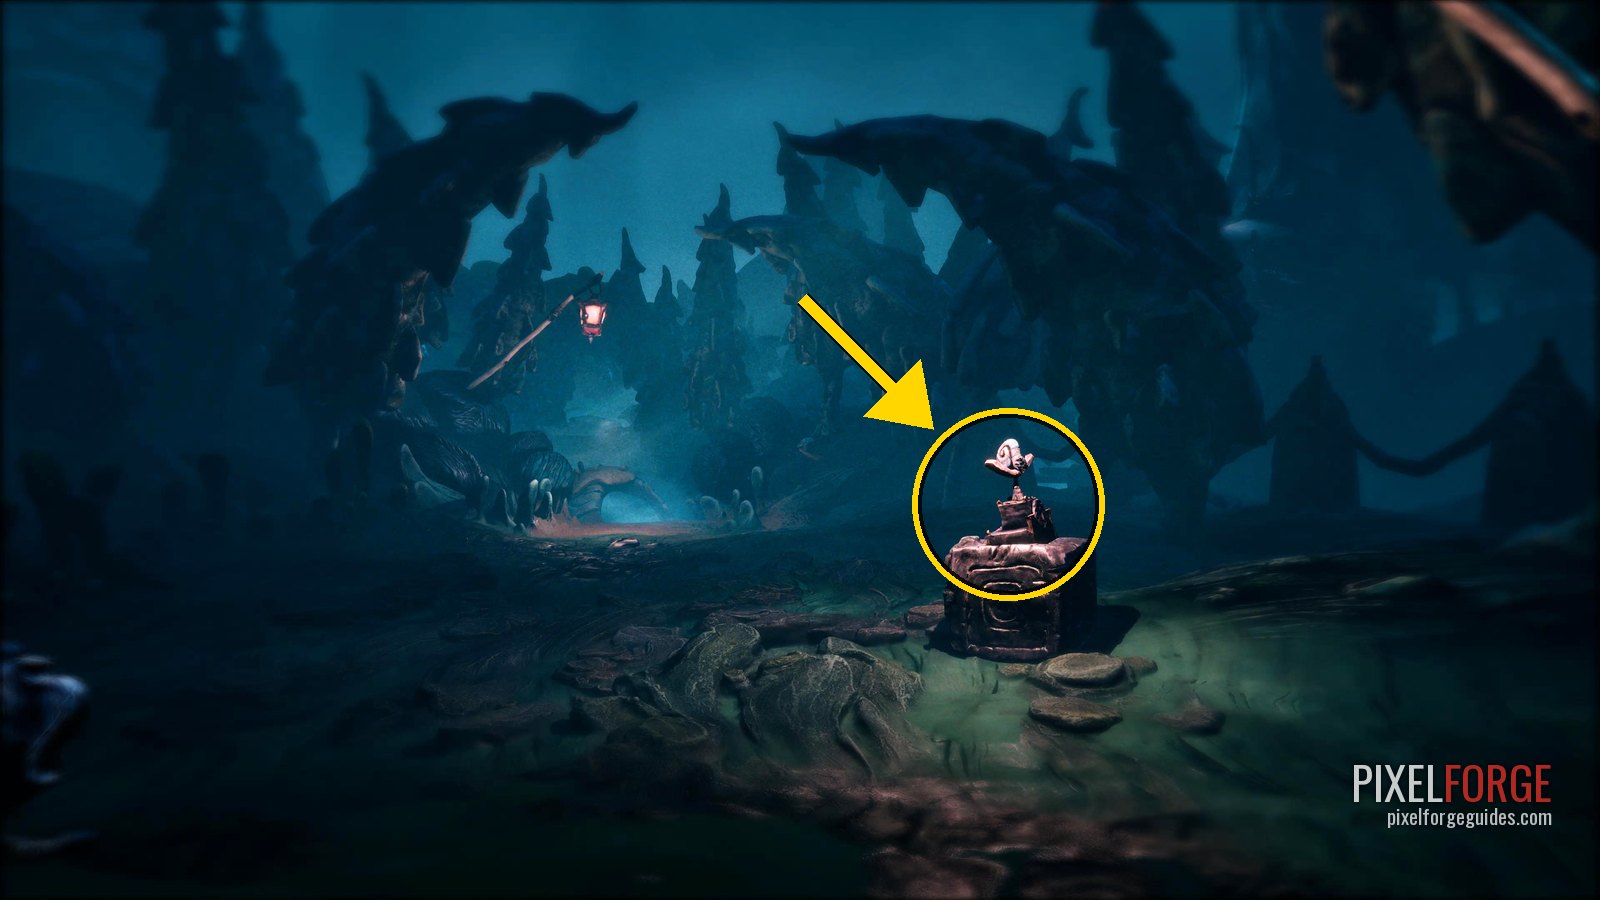 |
| Shellphone 5/25 Chapter 2: The Tale of the Loathsome Molgrim | At the first monster, where the game teaches you to hide: past that wardrobe, crawl through the small hole on the right. It's on the other side. | 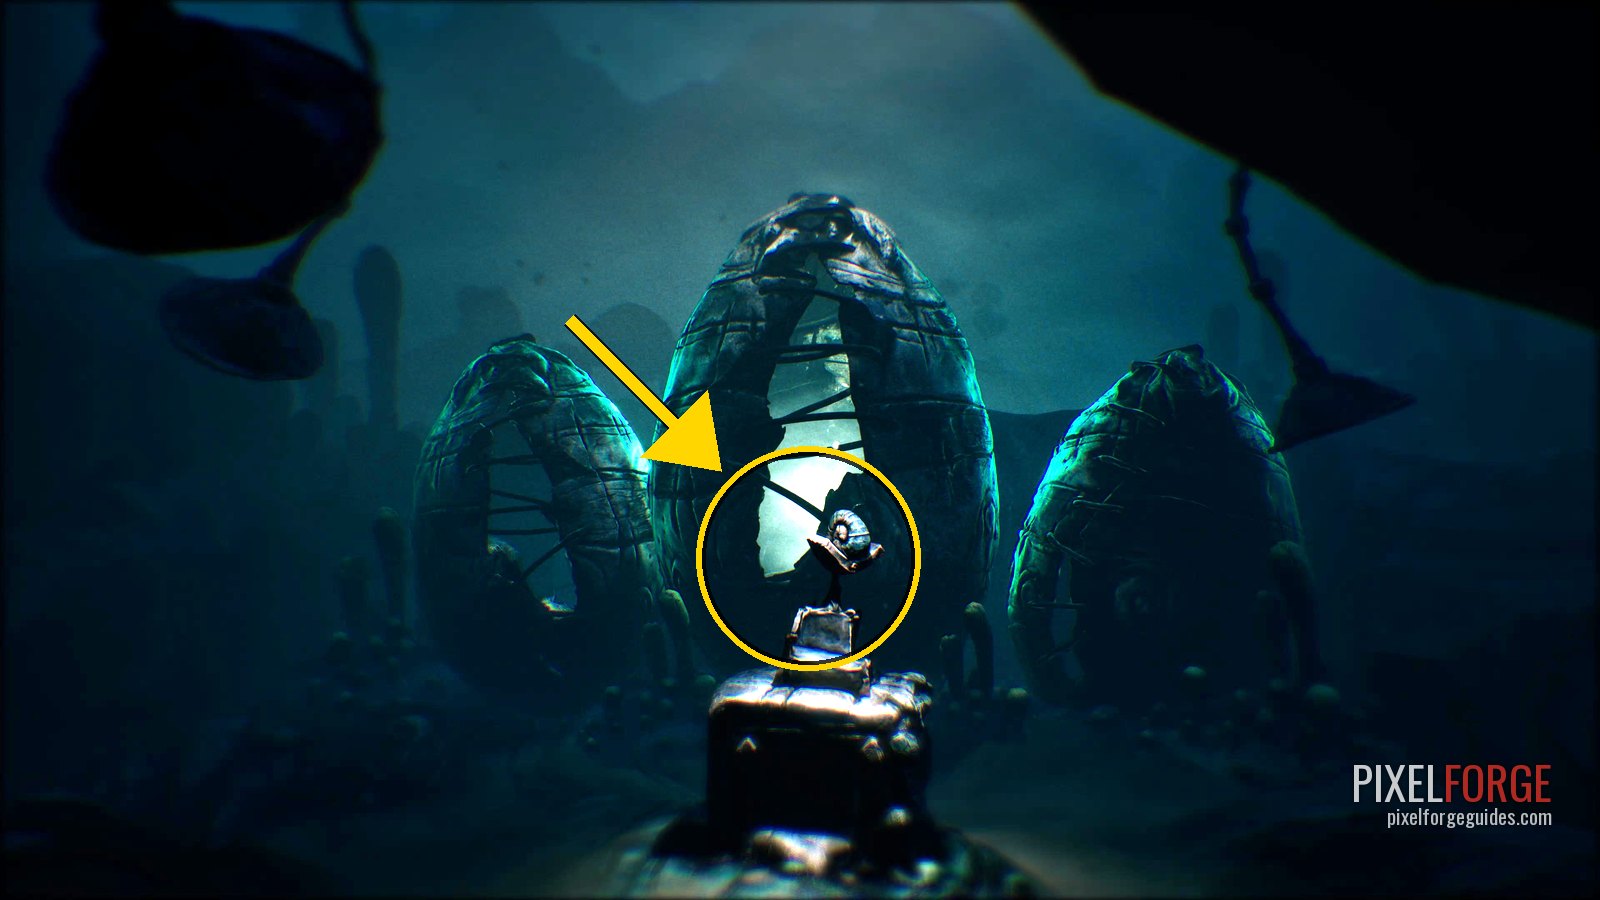 |
| Shellphone 6/25 Chapter 2: The Tale of the Loathsome Molgrim | Back with Housy, follow the path until the screen goes dark and two white eyes appear: it's on the left, by a matchbox. | 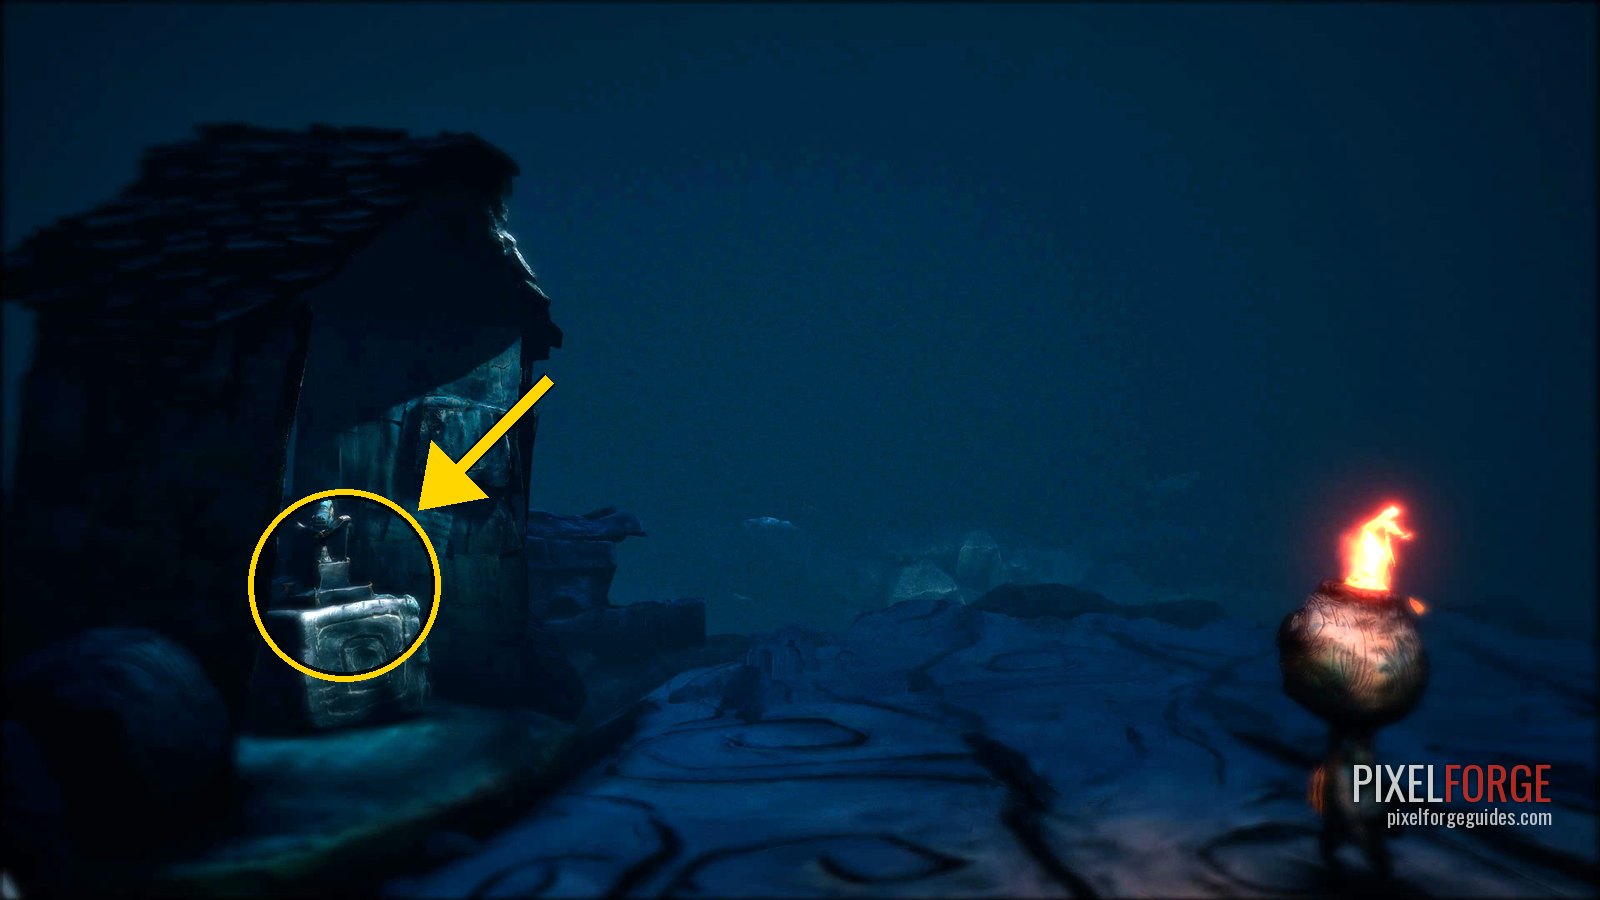 |
| Shellphone 7/25 Chapter 2: The Tale of the Loathsome Molgrim | After you meet the Headmaster and get the firearm, go into the building on the left (the guillotine room for Mind Over Body). | 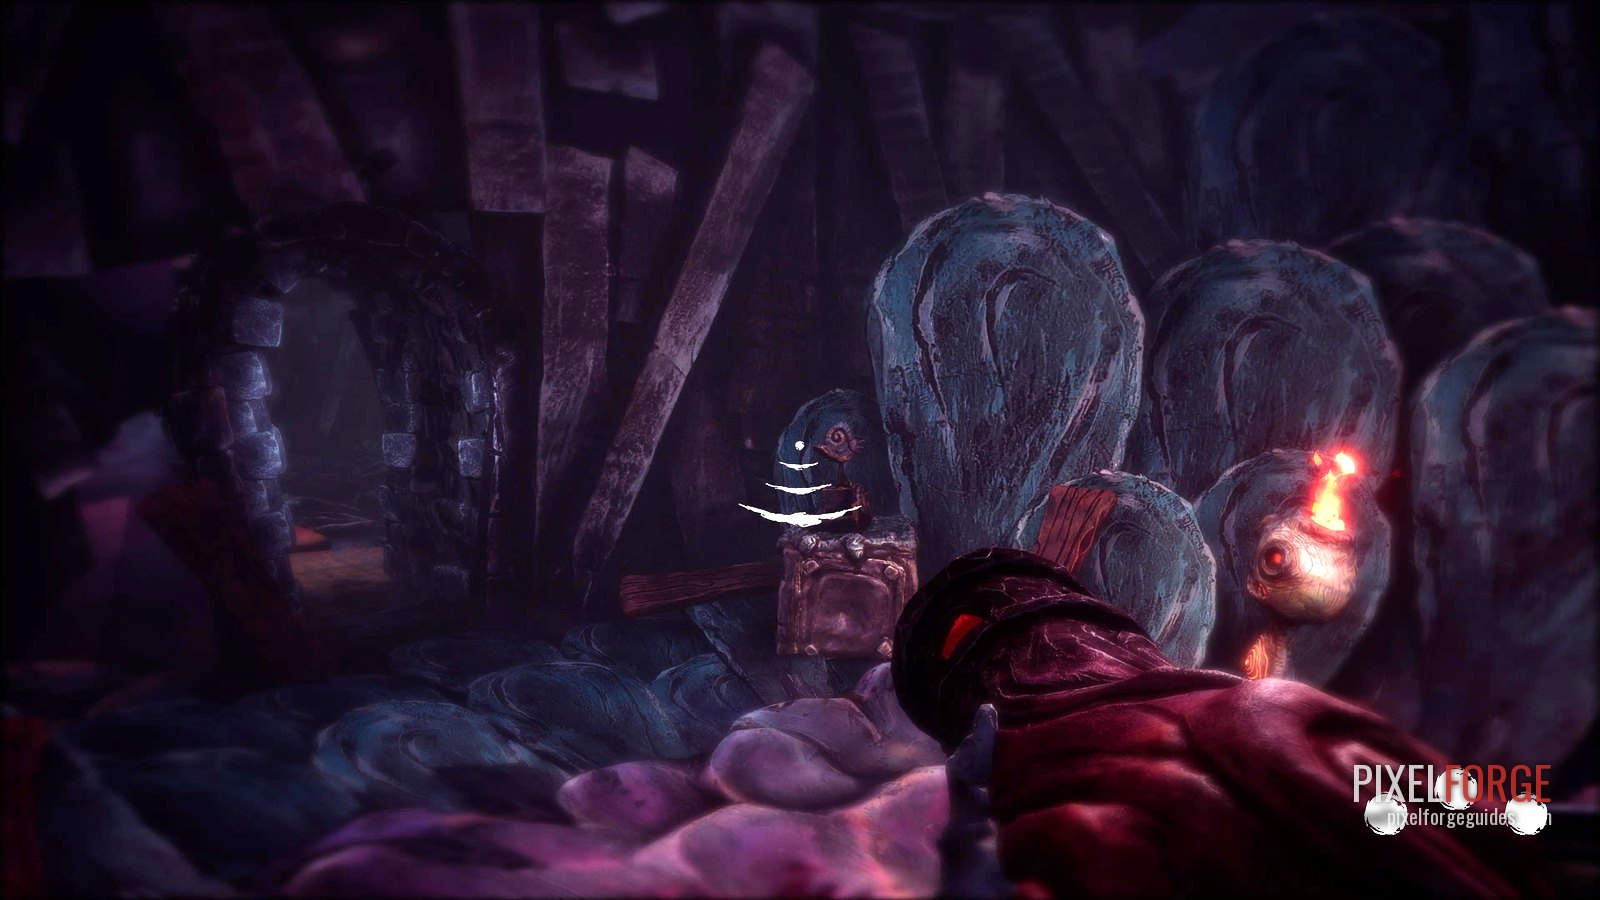 |
| Shellphone 8/25 Chapter 2: The Tale of the Loathsome Molgrim | The flying contraption drops you in a swamp: it's in plain sight to the right of the main path. | 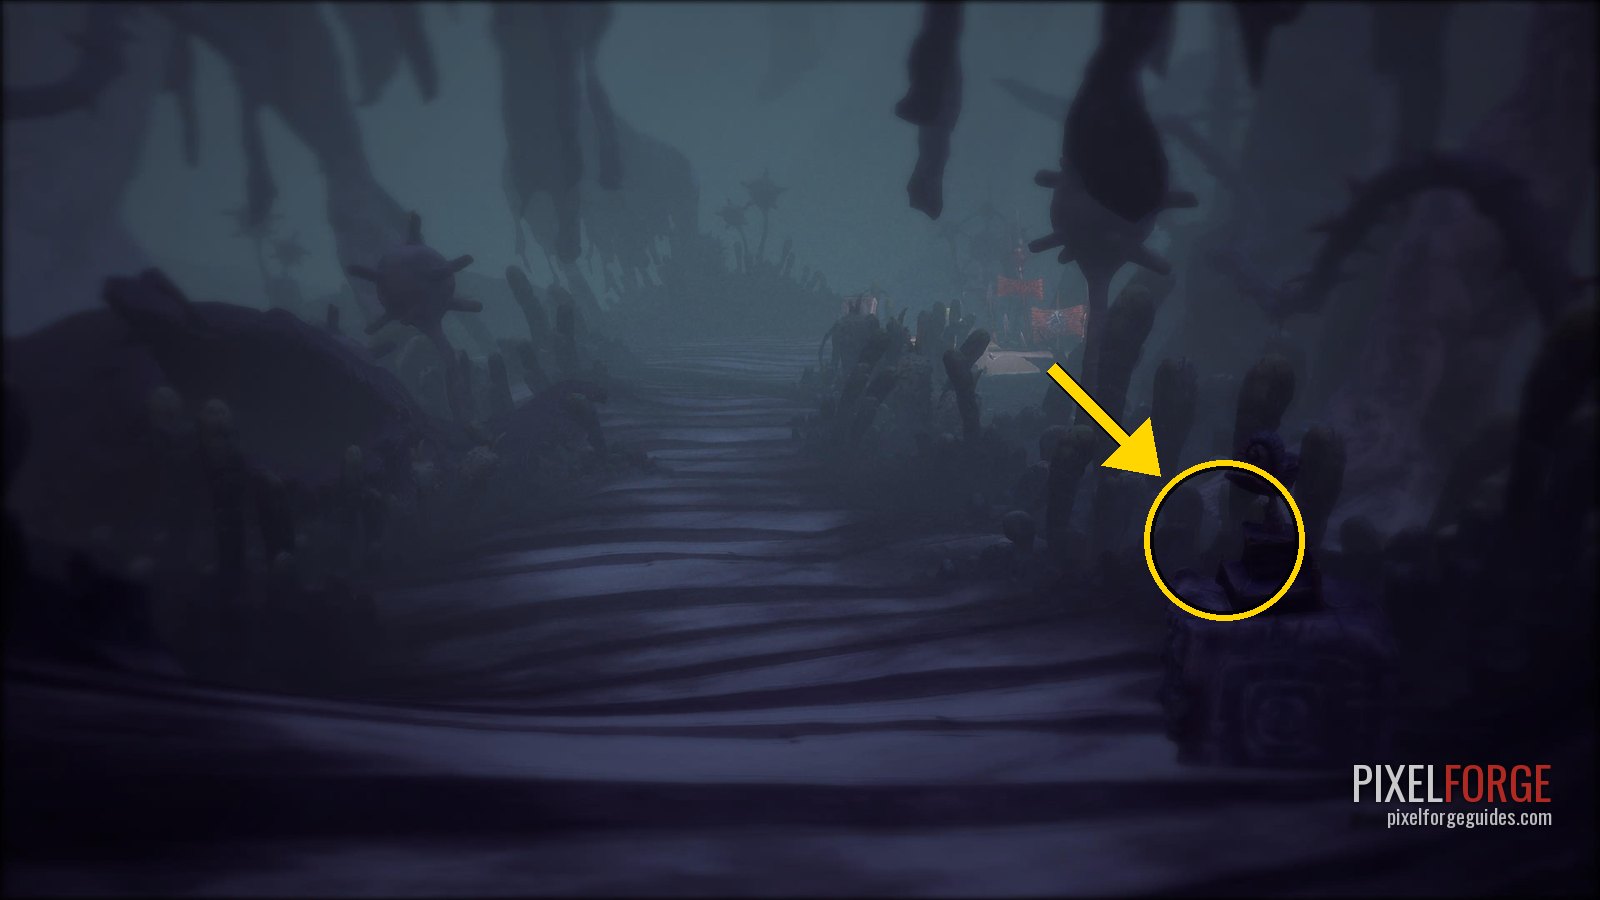 |
| Shellphone 9/25 Chapter 2: The Tale of the Loathsome Molgrim | Crawl through the hole to the right of The Old Man into the area where you put three masks on three creatures. It's on the left side. |  |
| Shellphone 10/25 Chapter 2: The Tale of the Loathsome Molgrim | Keep following the right path to a pipe and a cauldron: next to the pipe. | 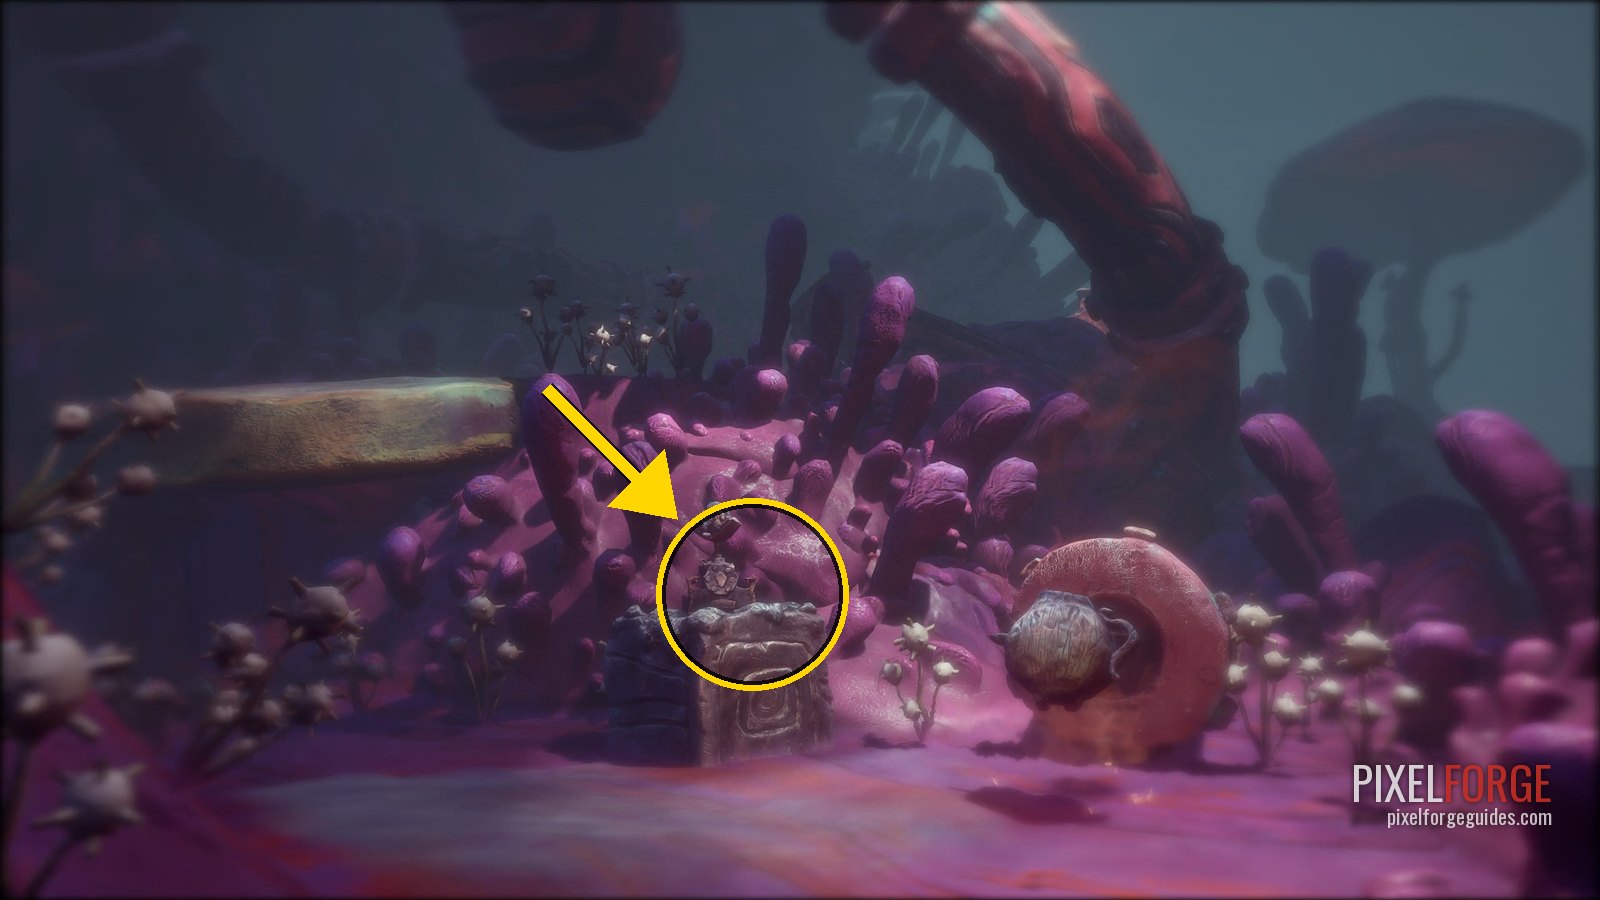 |
| Shellphone 11/25 Chapter 2: The Tale of the Loathsome Molgrim | Once the three fragments are in the cauldron, the Headmaster gives you a key. After you use it, it's on the right of the path. | 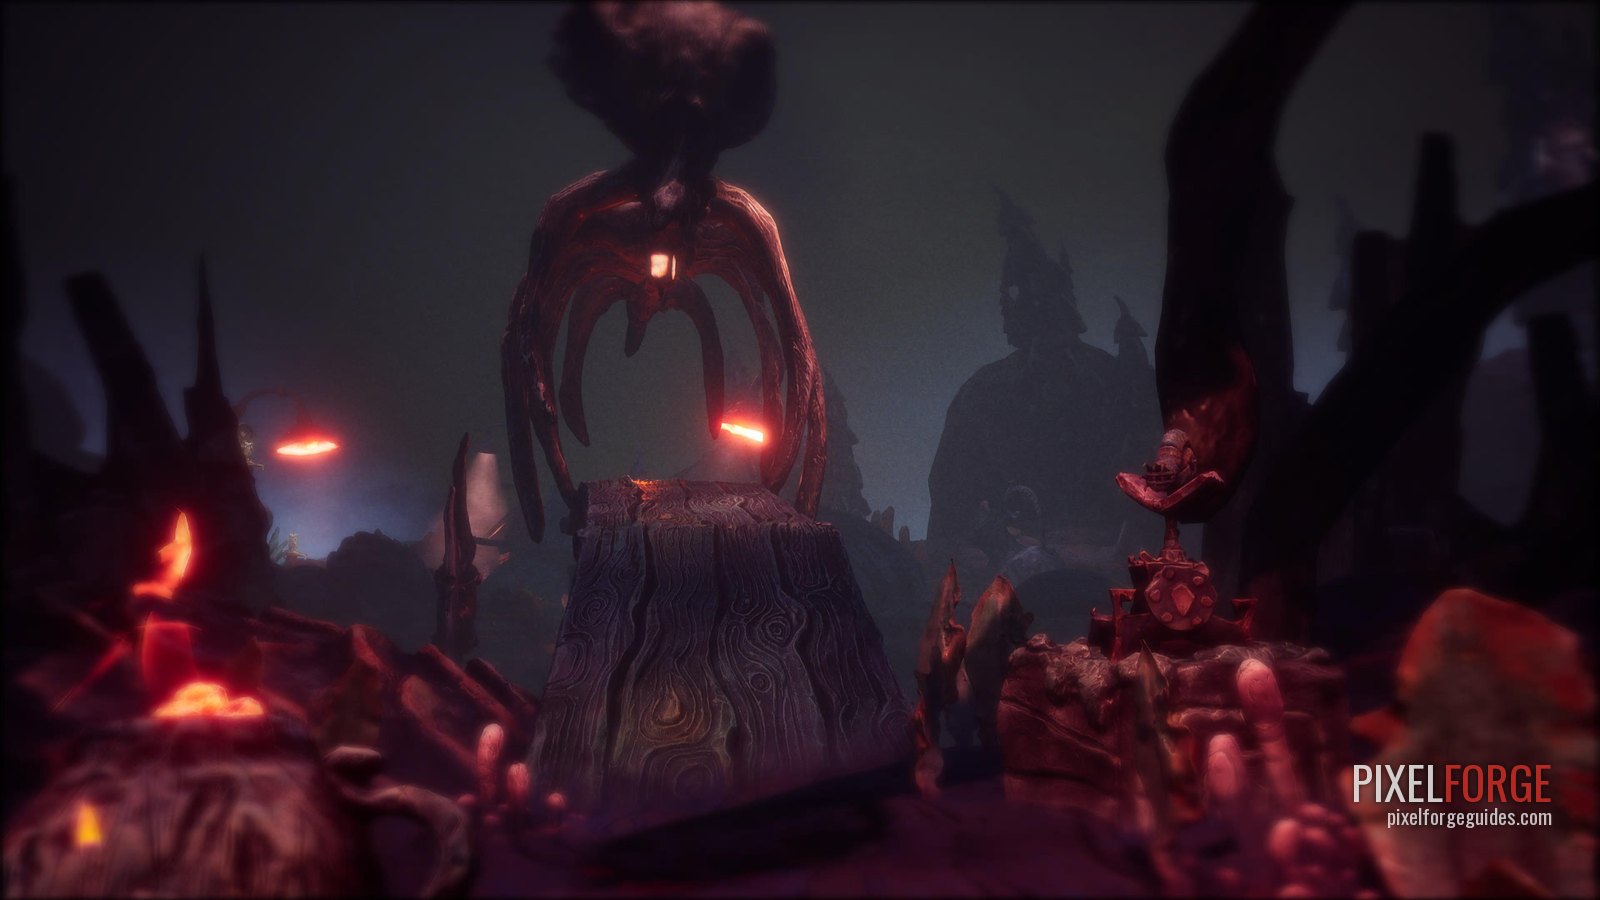 |
| Shellphone 12/25 Chapter 2: The Tale of the Loathsome Molgrim | Right next to Story Page 5. | 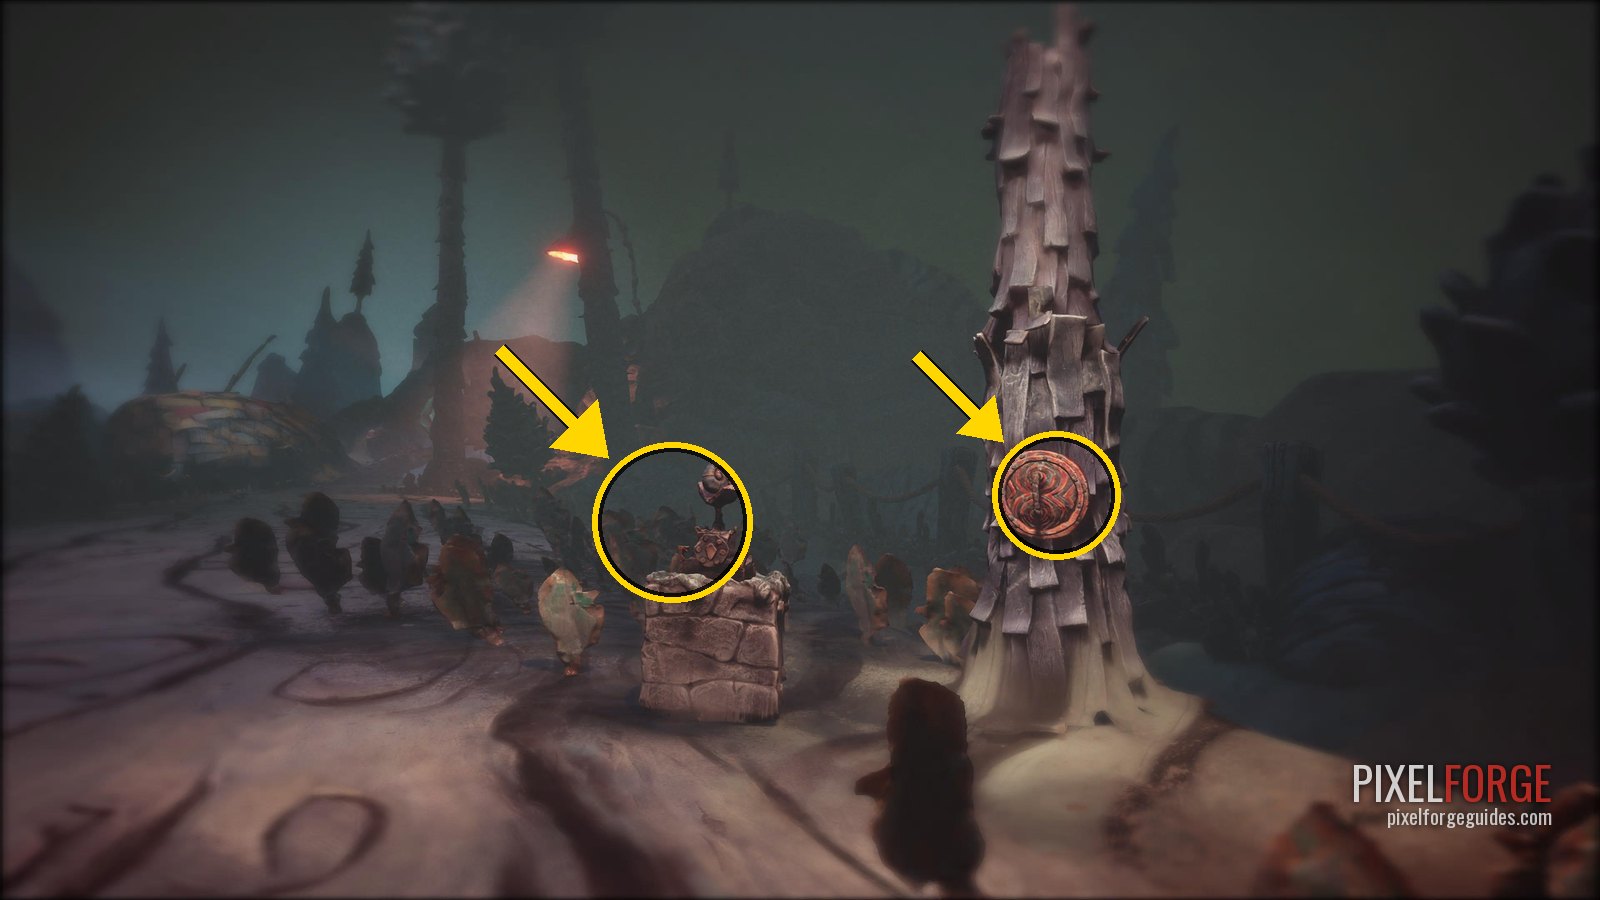 |
| Shellphone 13/25 Chapter 3: The Tale of Coalhaven | As soon as you leave Housy, turn around. | 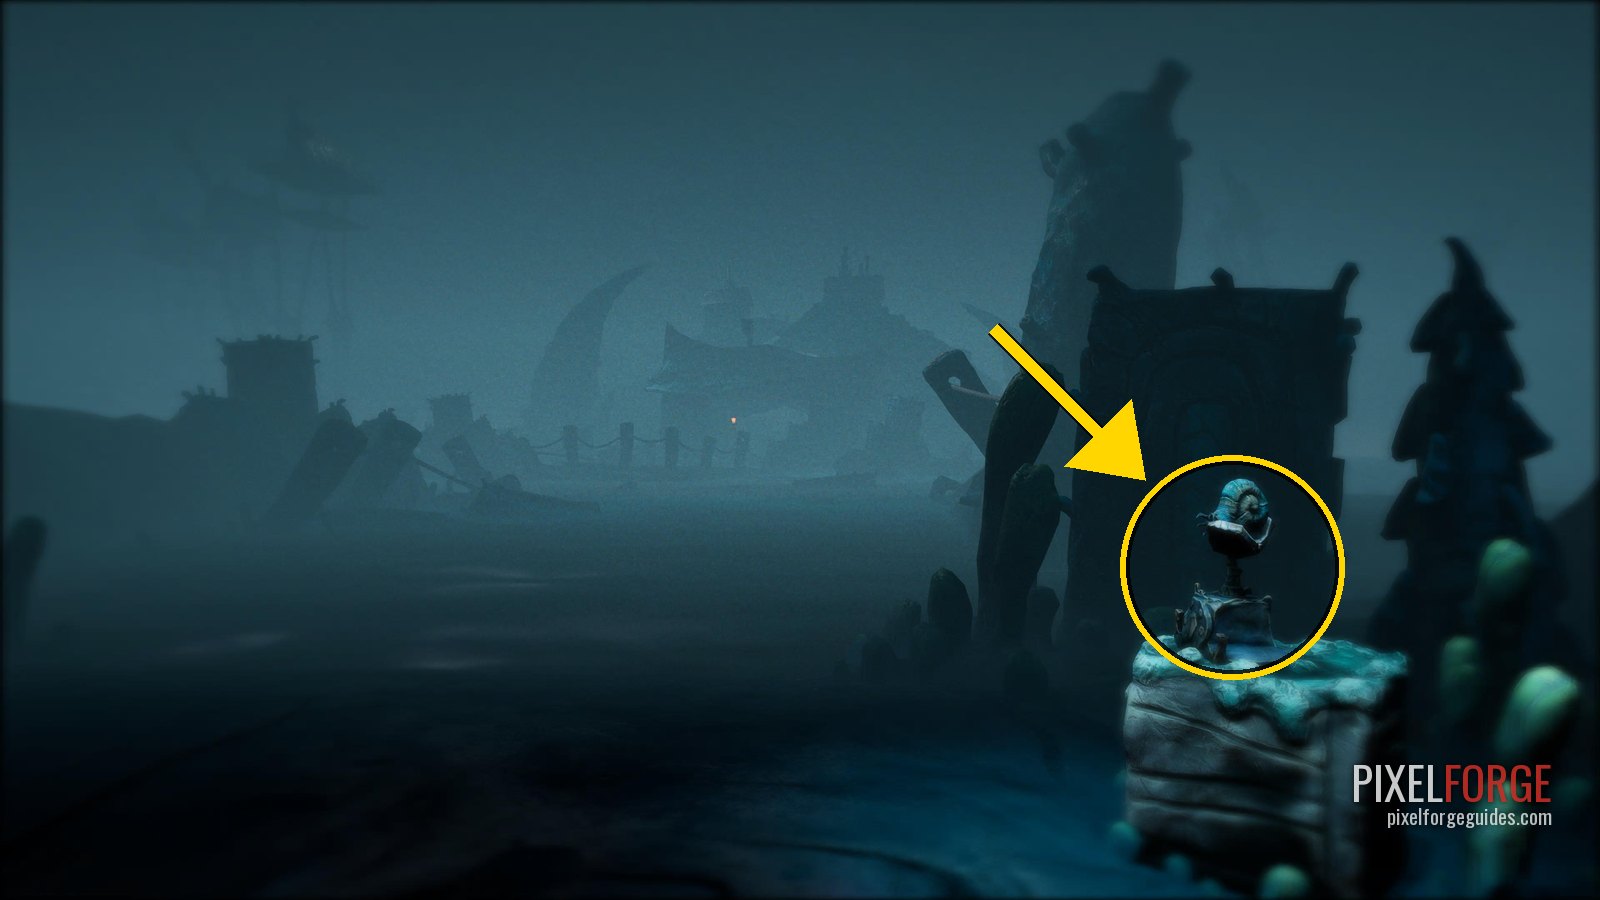 |
| Shellphone 14/25 Chapter 3: The Tale of Coalhaven | Walking the dark tracks lighting candles, one candle sits where the tracks split. Take the right-hand tracks: it's by the next candle. | 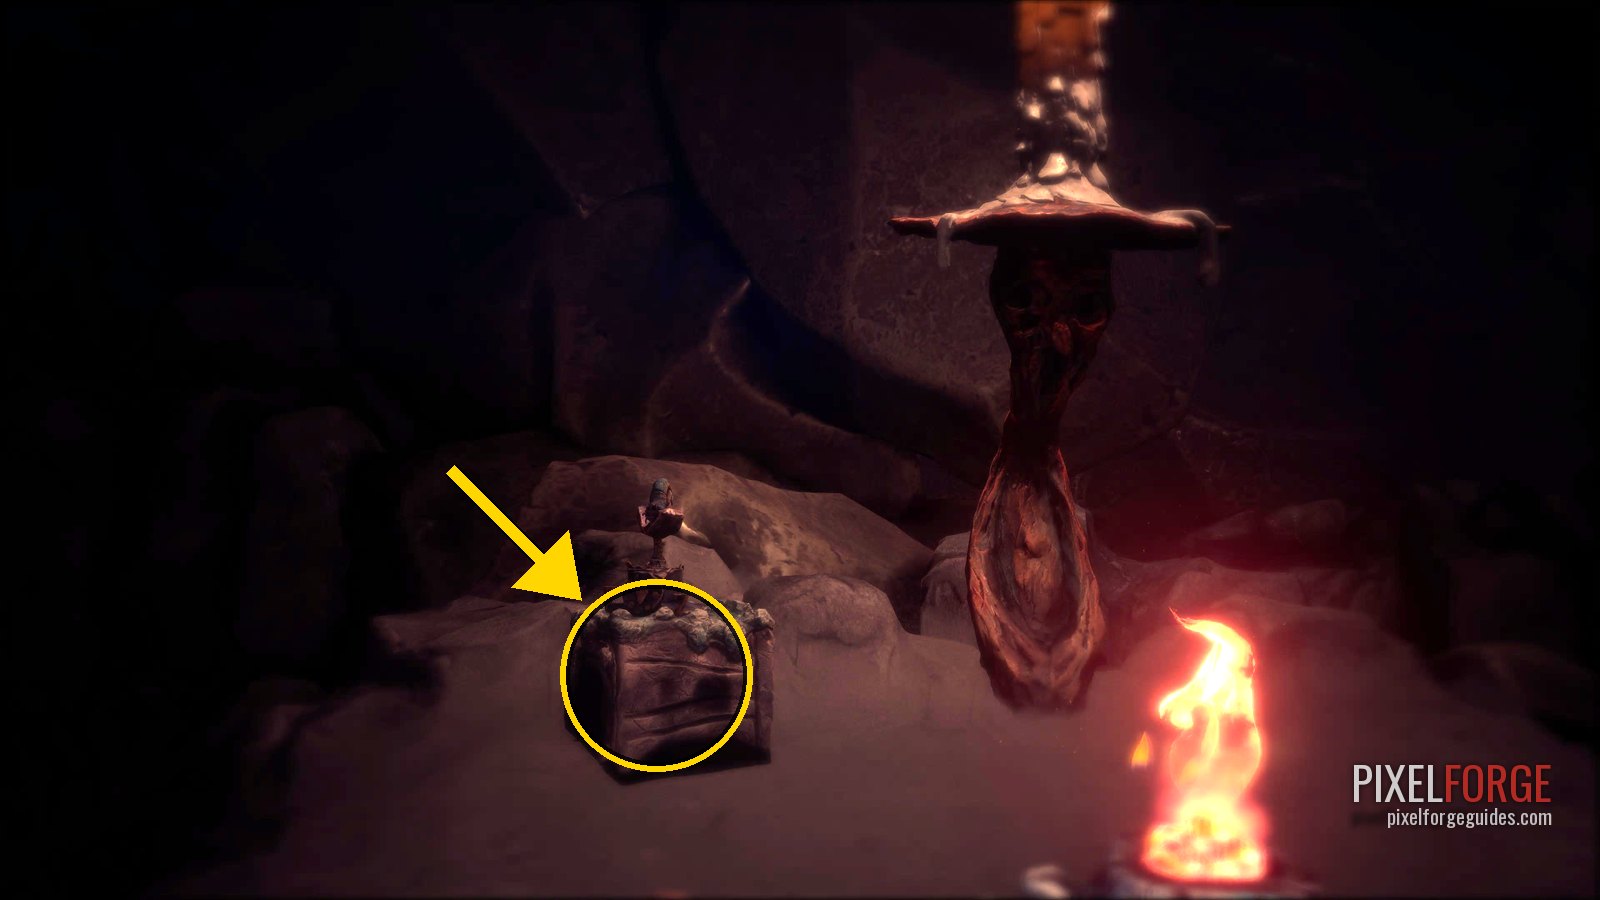 |
| Shellphone 15/25 Chapter 3: The Tale of Coalhaven | In the village after the snowstorm, next to the well where the eye appears. | 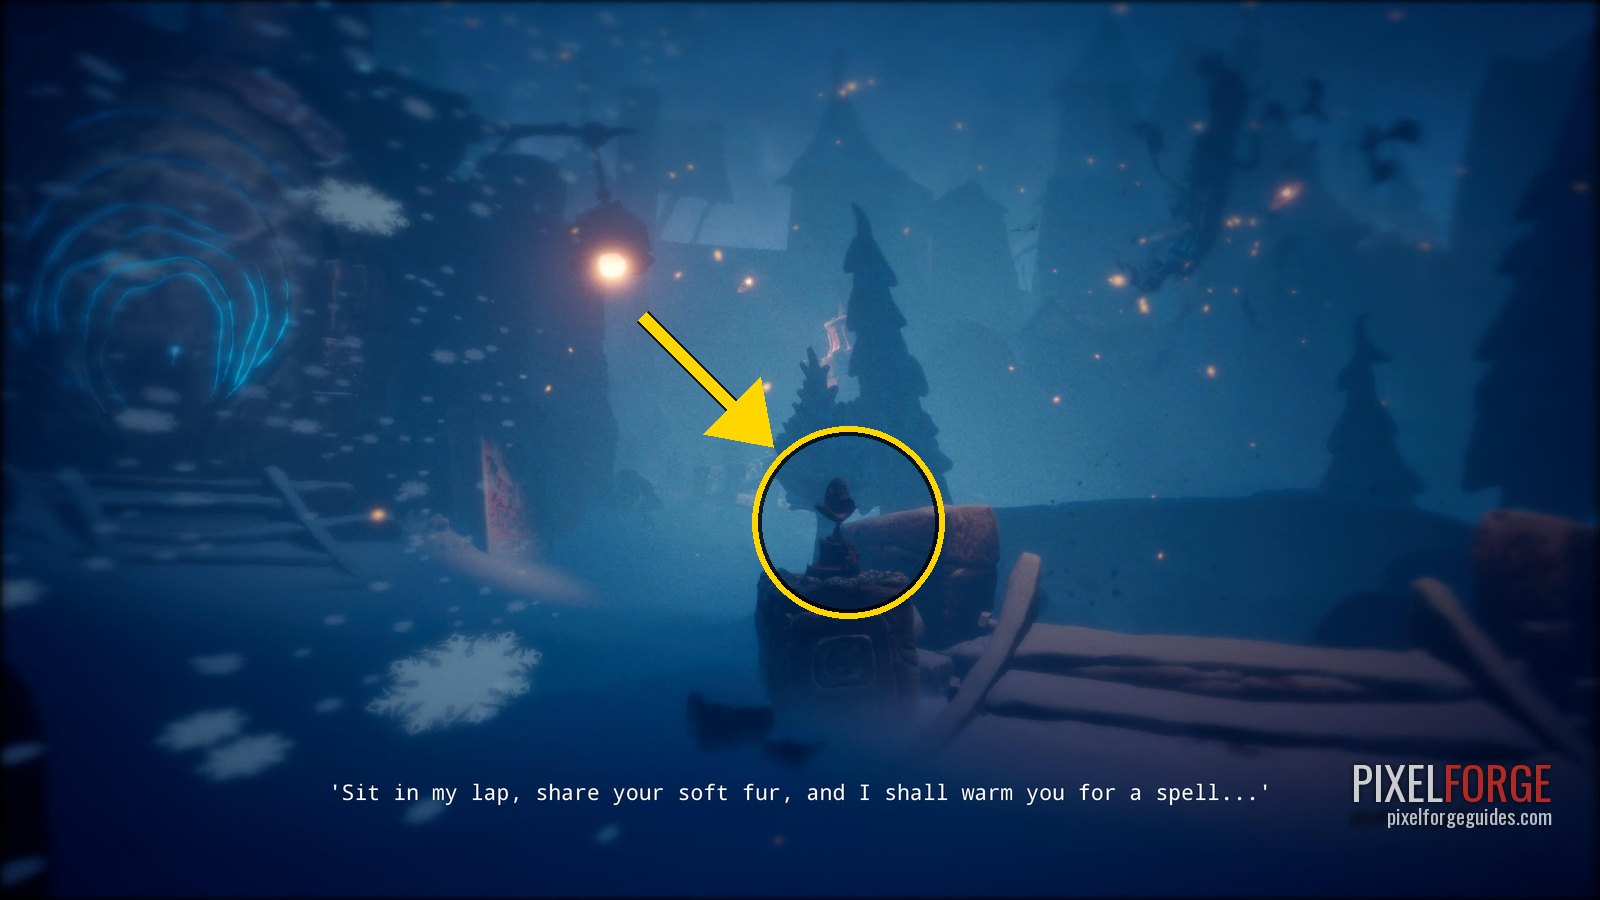 |
| Shellphone 16/25 Chapter 3: The Tale of Coalhaven | Light the second gas boiler and go through its door. It's to the left of the wardrobe in the open area. | 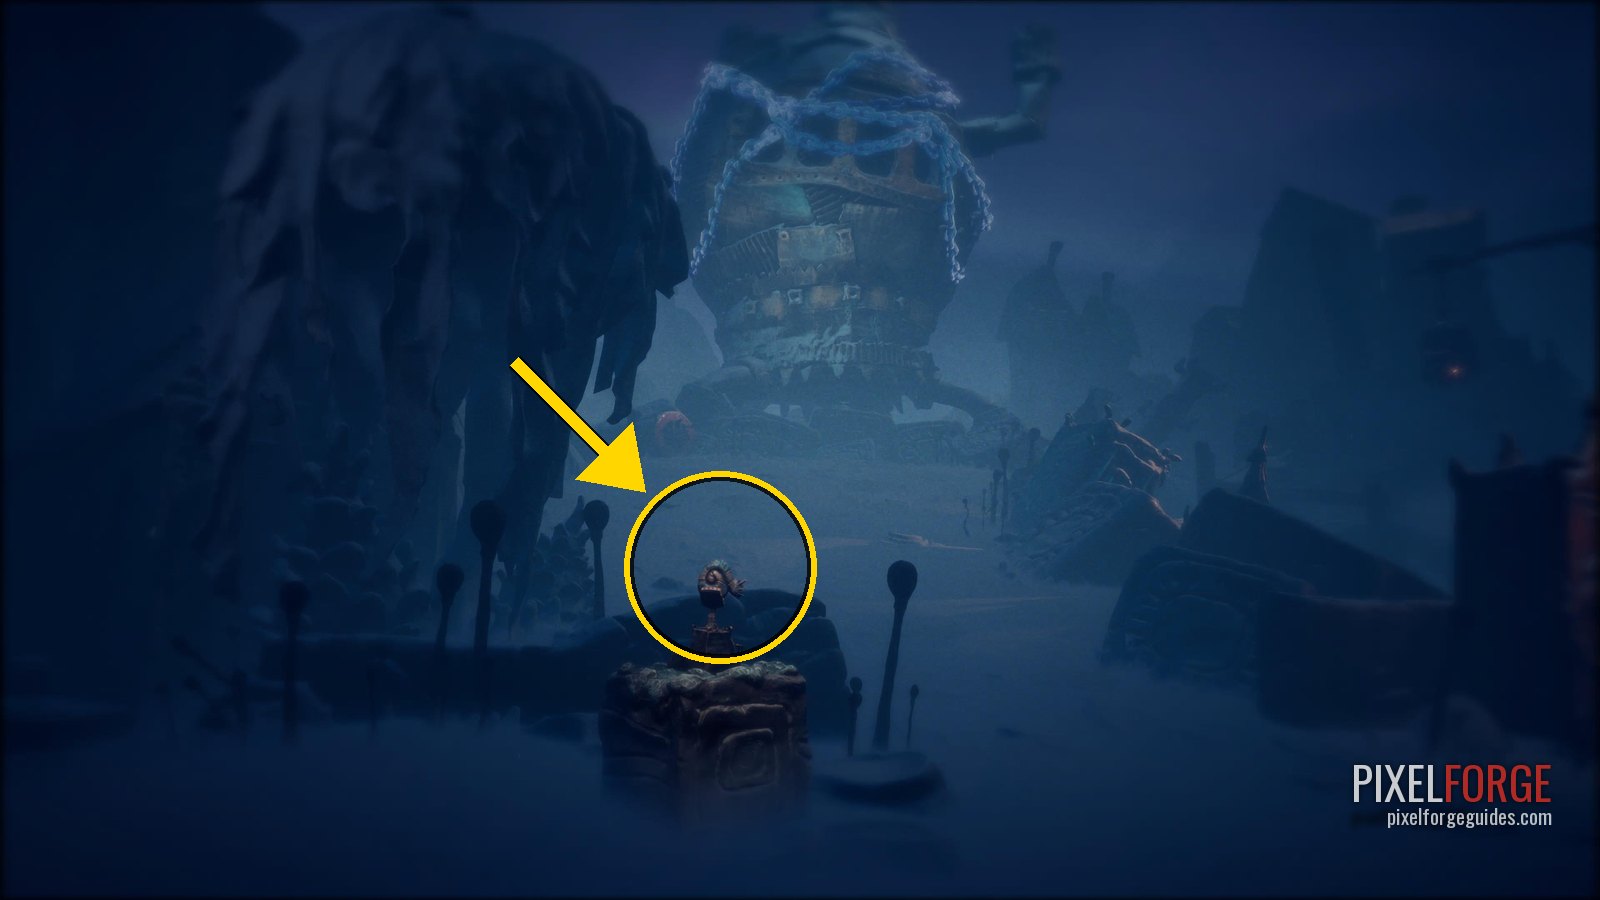 |
| Shellphone 17/25 Chapter 3: The Tale of Coalhaven | Inside the house on the hill, where you find the Left Arm. | 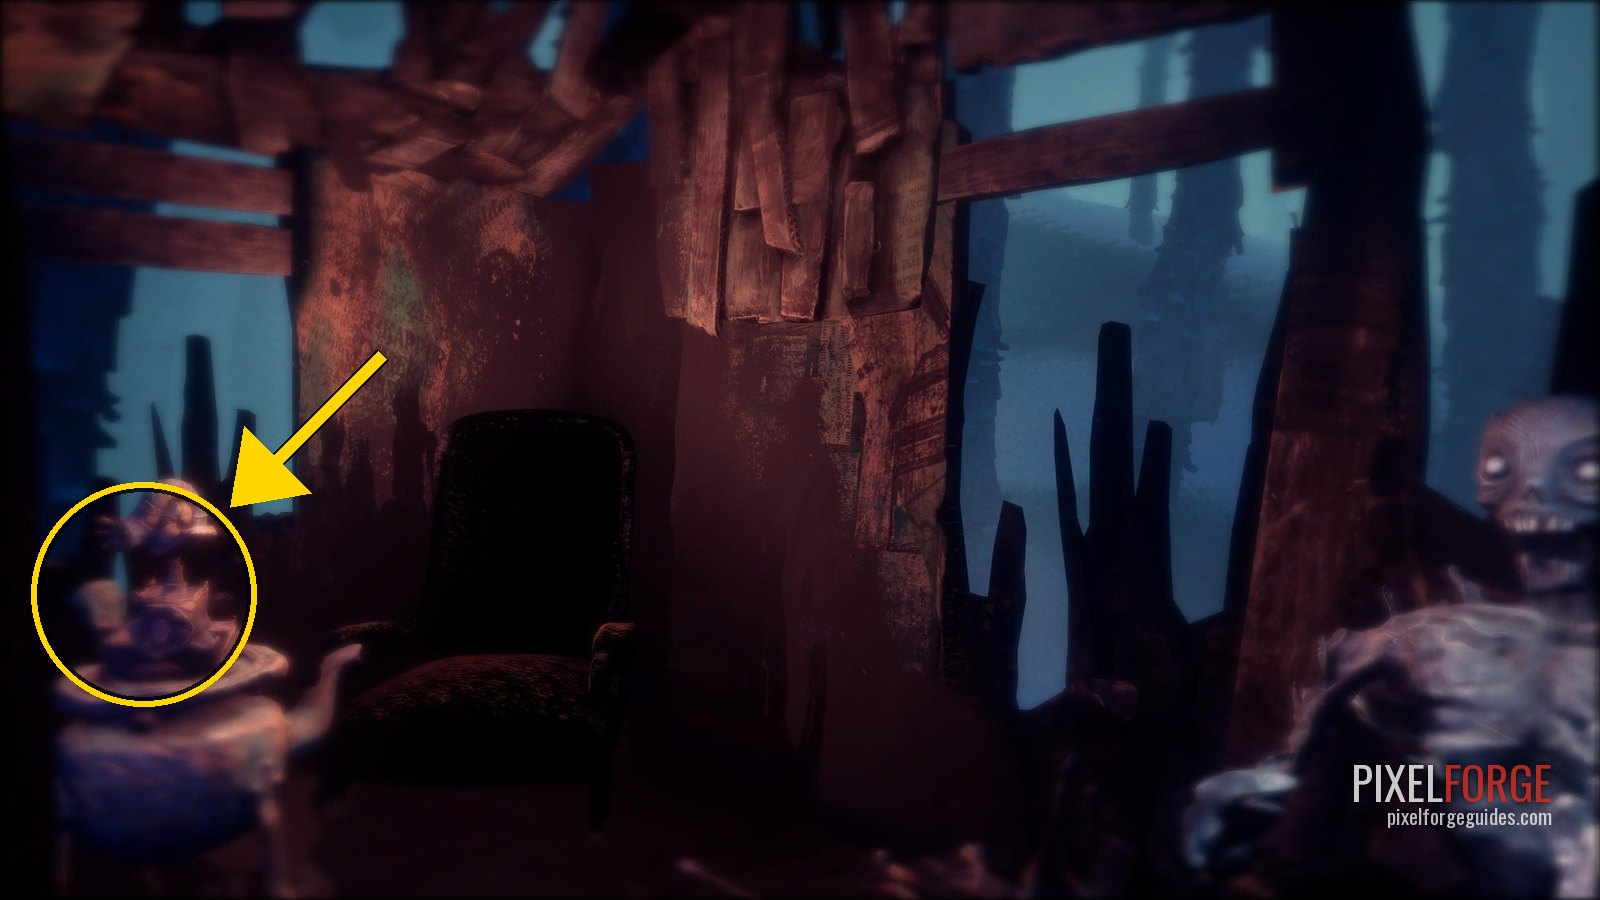 |
| Shellphone 18/25 Chapter 3: The Tale of Coalhaven | Just after Auntie Murkle there's a group of characters. Go left and up the hill. | 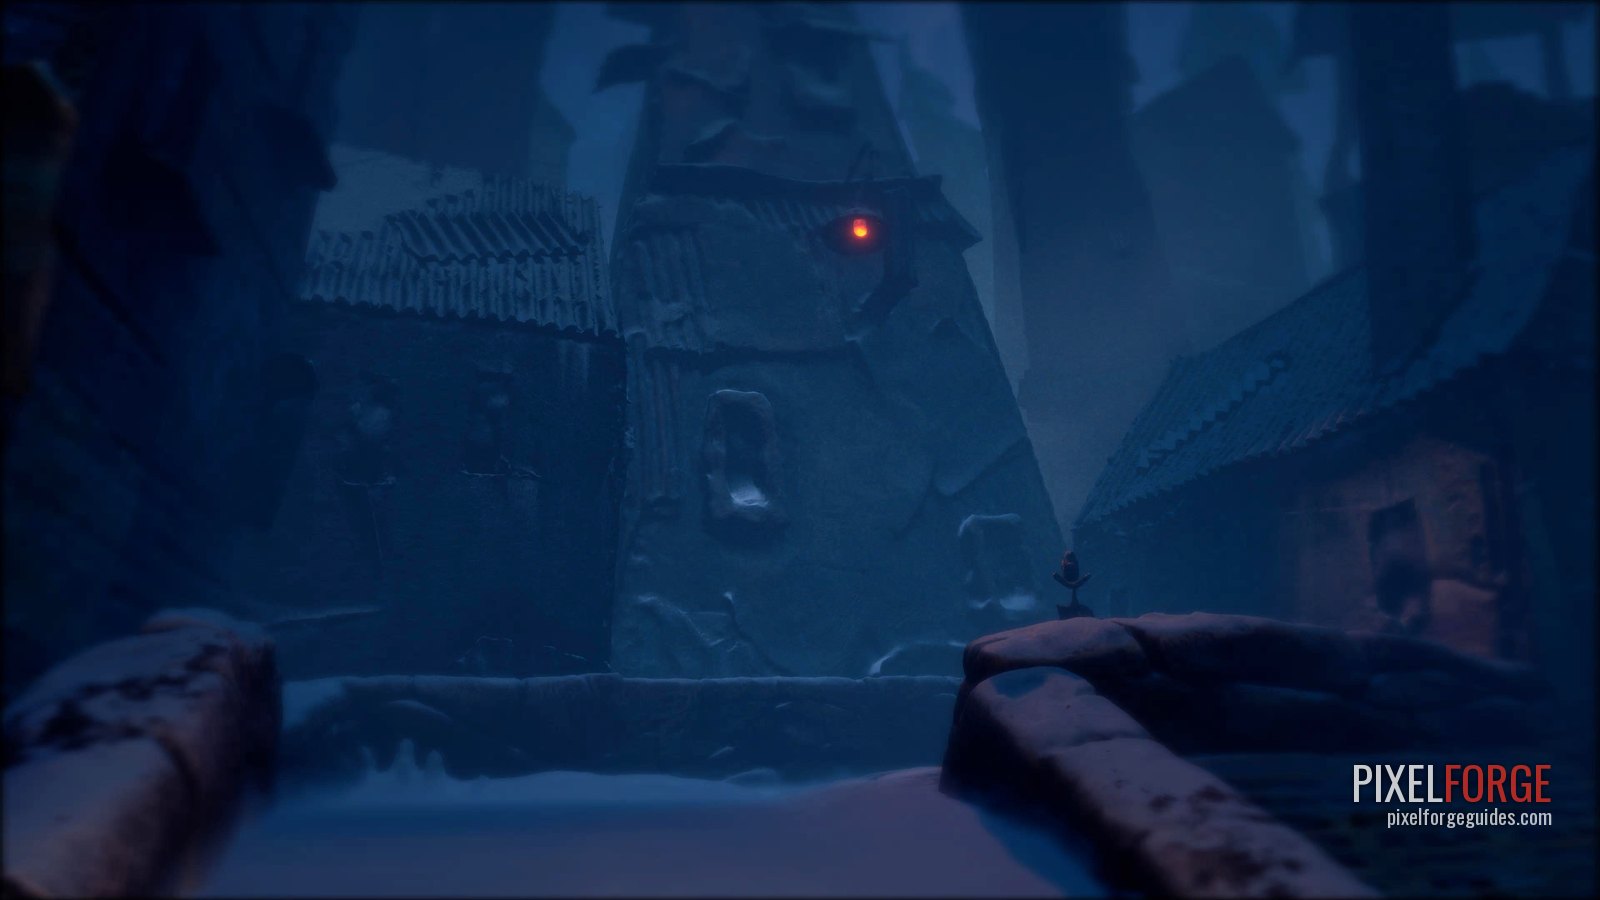 |
| Shellphone 19/25 Chapter 4: The Tale of the Craftsman's Heart | A few steps further, on the right of the main path. | 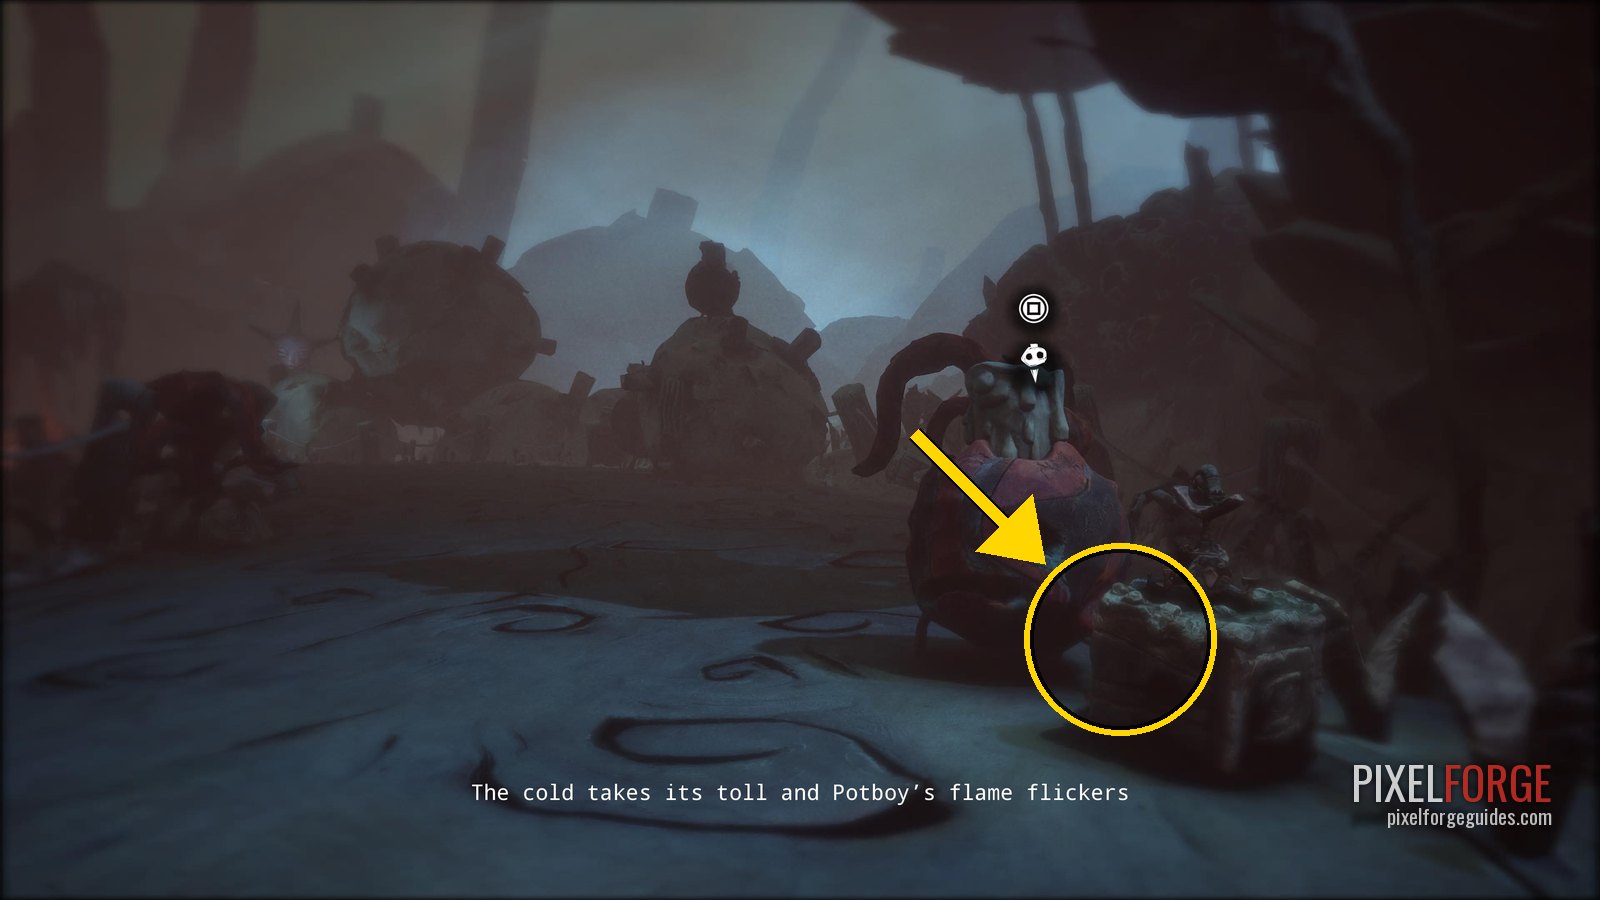 |
| Shellphone 20/25 Chapter 4: The Tale of the Craftsman's Heart | After the flying contraption, on the right of the path where you land. | 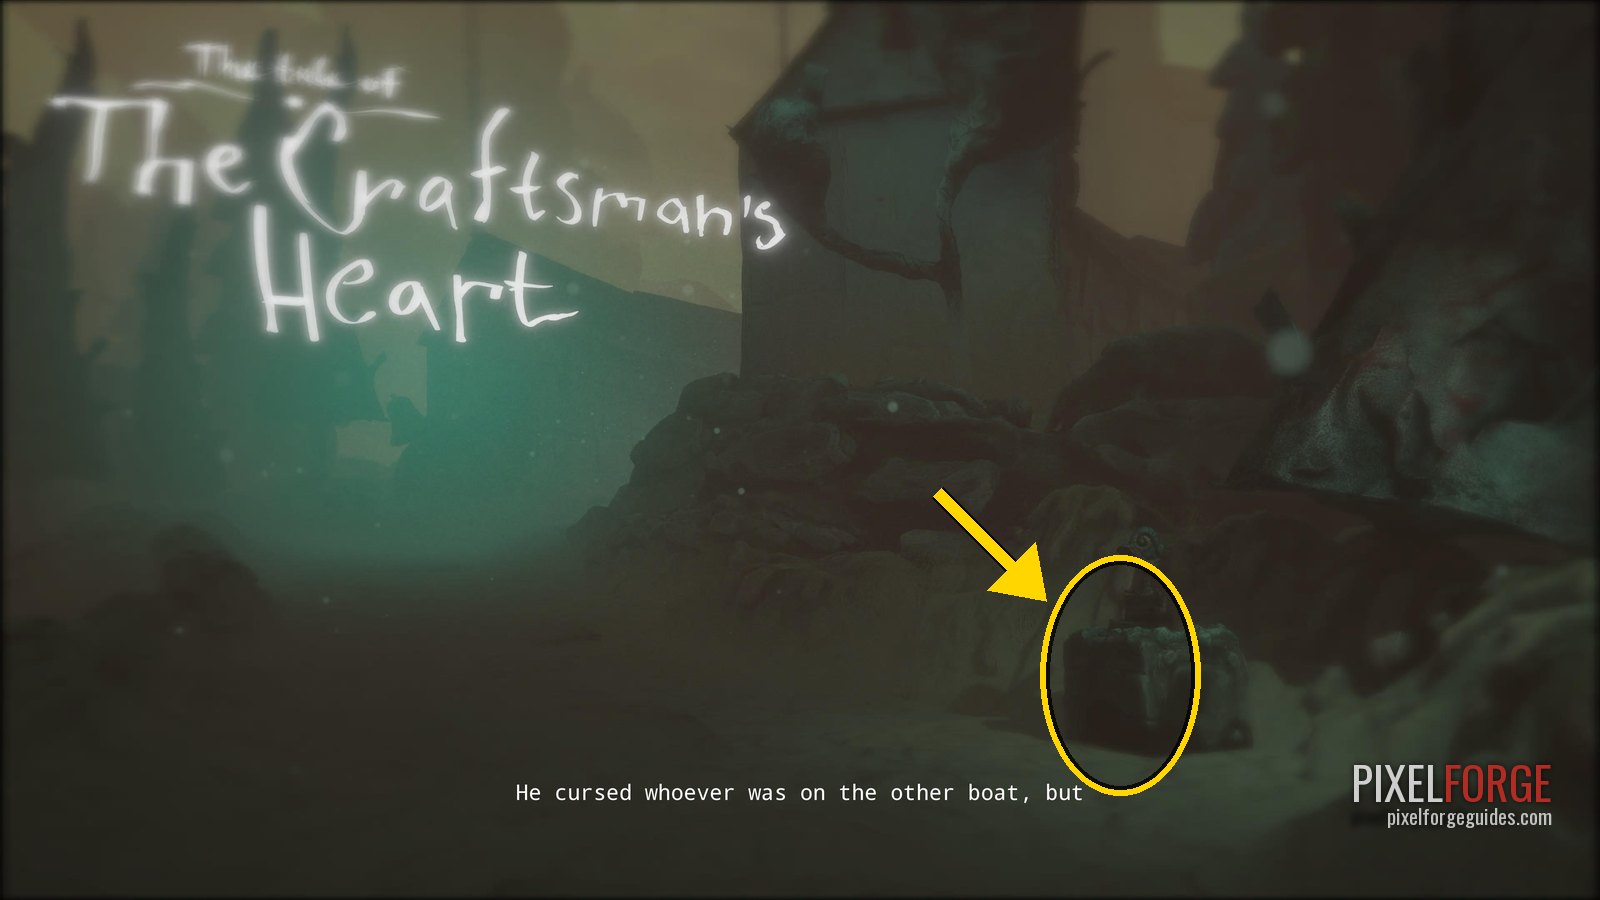 |
| Shellphone 21/25 Chapter 4: The Tale of the Craftsman's Heart | Through the slimy tunnel to the room with three switches: on the far side of the room. | 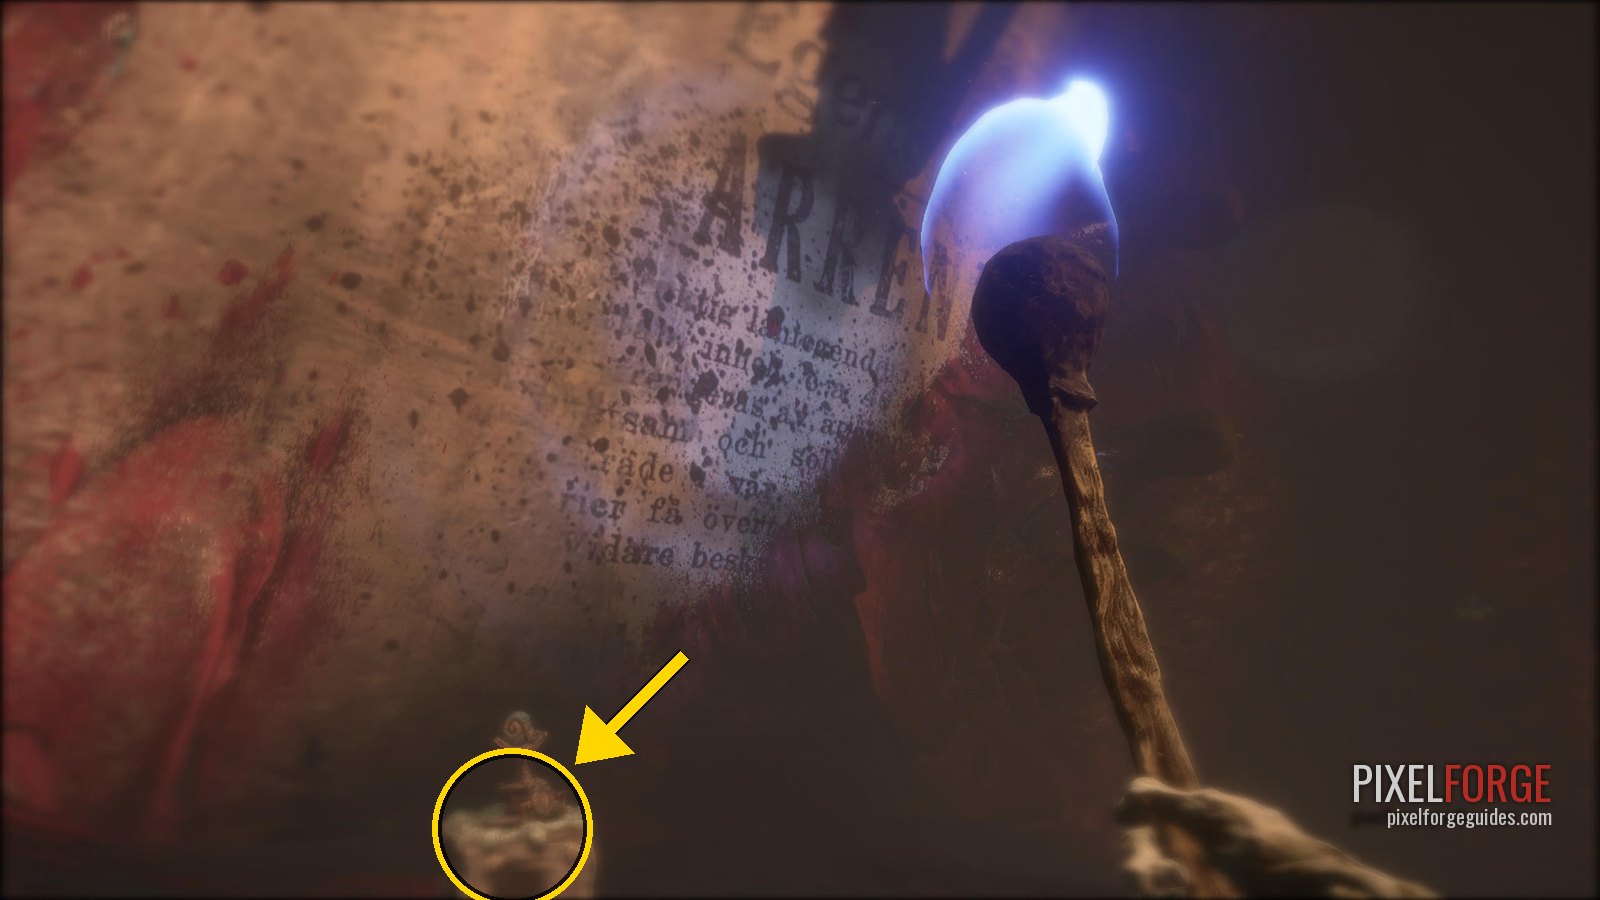 |
| Shellphone 22/25 Chapter 5: The Tale of the Dark | Right at the start, on the right of the path under a swinging lamp. | 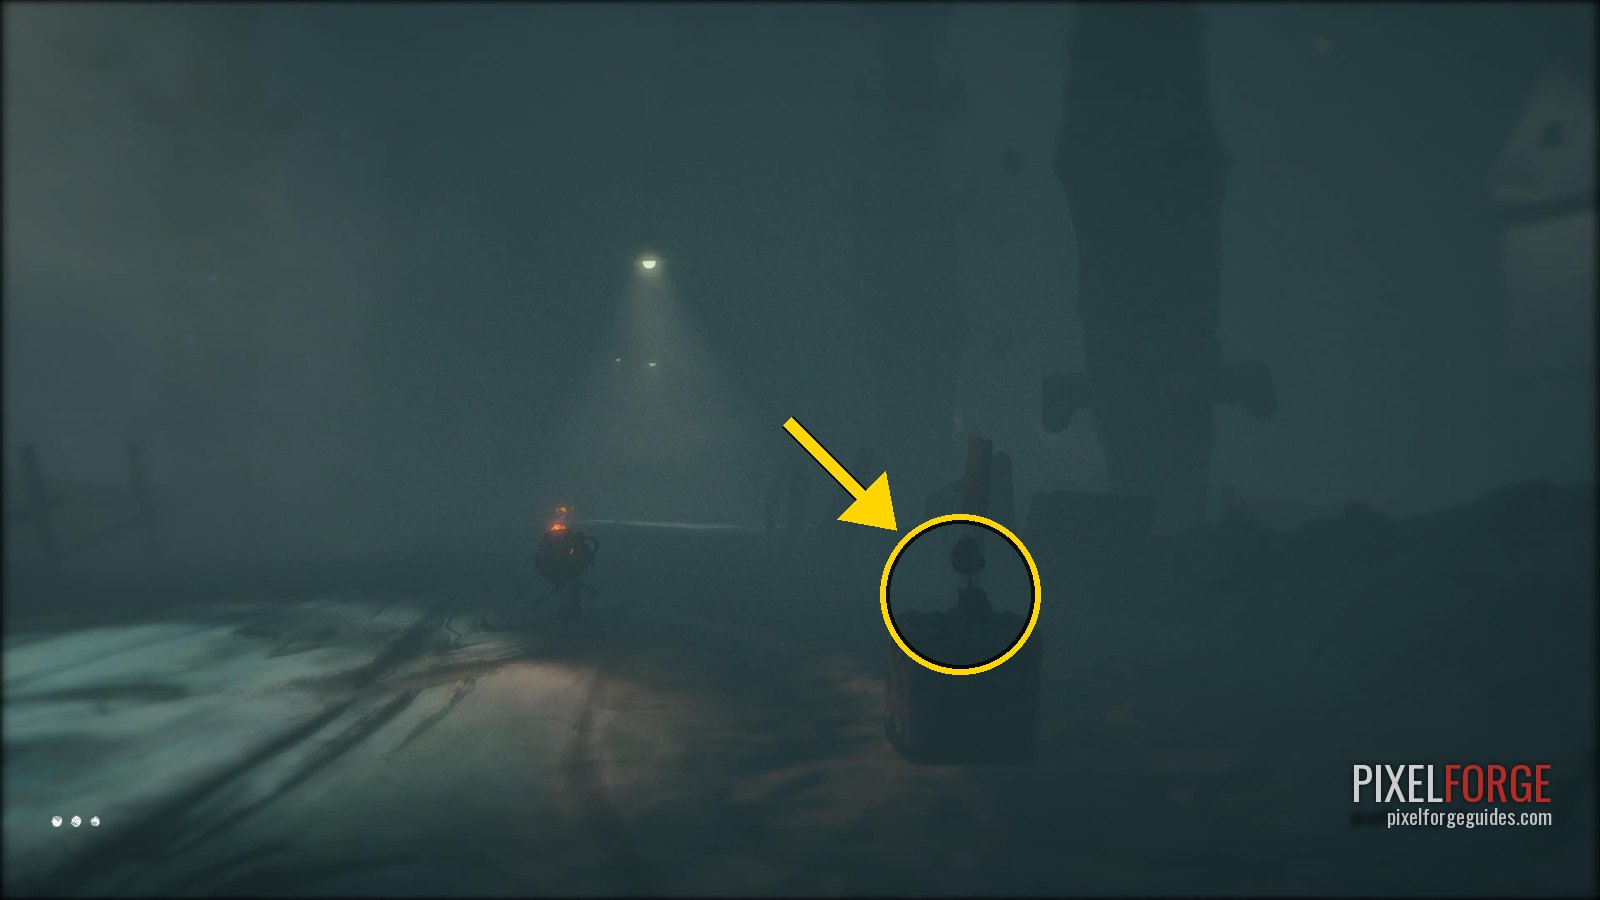 |
| Shellphone 23/25 Chapter 5: The Tale of the Dark | Go down the hill to fetch what you need: it's in plain view at the bottom. | 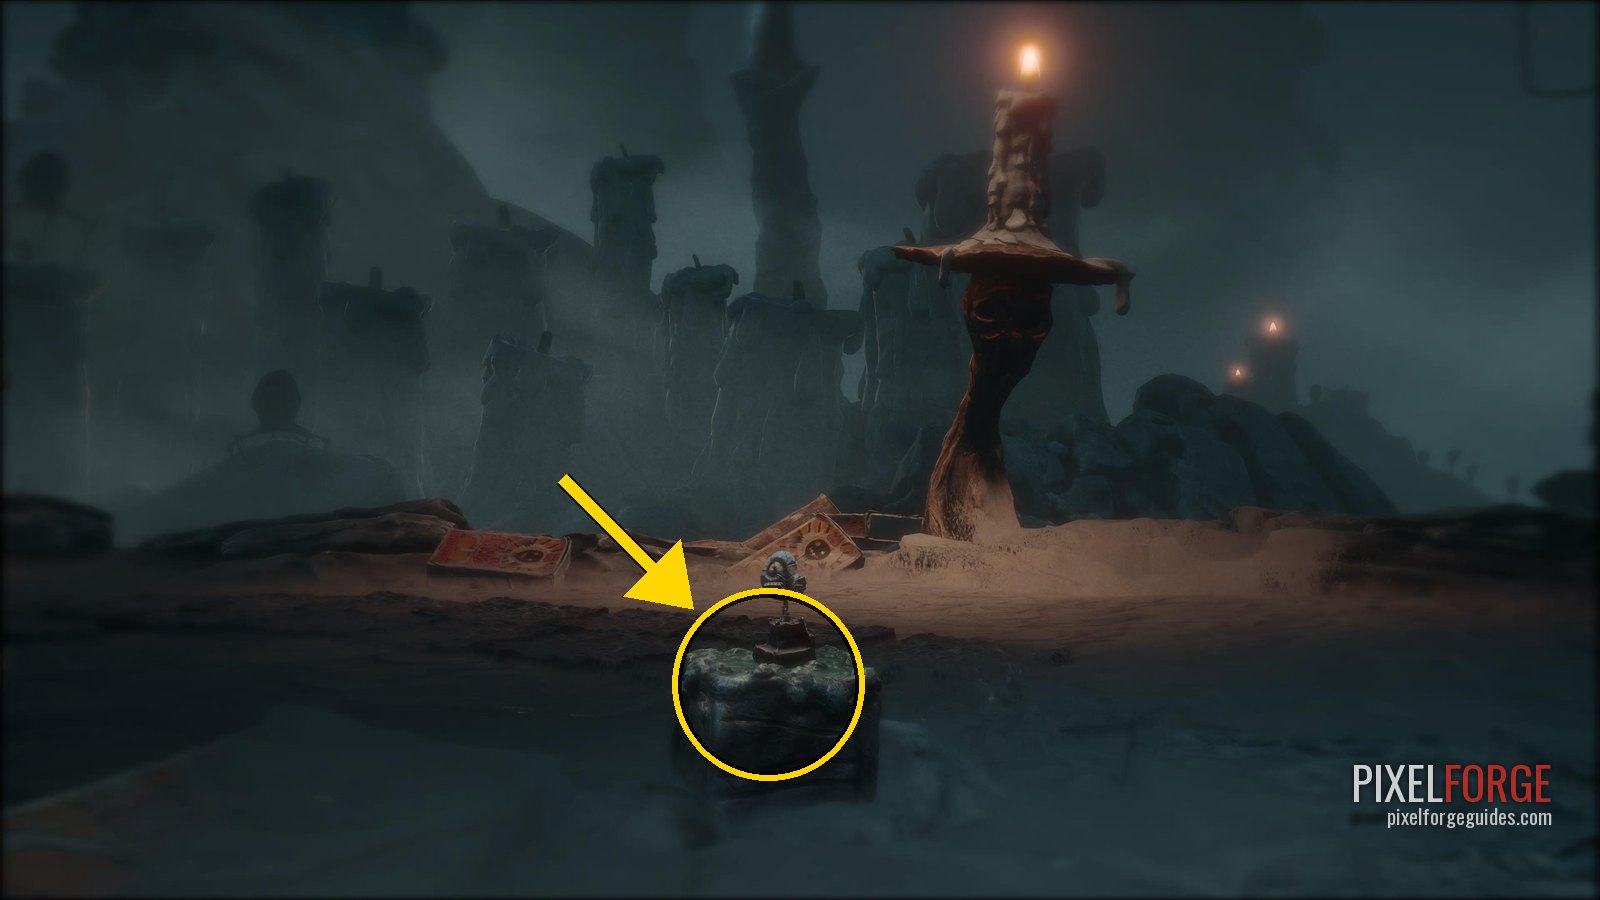 |
| Shellphone 24/25 Chapter 6: The Tale of Moon Mountain | Stay on the main path; it's just after the first few enemies. | 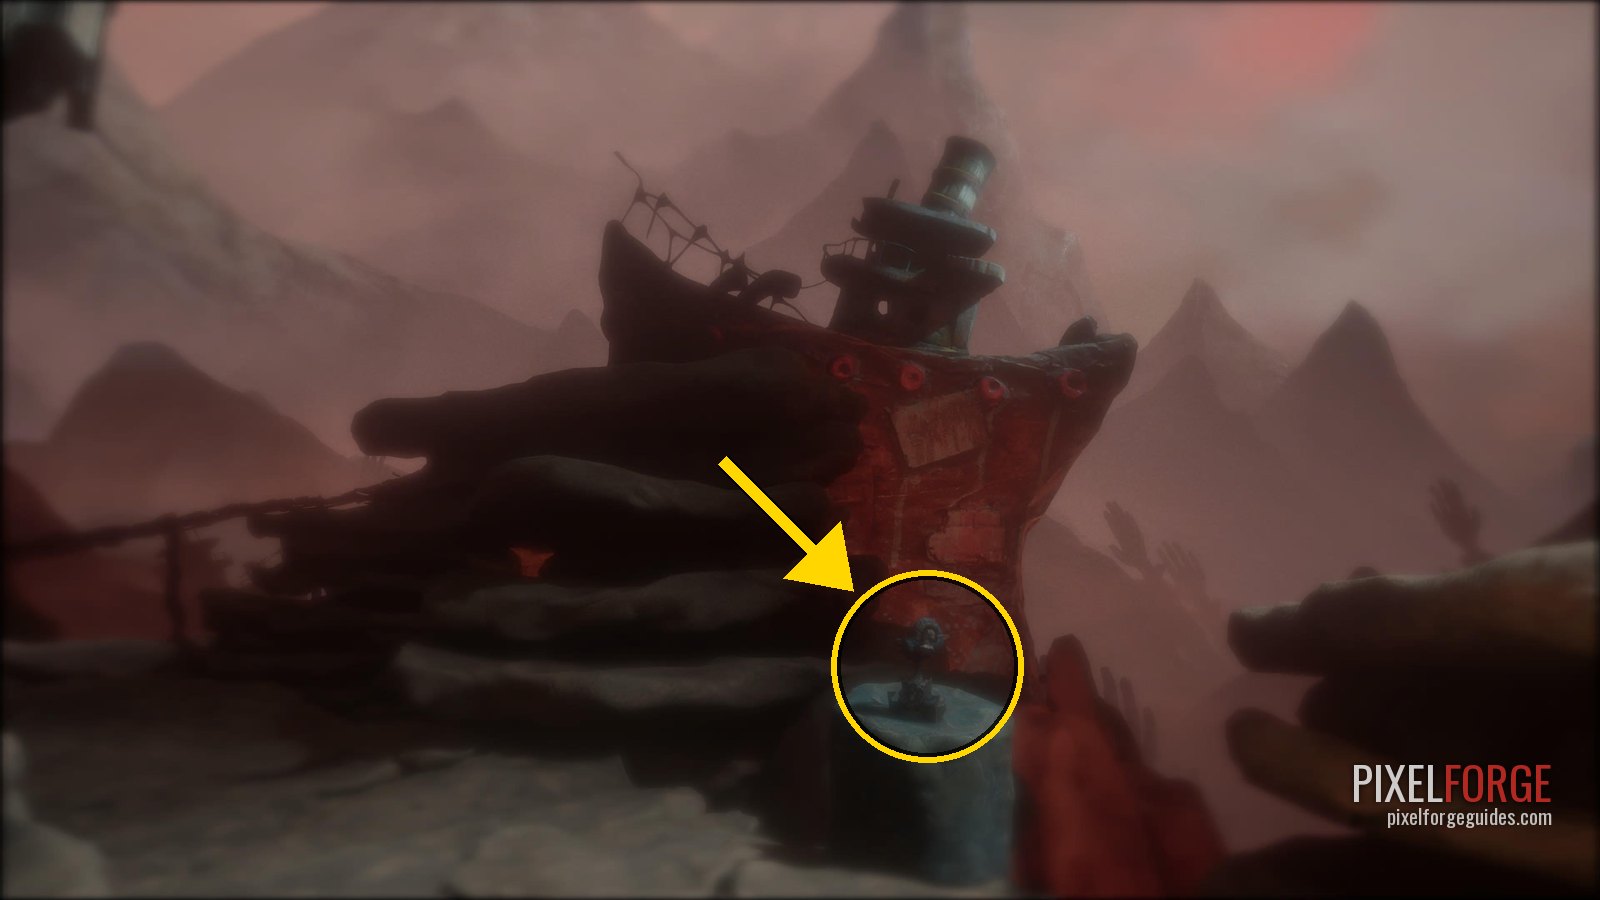 |
| Shellphone 25/25 Chapter 6: The Tale of Moon Mountain | Once you're in the cave after dodging the winds, in plain view. Last shellphone: Who's There? | 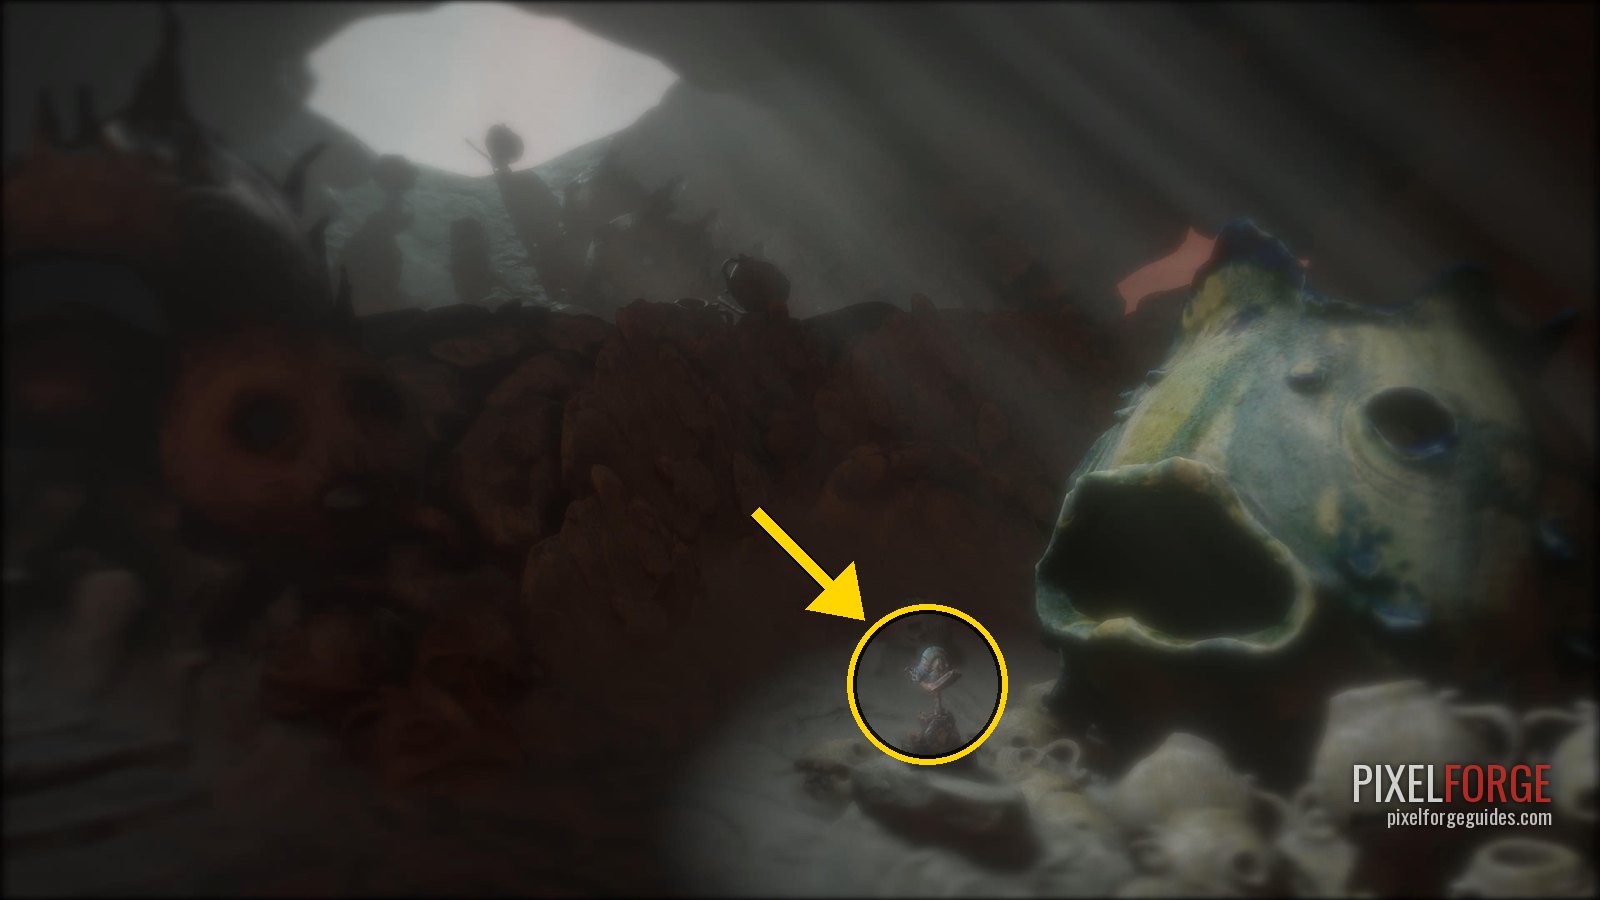 |
Gramophone discs (There Is Always Music In The Air) 17
| Collectible | Exactly where | Our screenshot |
|---|---|---|
| Gramophone Disc 1/17 · The Soulfisher's Secret Chapter 1: The Tale of the Burnt One | Once Potboy is lit you chase him up a hill to feed him coal. Halfway up, before the coal, a hatch on your left. | 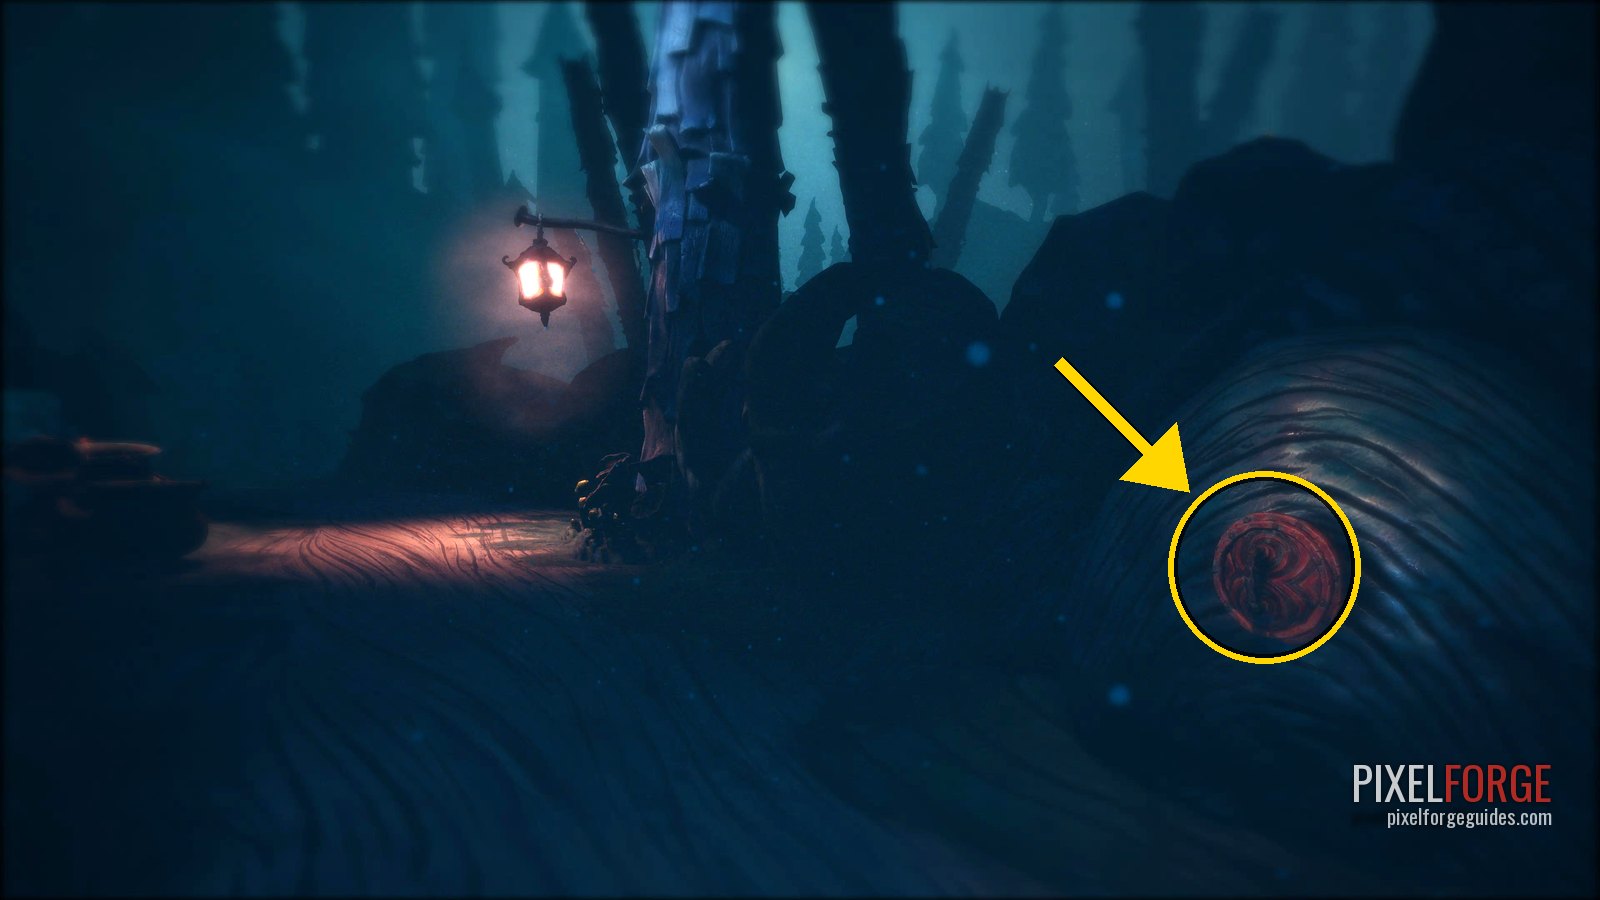 |
| Gramophone Disc 2/17 · Mitt Happyplace När Världen Står I Brand Chapter 1: The Tale of the Burnt One | In the area where you and Potboy each stand on a switch: a hatch beside the right-hand switch. | 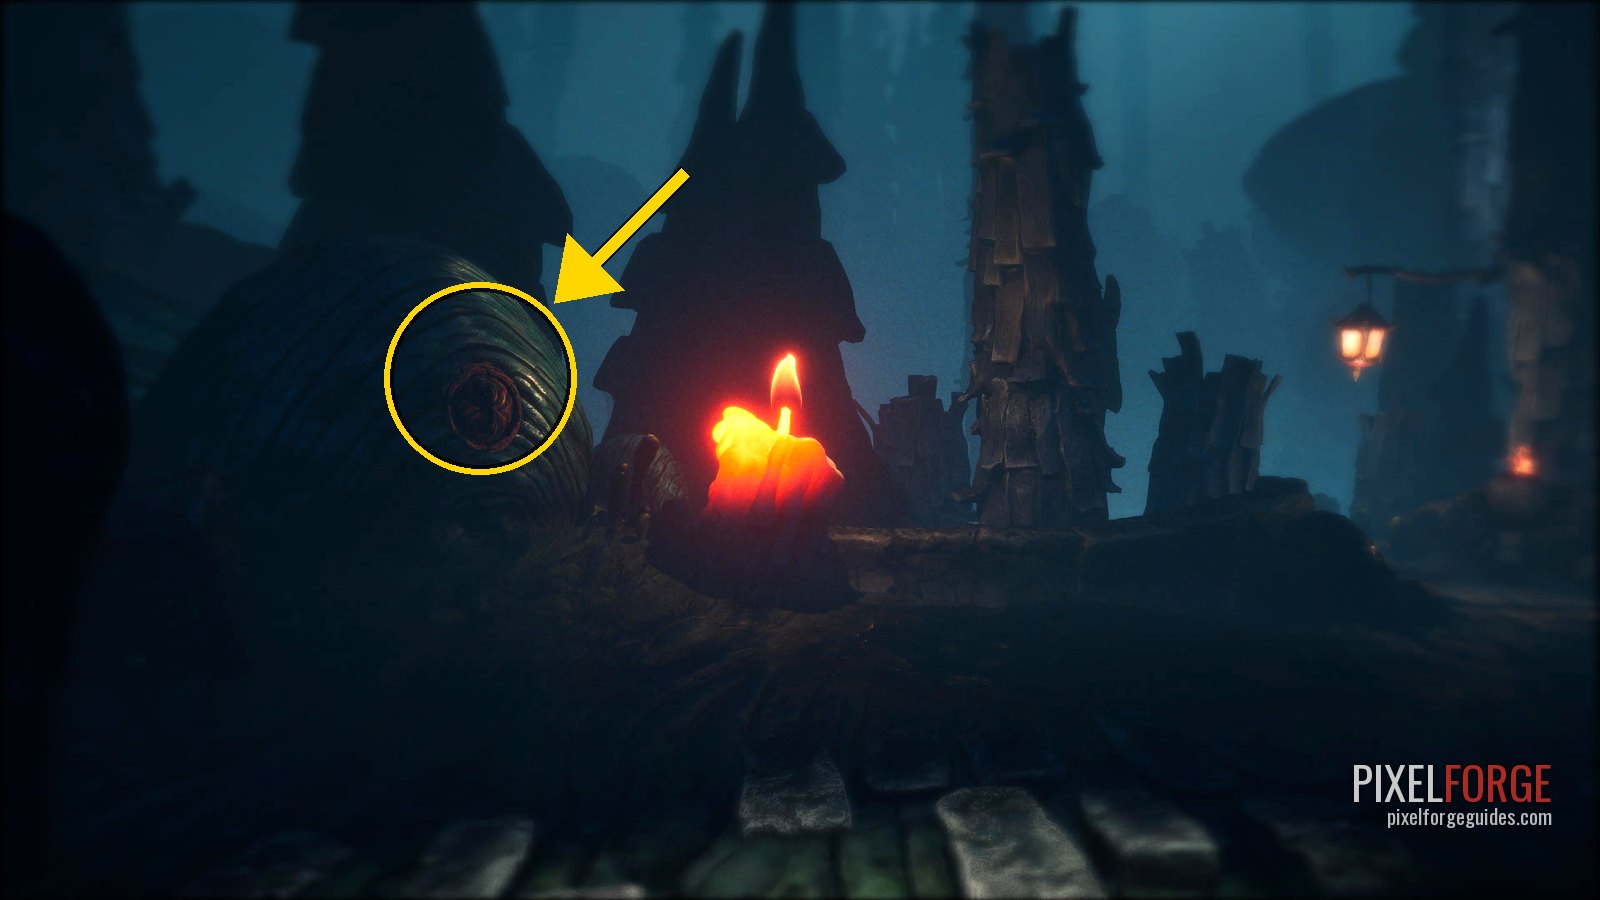 |
| Gramophone Disc 3/17 · Köket Chapter 1: The Tale of the Burnt One | Where you lure the monster with the candle flame: a hatch on the left of the path, next to the wardrobe. |  |
| Gramophone Disc 4/17 · Gräns Chapter 2: The Tale of the Loathsome Molgrim | Run from the creatures hatching out of the eggs and crawl through the hole at the end. Look left on the far side: a hatch at the end of the road. | 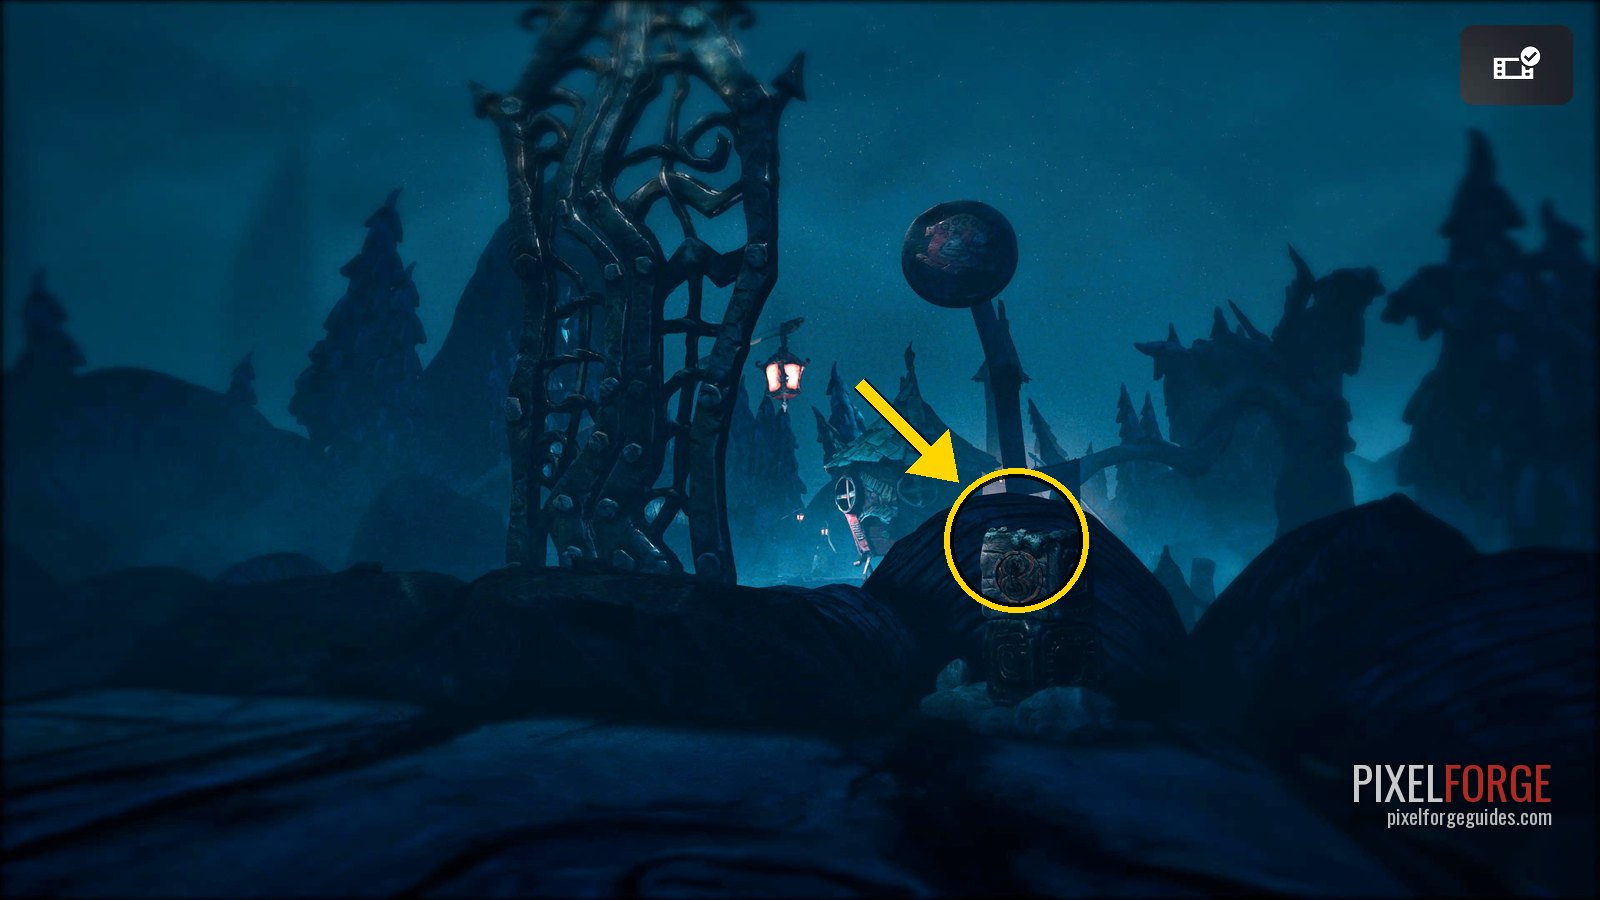 |
| Gramophone Disc 5/17 · Nobodyville Chapter 2: The Tale of the Loathsome Molgrim | Solve the candle puzzle to open the gate; the hatch is on the right of the path beyond it. | 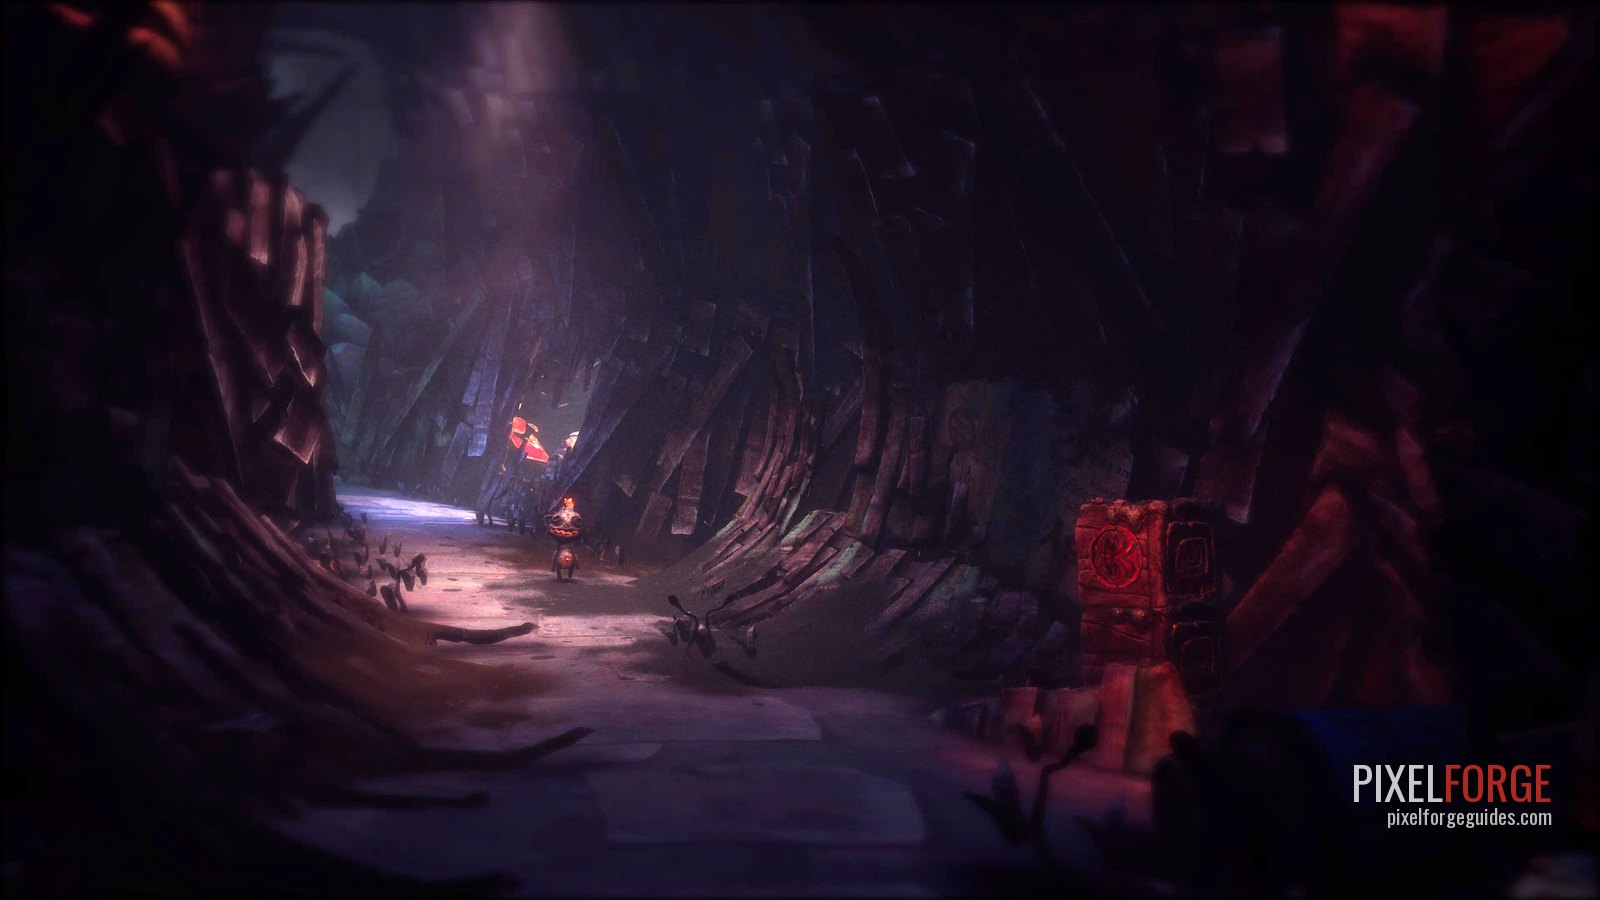 |
| Gramophone Disc 6/17 · The Spark Chapter 2: The Tale of the Loathsome Molgrim | Go back to the three blue candles and take the right path. Just after the giant guitar on your left, turn left: a hatch on a small island. | 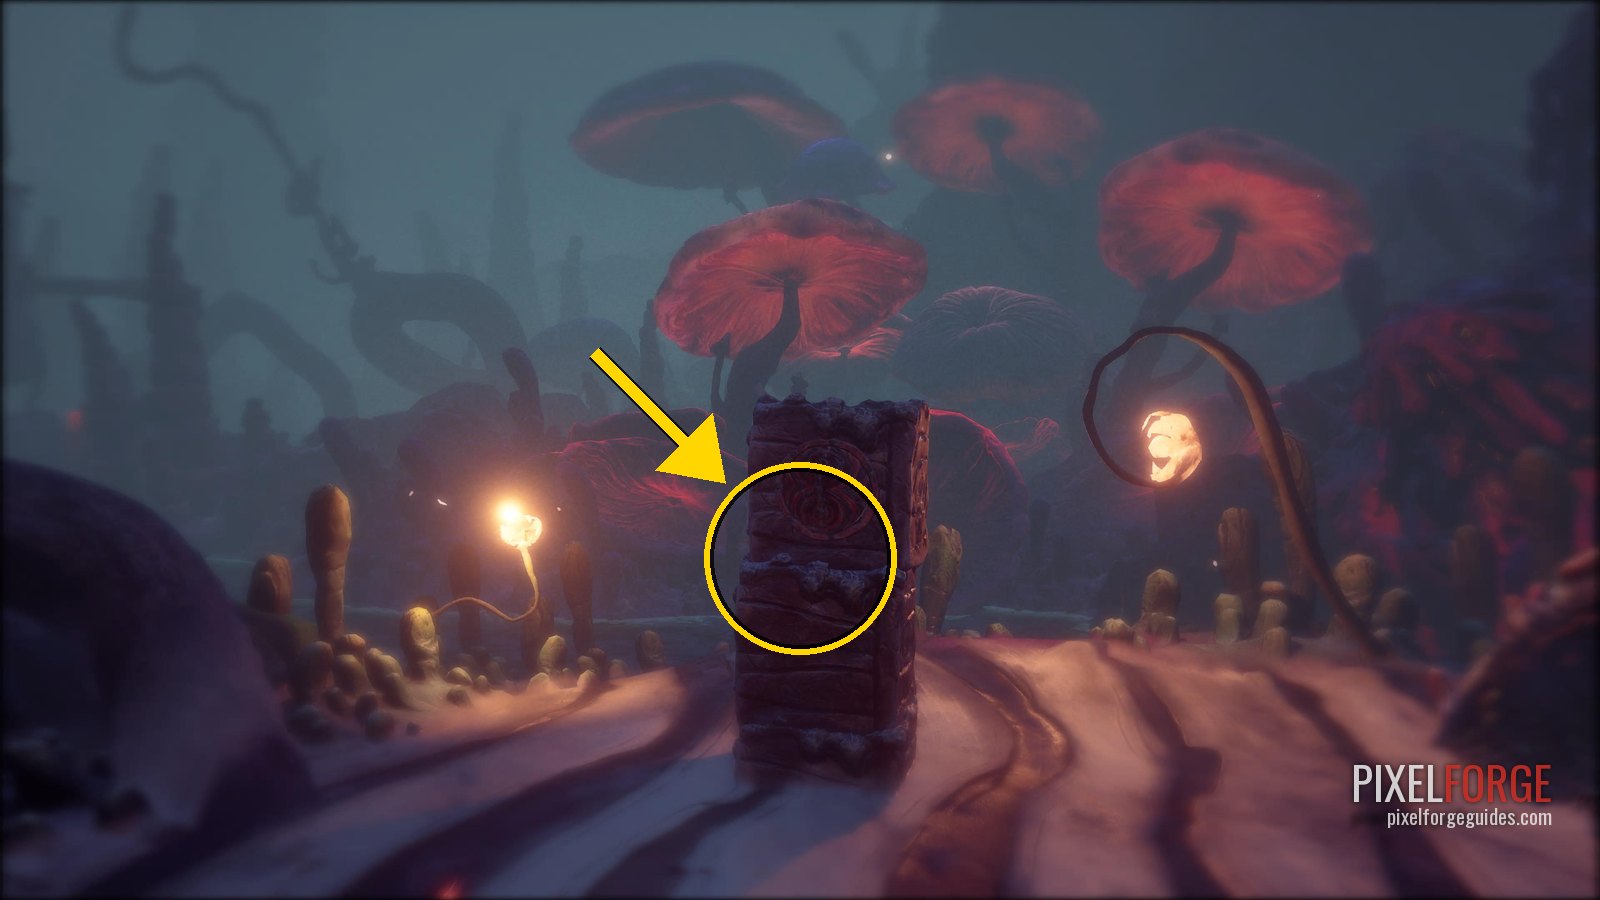 |
| Gramophone Disc 7/17 · All Darkness Vanishes Chapter 3: The Tale of Coalhaven | At the start, take the right-hand path just past the character with the umbrella: behind a hatch. | 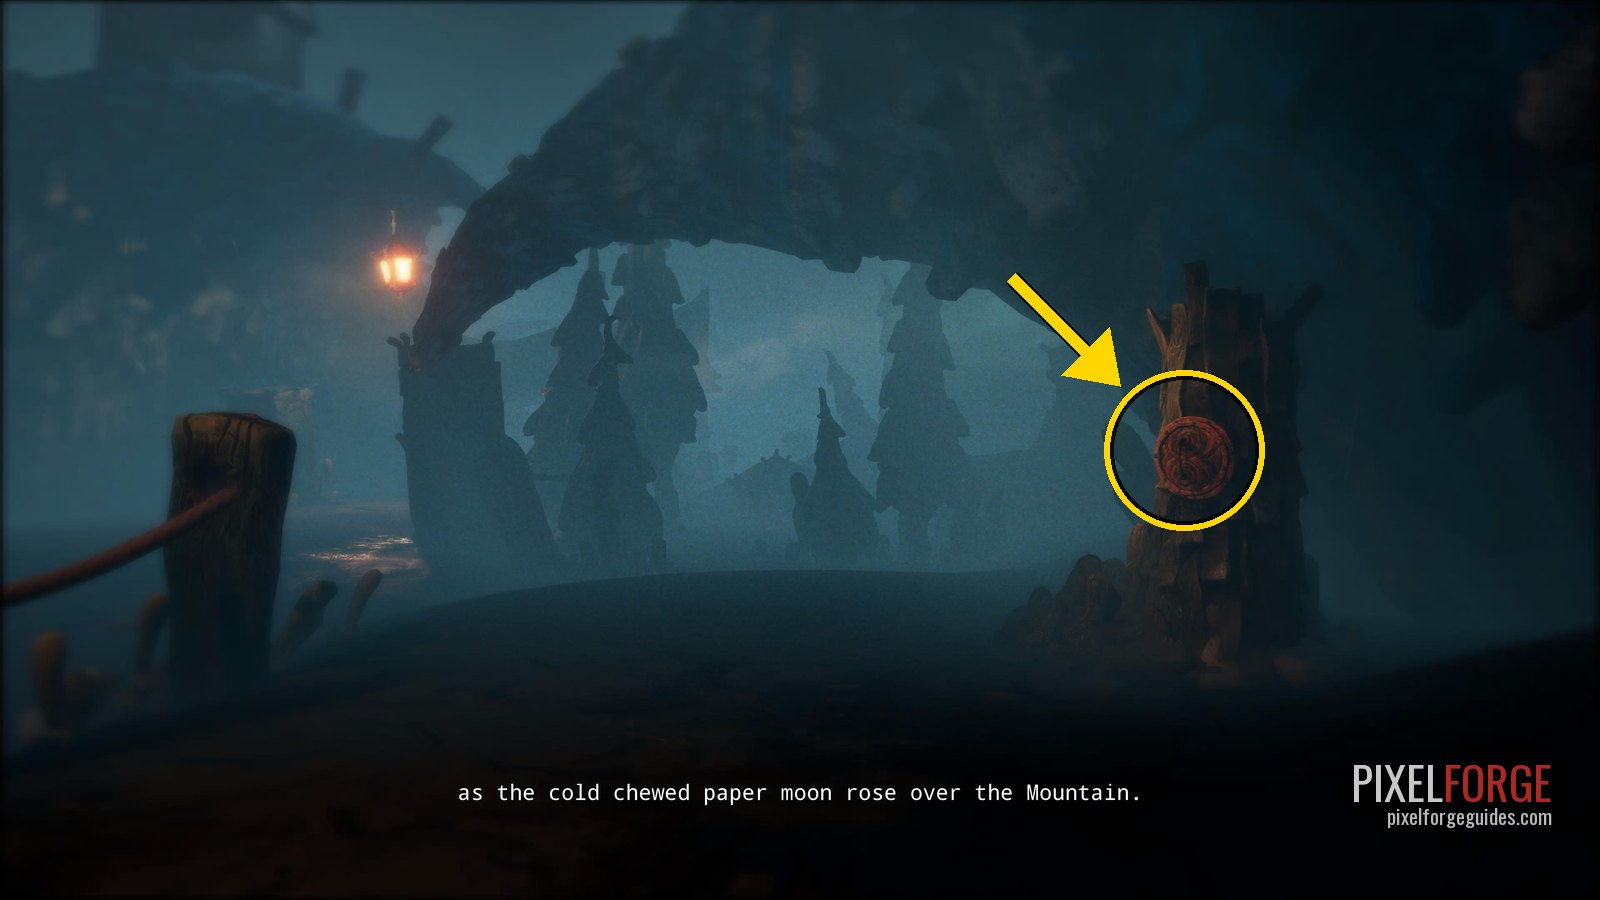 |
| Gramophone Disc 8/17 · I Trappan Chapter 3: The Tale of Coalhaven | Inside the cave: the area with the tracks, a hole in the middle and orange plants. The hatch is on a block on the far side of the hole. | 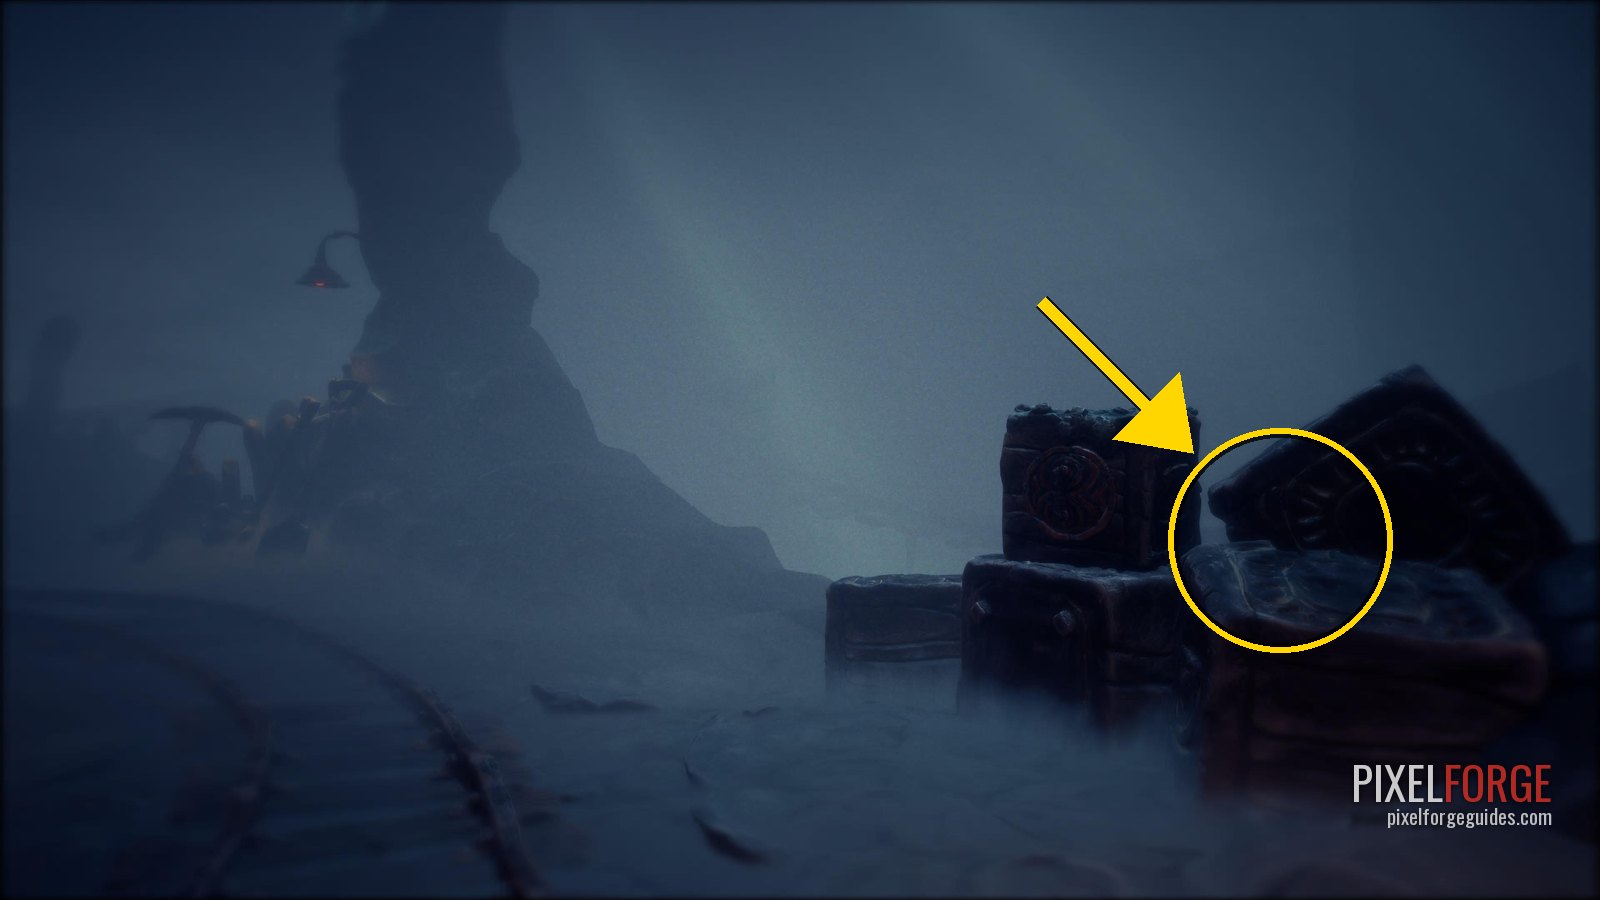 |
| Gramophone Disc 9/17 · Alla Sover Chapter 3: The Tale of Coalhaven | Follow the tracks until you drop down a small ledge (the tracks carry on below): a hatch on your right as you land. | 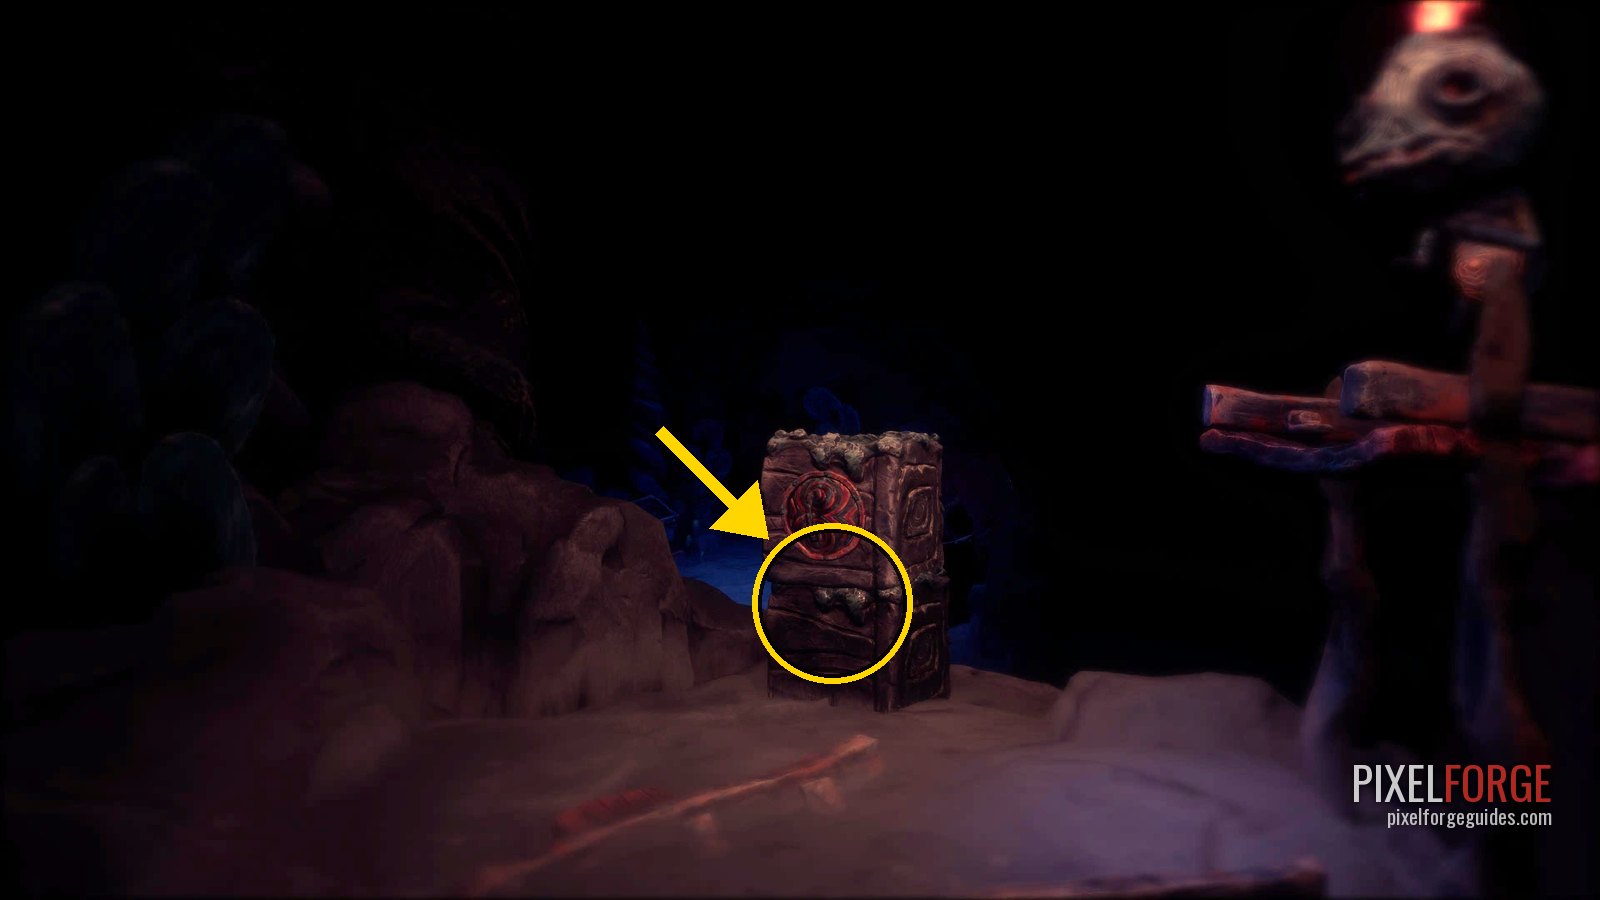 |
| Gramophone Disc 10/17 · Tröstetankar I Juletid Chapter 3: The Tale of Coalhaven | Light the first gas boiler; the door behind it opens. Go through and take the left path: behind a hatch. | 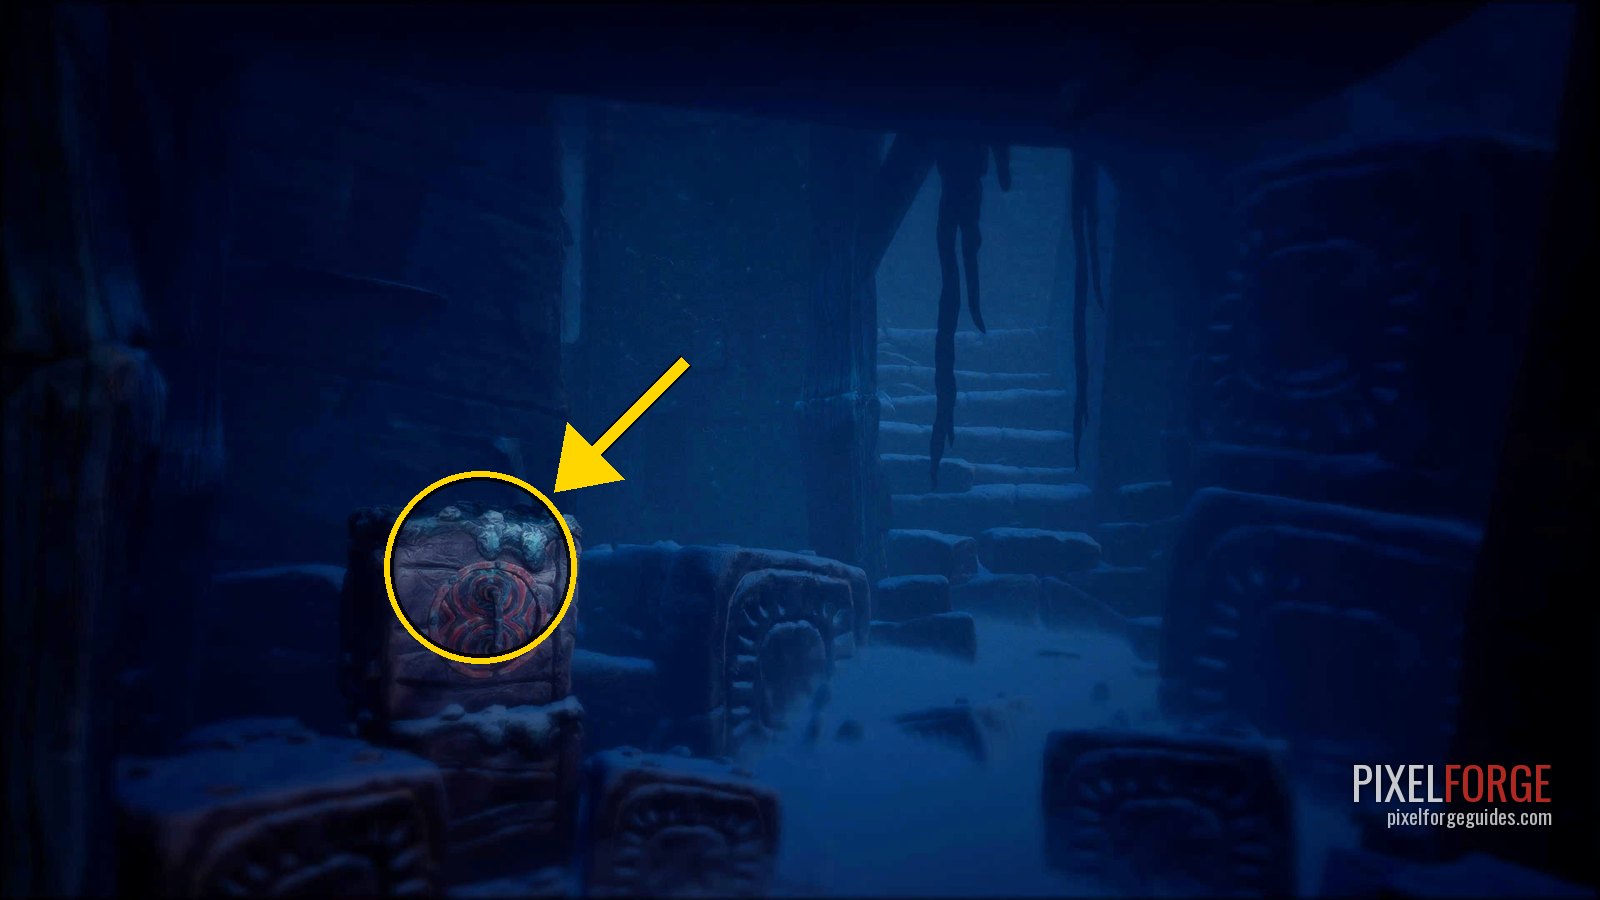 |
| Gramophone Disc 11/17 · The Lullaby Chapter 3: The Tale of Coalhaven | On the same side of that bridge there's a sealed well. Climb the stairs to the left of it. | 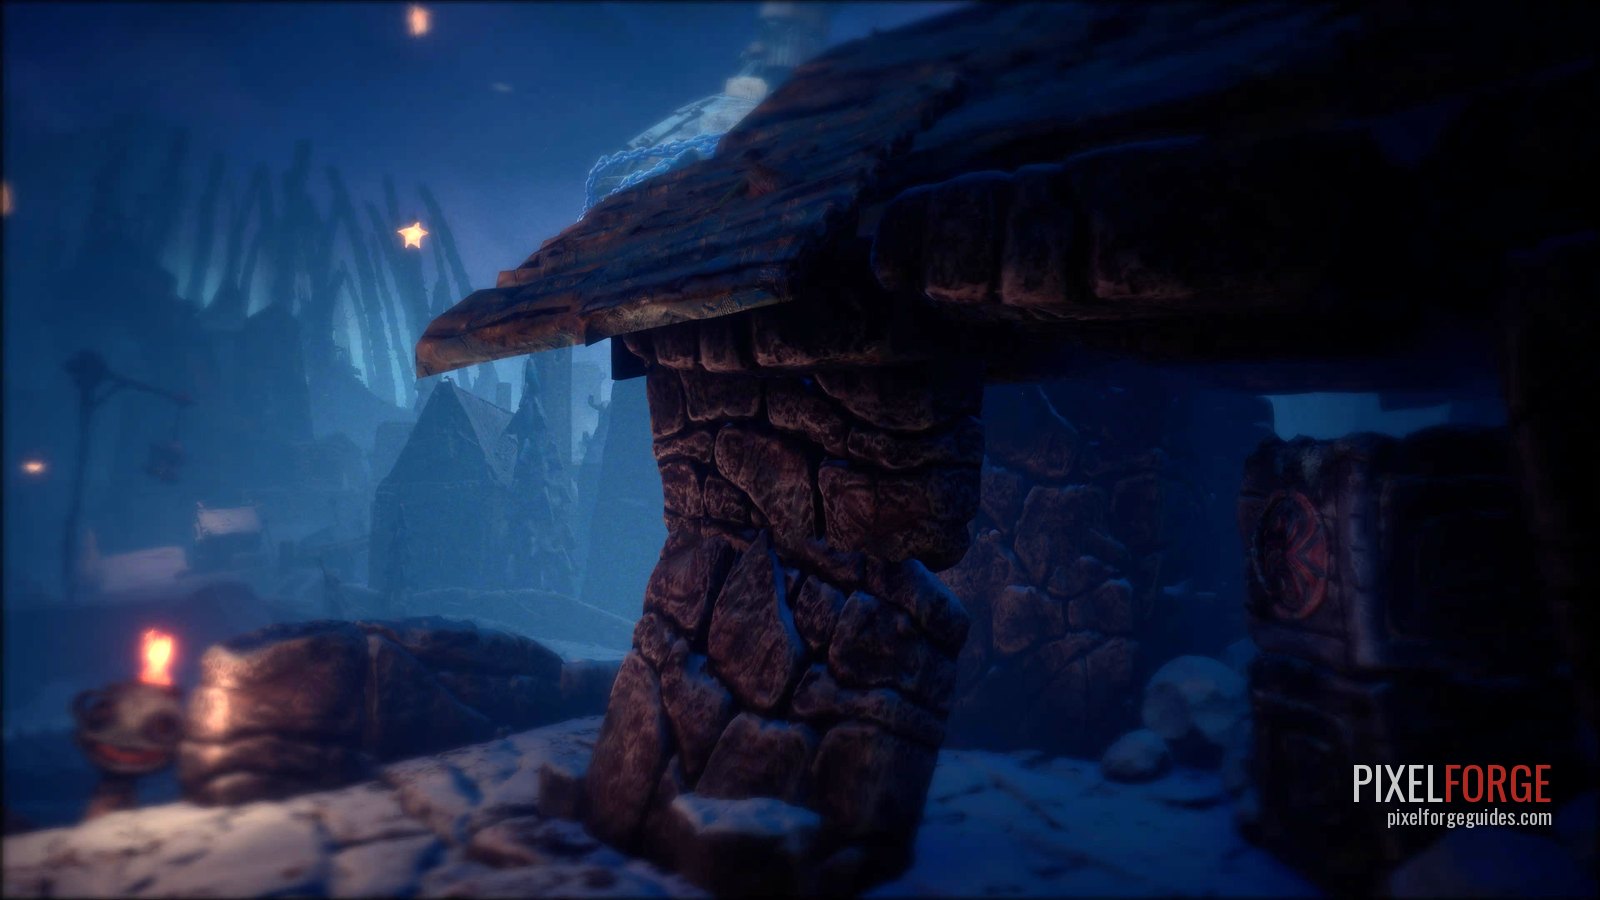 |
| Gramophone Disc 12/17 · Och På Så Vis Skrider Dagarna Vidare Chapter 4: The Tale of the Craftsman's Heart | In the section where you light furnaces to dodge the hunter after the Moonbird, shoot the three candles at the end to open the underground tunnel. The hatch is inside the tunnel. | 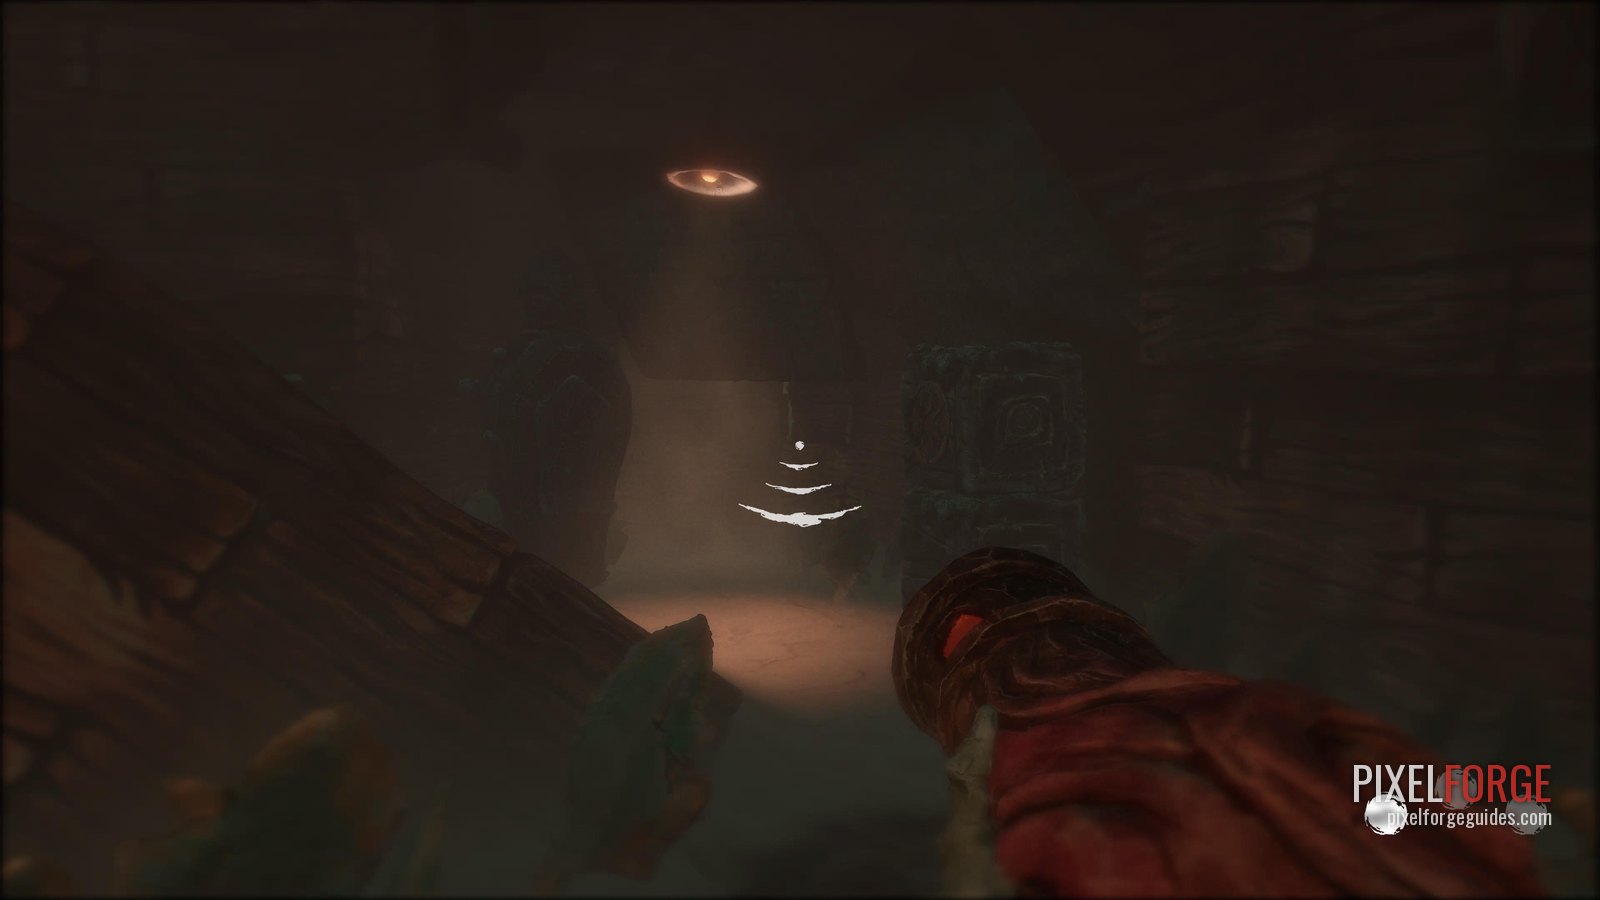 |
| Gramophone Disc 13/17 · The Craftsman's Heart Chapter 4: The Tale of the Craftsman's Heart | After the theatre you drop into the sewers. Walk straight past the second blue candle to the end of the path. | 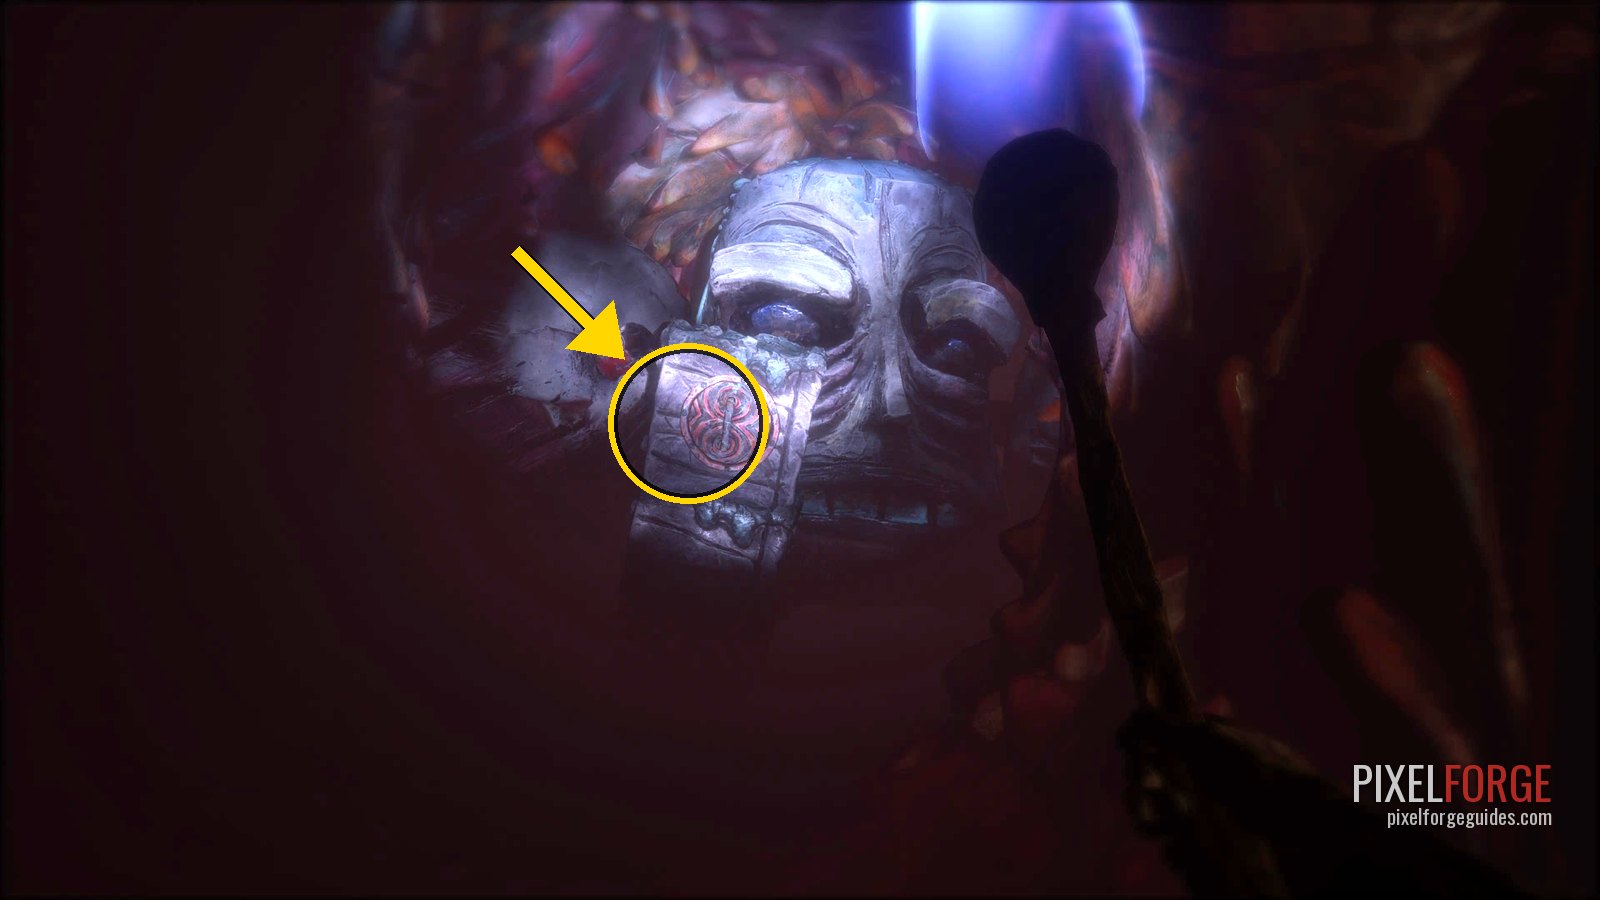 |
| Gramophone Disc 14/17 · The Midnight Walk Chapter 5: The Tale of the Dark | After talking to the Soothsayer again, turn right towards the candles you can light: a hatch on your left near them. | 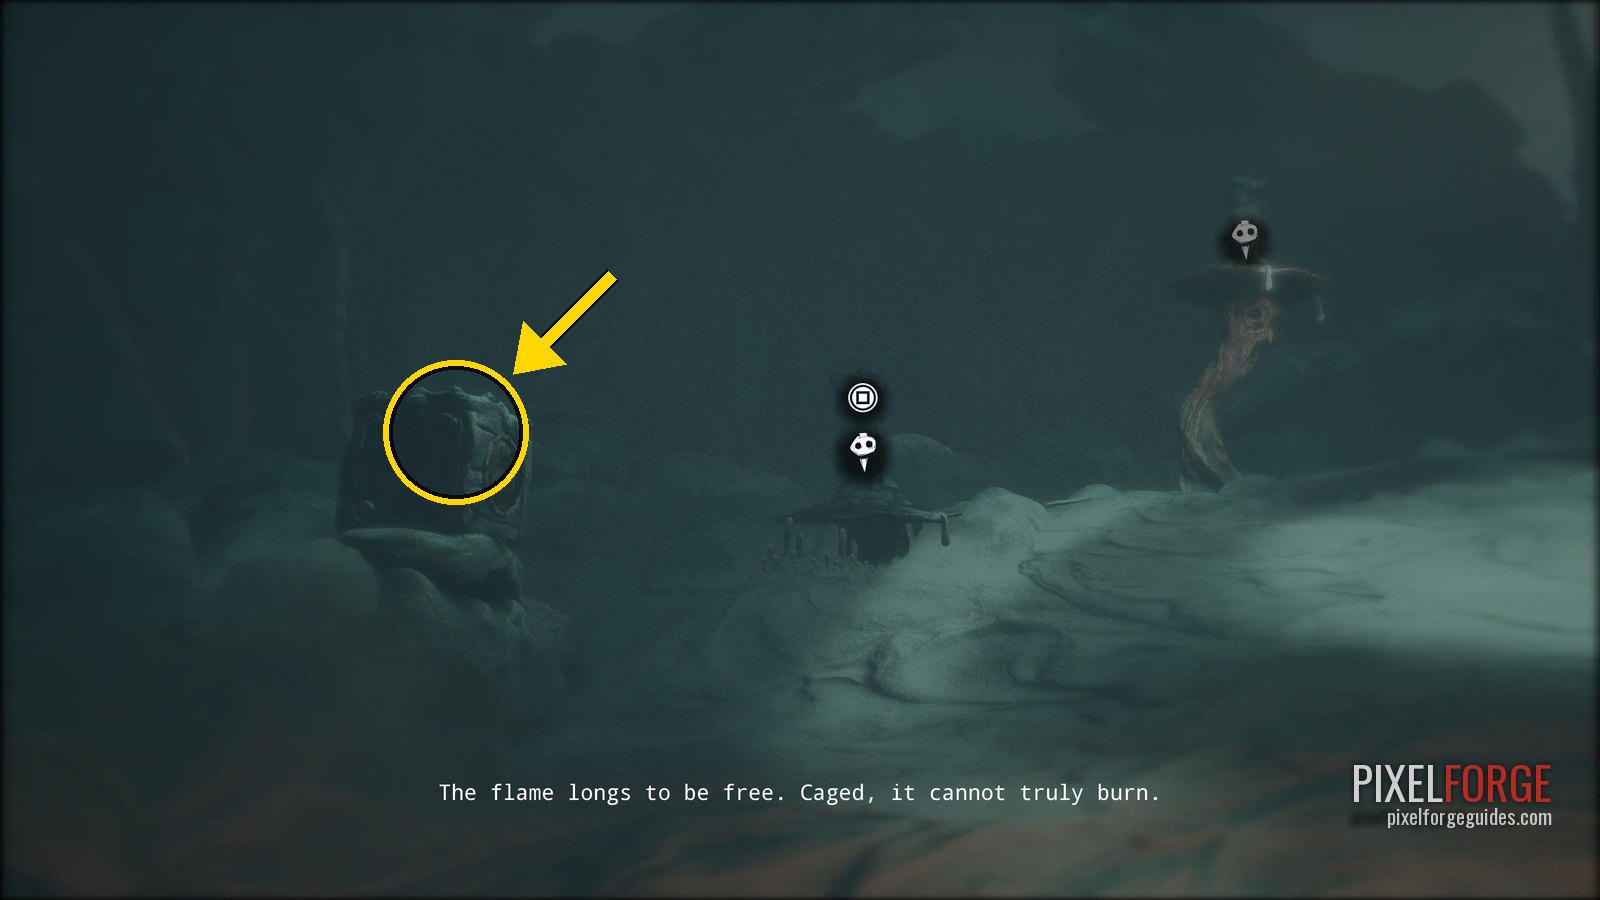 |
| Gramophone Disc 15/17 · Natten Är Nog Det Finaste Här Chapter 5: The Tale of the Dark | Through the gate that needs lots of candles, go straight: a hatch on a trunk on the right of the path. | 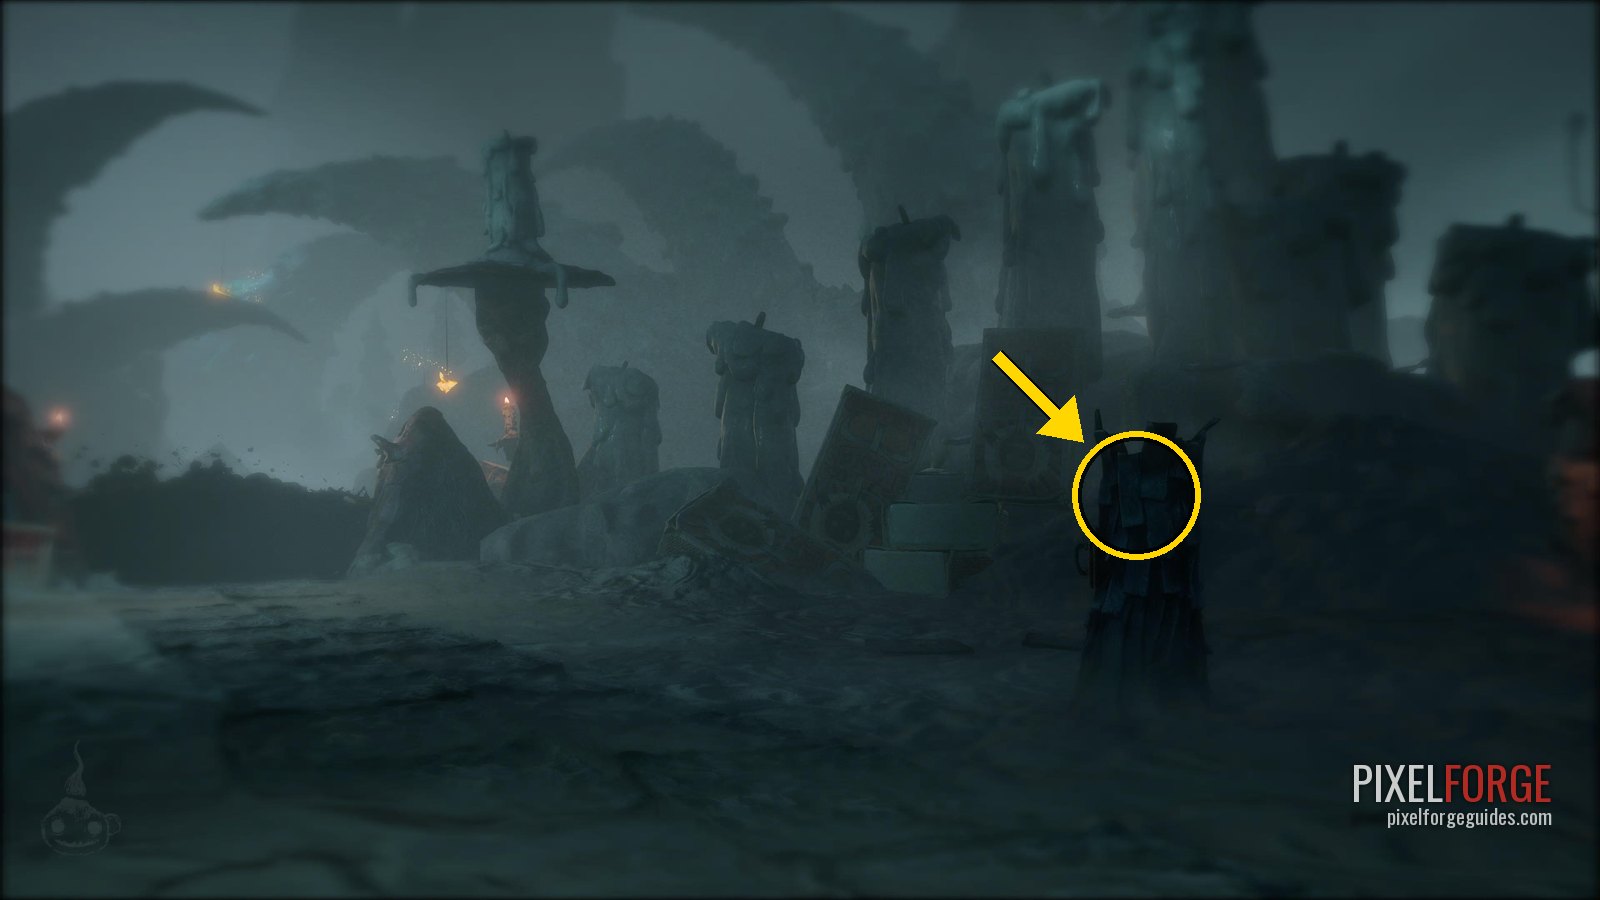 |
| Gramophone Disc 16/17 · Att Skåda Himlen Om Natten Chapter 5: The Tale of the Dark | After the Potboy and Housy scene, Potboy waits at the cliff edge. The hatch is to his left, before you head down the hill. | 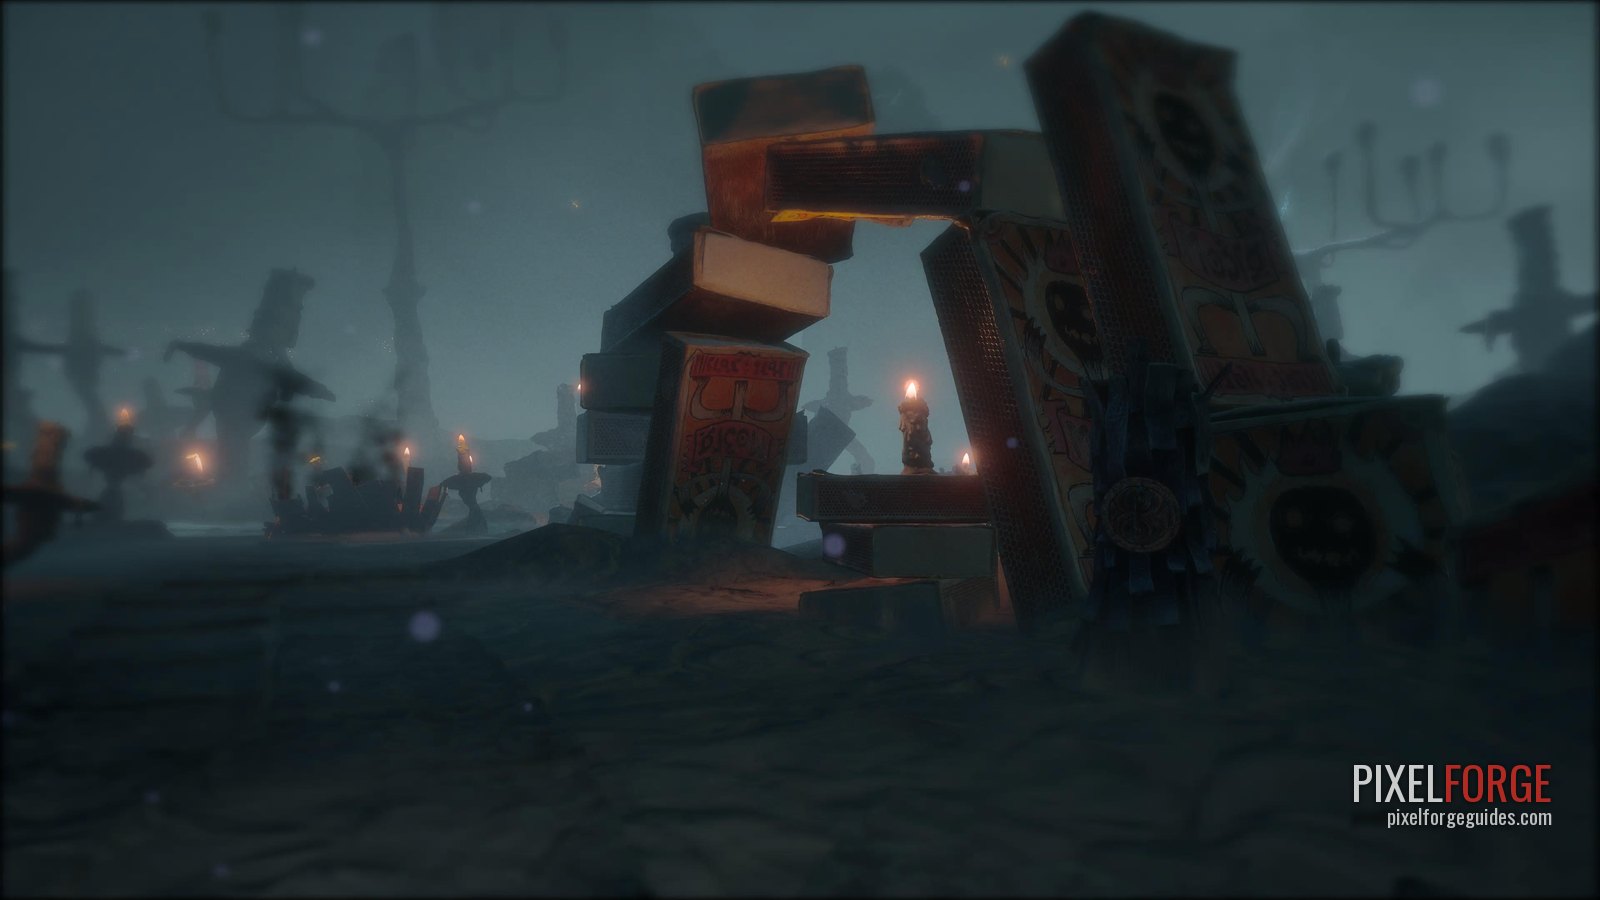 |
| Gramophone Disc 17/17 · Candle Valley Chapter 5: The Tale of the Dark | A hatch to the right of the character in the tent. Last disc: There Is Always Music In The Air. | 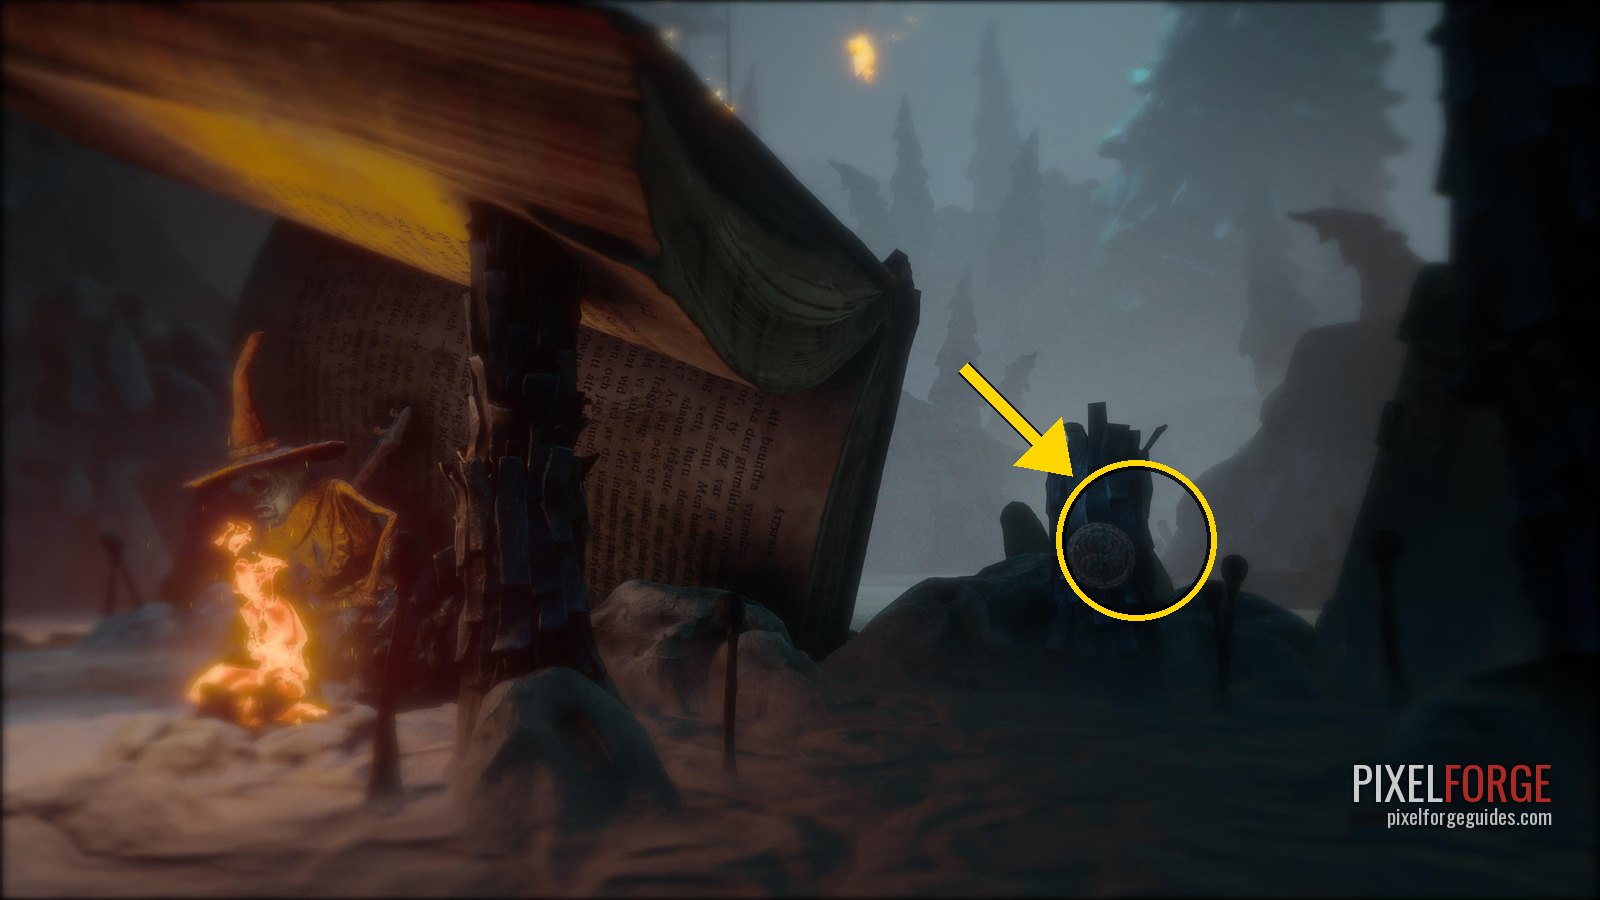 |
Story pages (Who Took The Sun Away?) 15
| Collectible | Exactly where | Our screenshot |
|---|---|---|
| Story Page 1/15 Chapter 1: The Tale of the Burnt One | Same wood, on the other side: a hatch on the tree just to your left after the drop. | 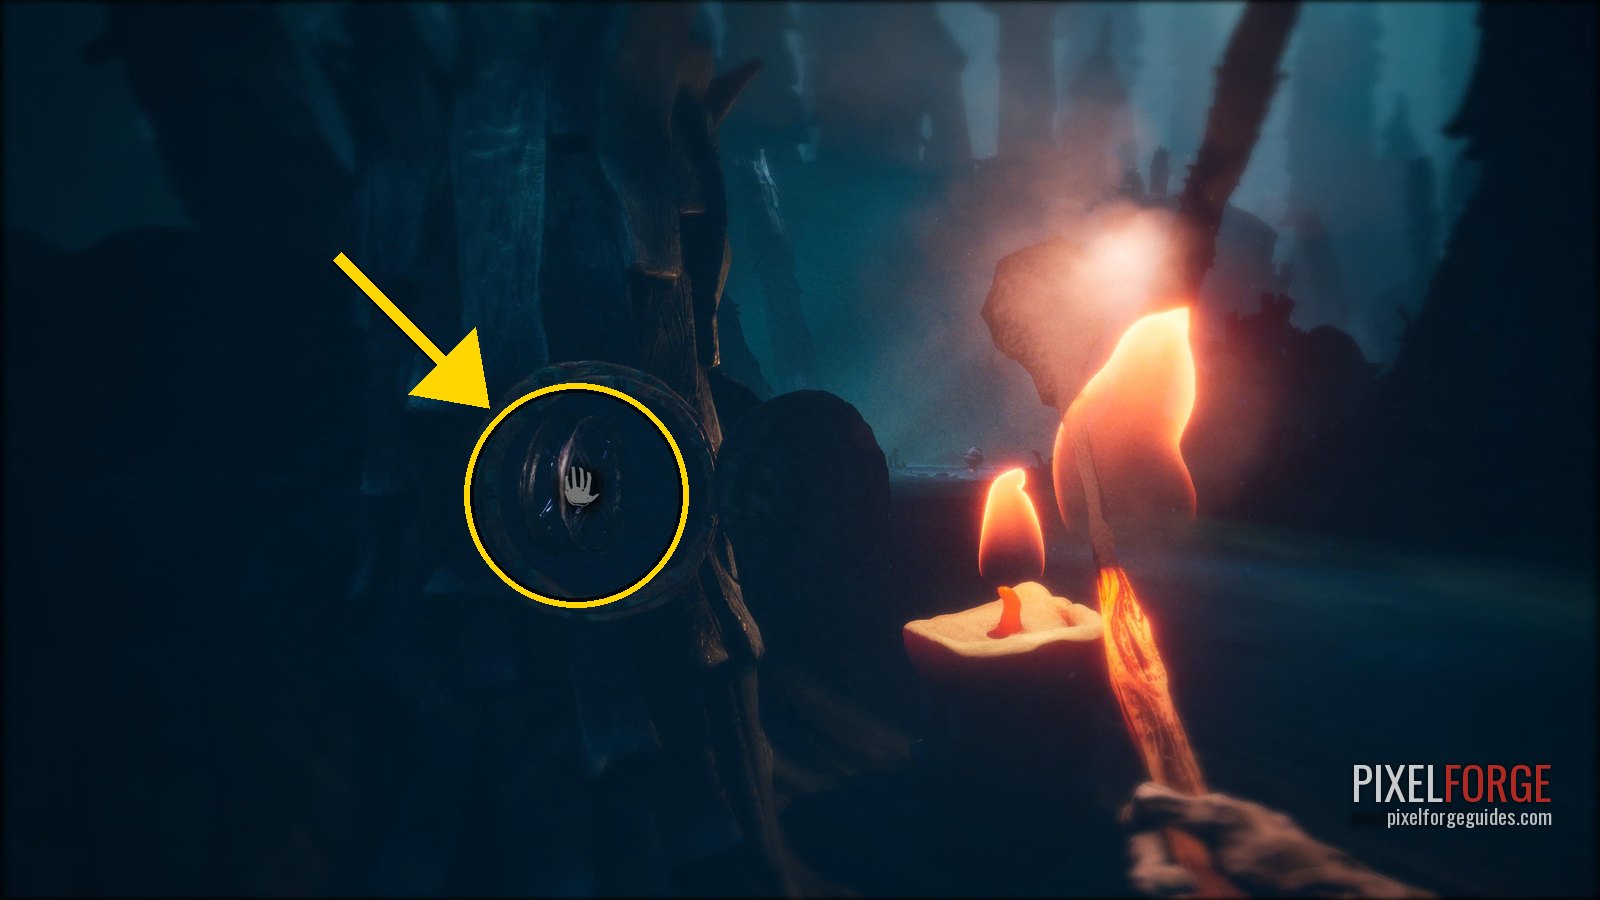 |
| Story Page 2/15 Chapter 2: The Tale of the Loathsome Molgrim | Just after Potboy's house, the first blue eye-door you open: the hatch is to its left. | 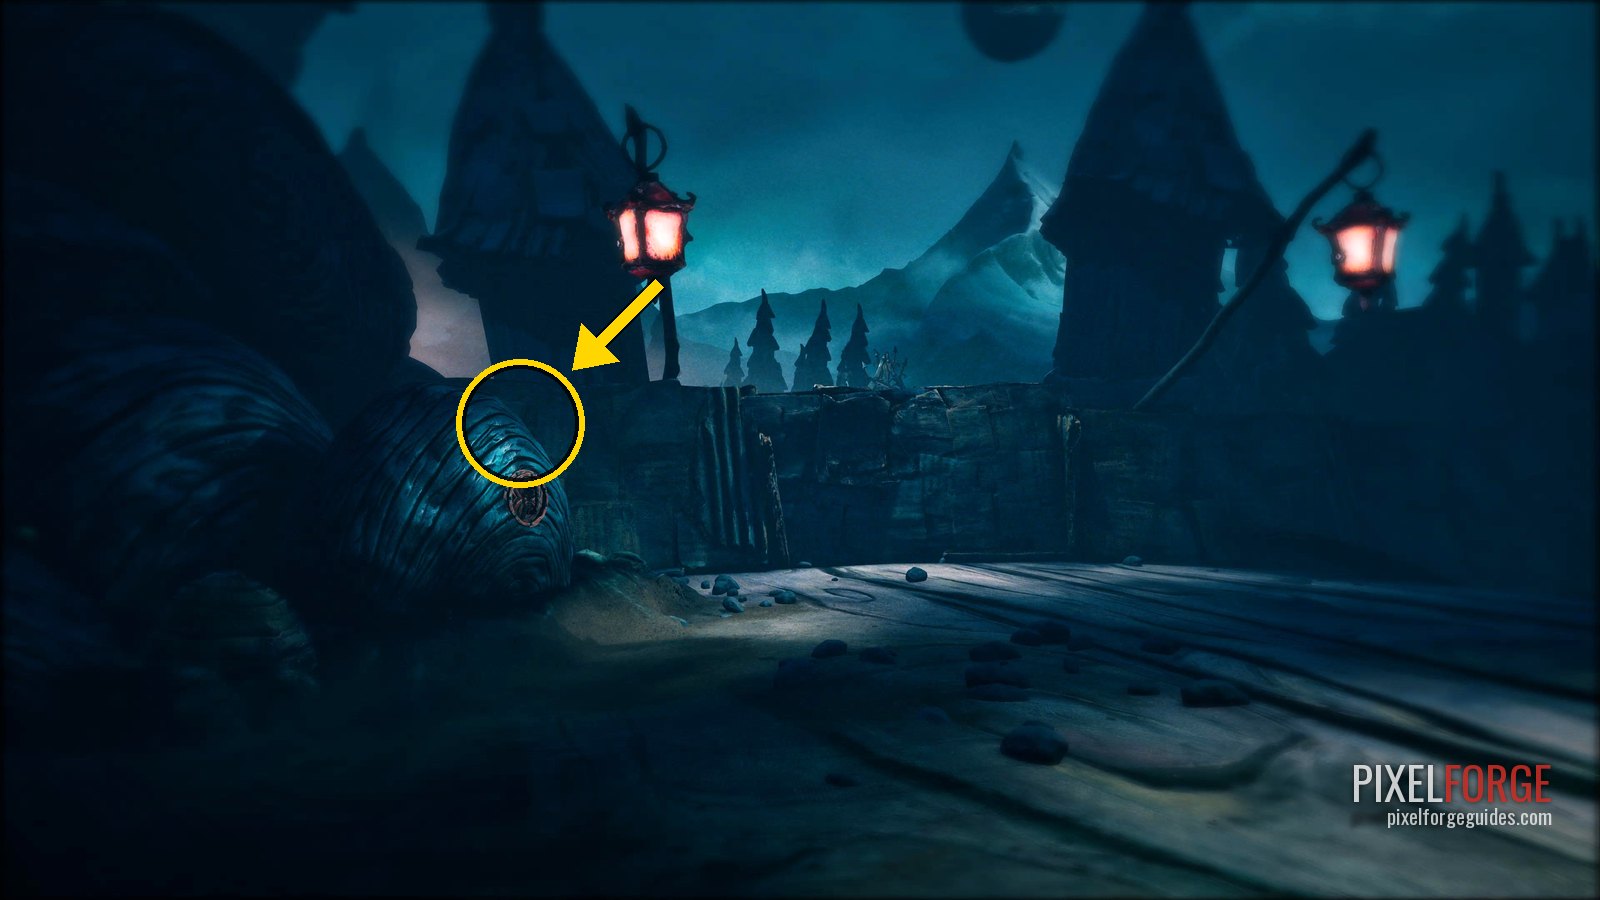 |
| Story Page 3/15 Chapter 2: The Tale of the Loathsome Molgrim | Just past the character who talks to you at the bonfire, a hatch on the left of the path. | 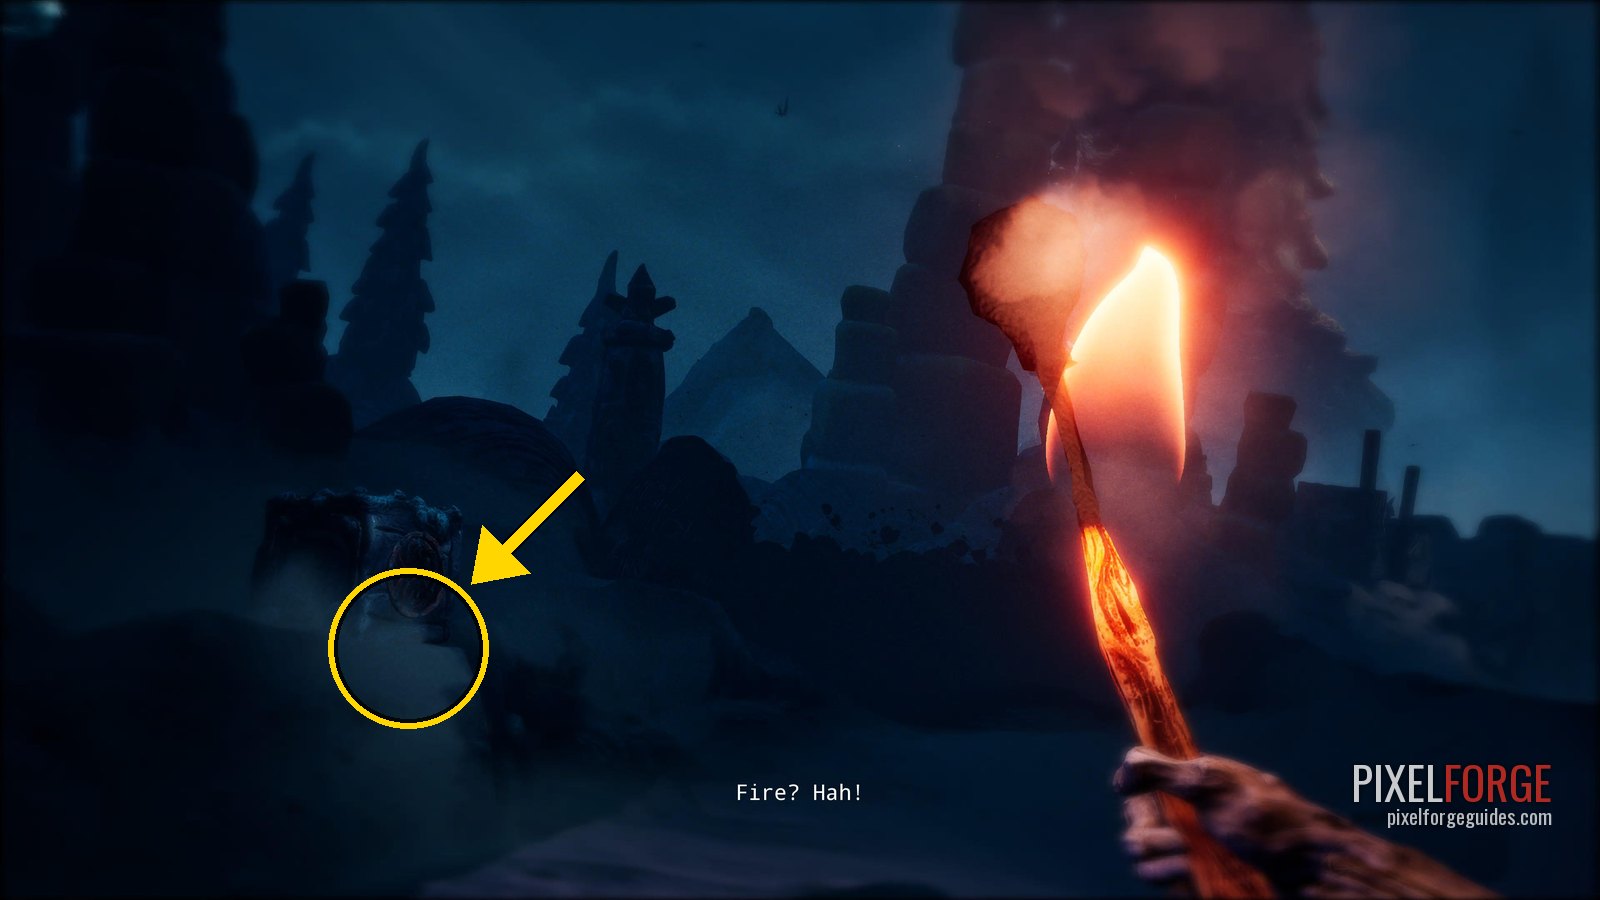 |
| Story Page 4/15 Chapter 2: The Tale of the Loathsome Molgrim | Use that cauldron to raise the platform across the gap. The hatch is to the left of the flying contraption. | 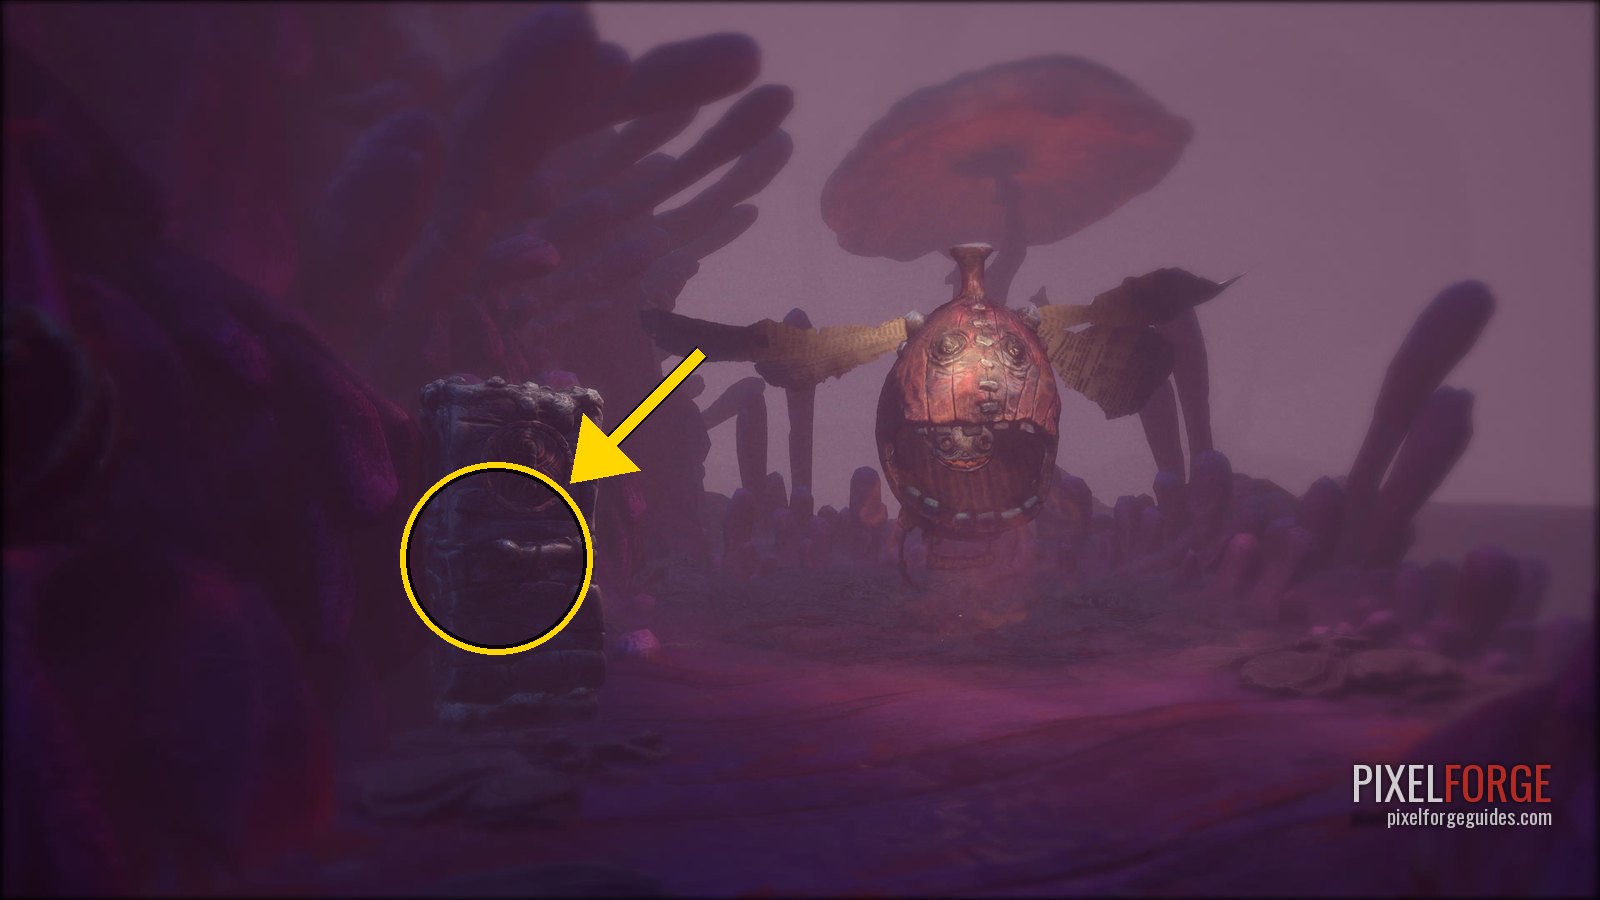 |
| Story Page 5/15 Chapter 2: The Tale of the Loathsome Molgrim | After the eye and reuniting with Housy, walk down the path where bodies shuffle towards you. Just past them, a hatch on the right. | |
| Story Page 6/15 Chapter 3: The Tale of Coalhaven | A hatch to the right of the giant cat. | 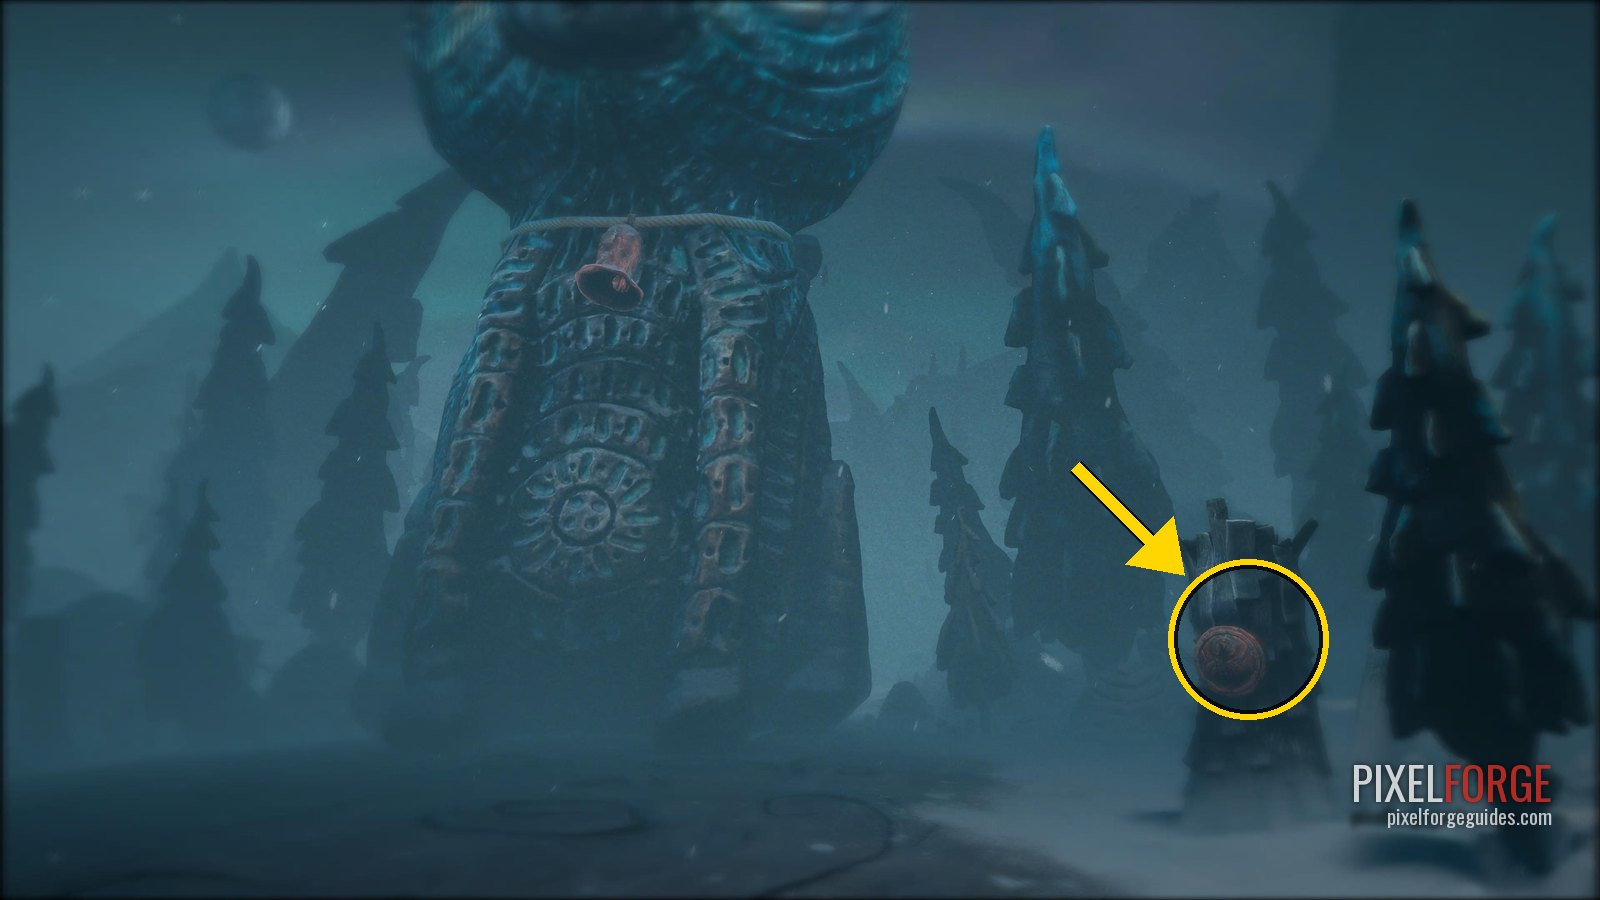 |
| Story Page 7/15 Chapter 3: The Tale of Coalhaven | Out of the mine you move between Potboy's candles to keep from freezing. The hatch is just before the third candle. | 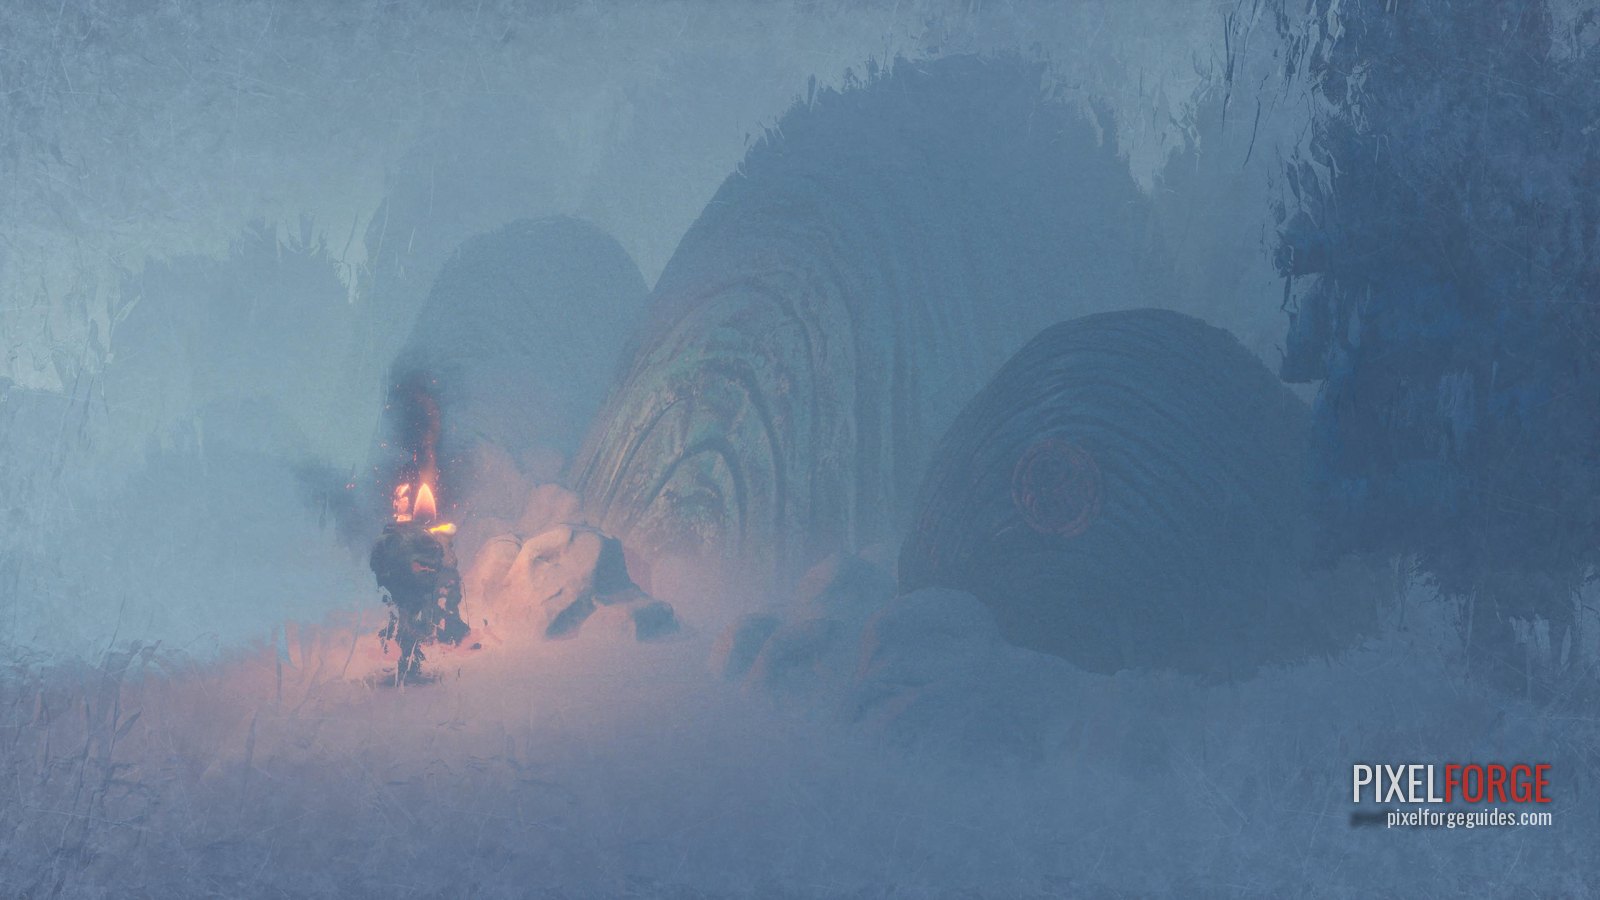 |
| Story Page 8/15 Chapter 3: The Tale of Coalhaven | Getting the thief's leg opens a second path to a small town. The hatch is to the left of the first character you meet. | 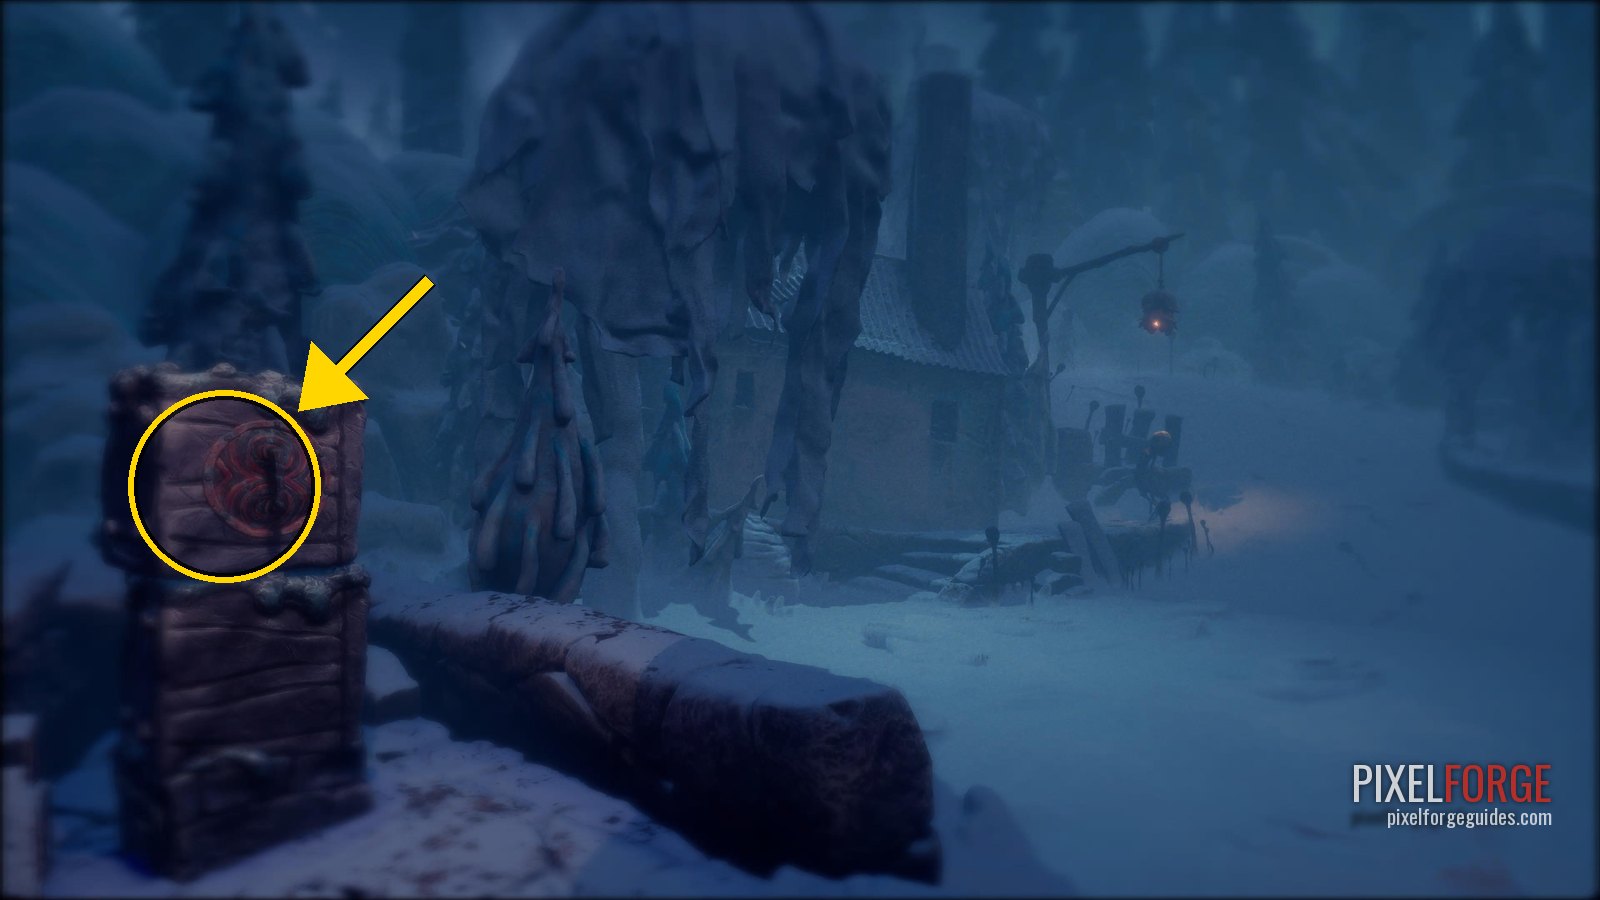 |
| Story Page 9/15 Chapter 3: The Tale of Coalhaven | A hatch to the right of the character holding the skull. | 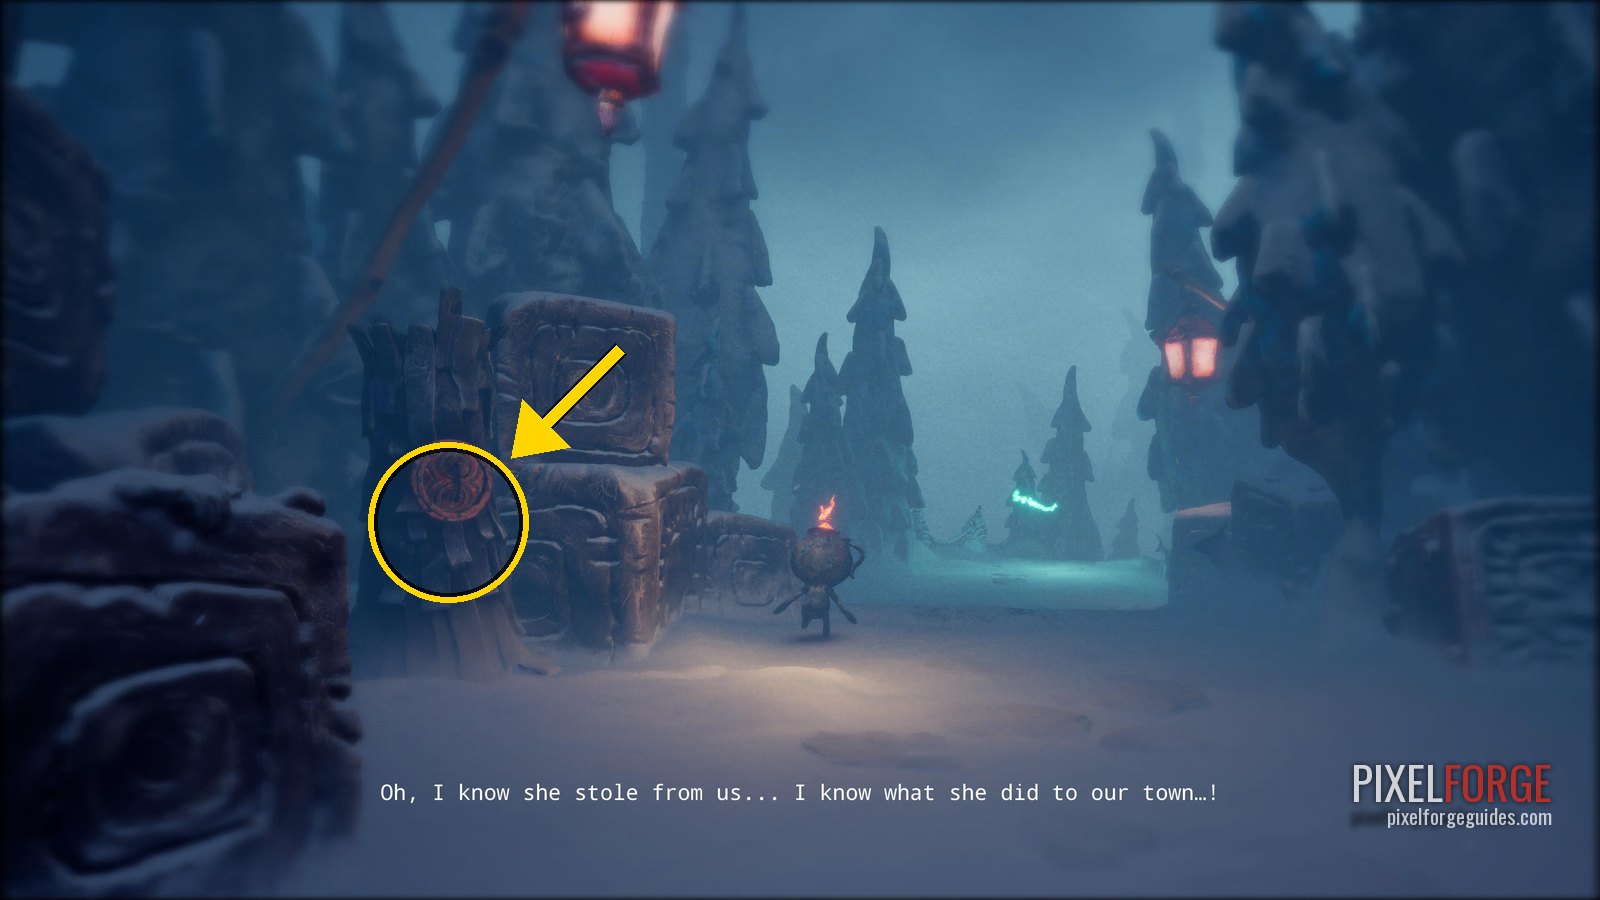 |
| Story Page 10/15 Chapter 3: The Tale of Coalhaven | After the bones quest, go through the wardrobe in front of the giant cat back to Housy. Head down the path: a hatch on the left just before the bridge a creature is crossing. | 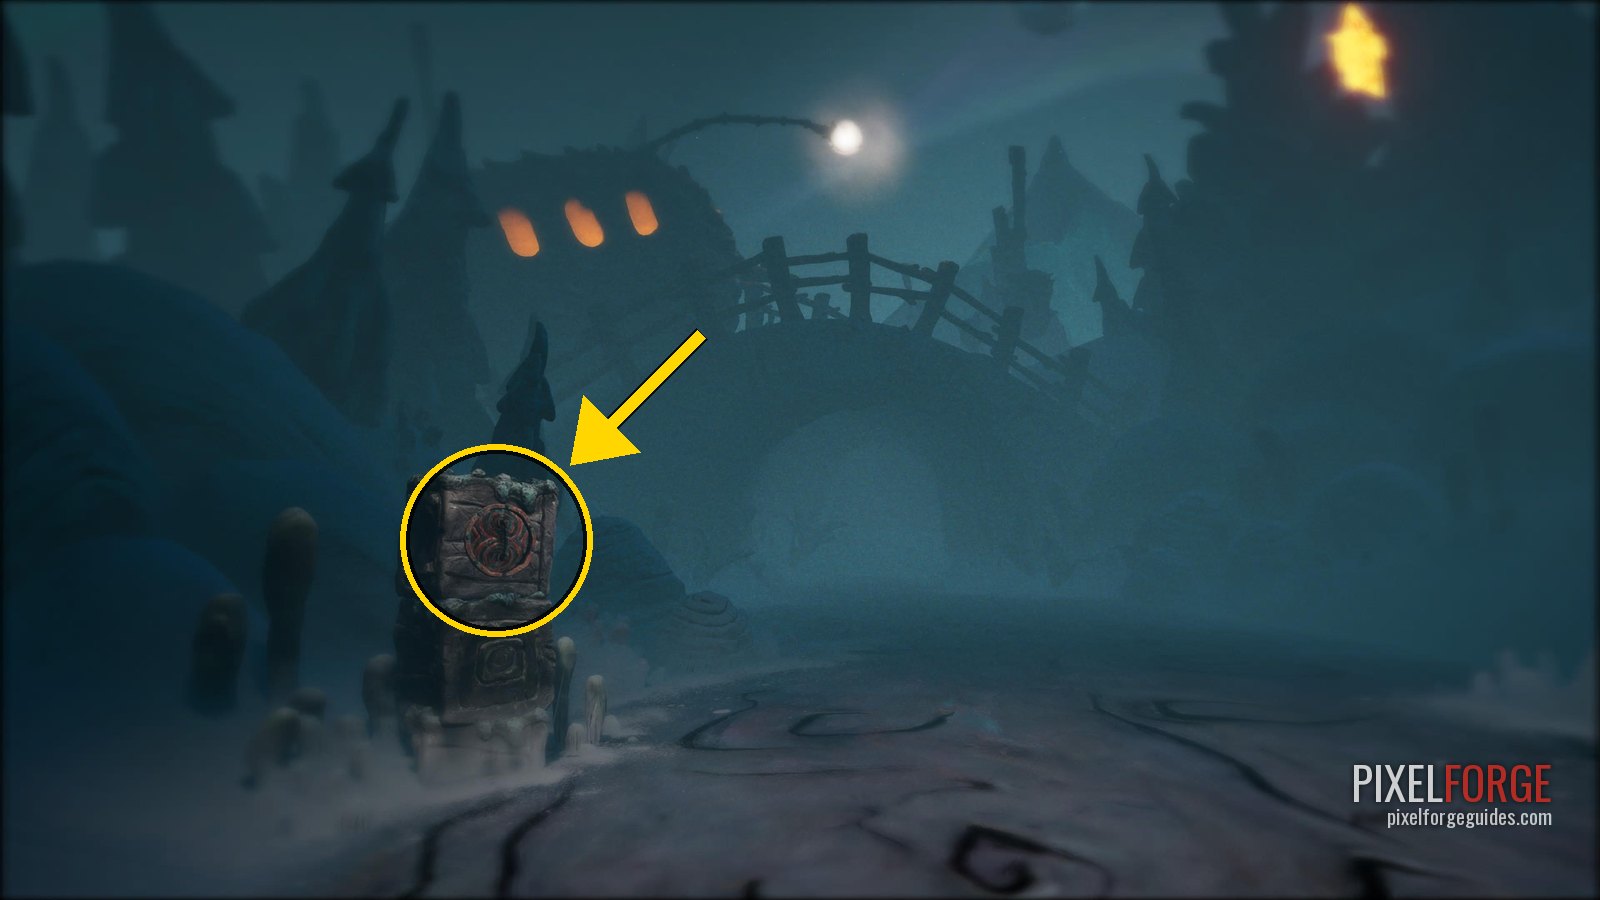 |
| Story Page 11/15 Chapter 4: The Tale of the Craftsman's Heart | Right at the start of the chapter, a hatch on the left of the main path. | 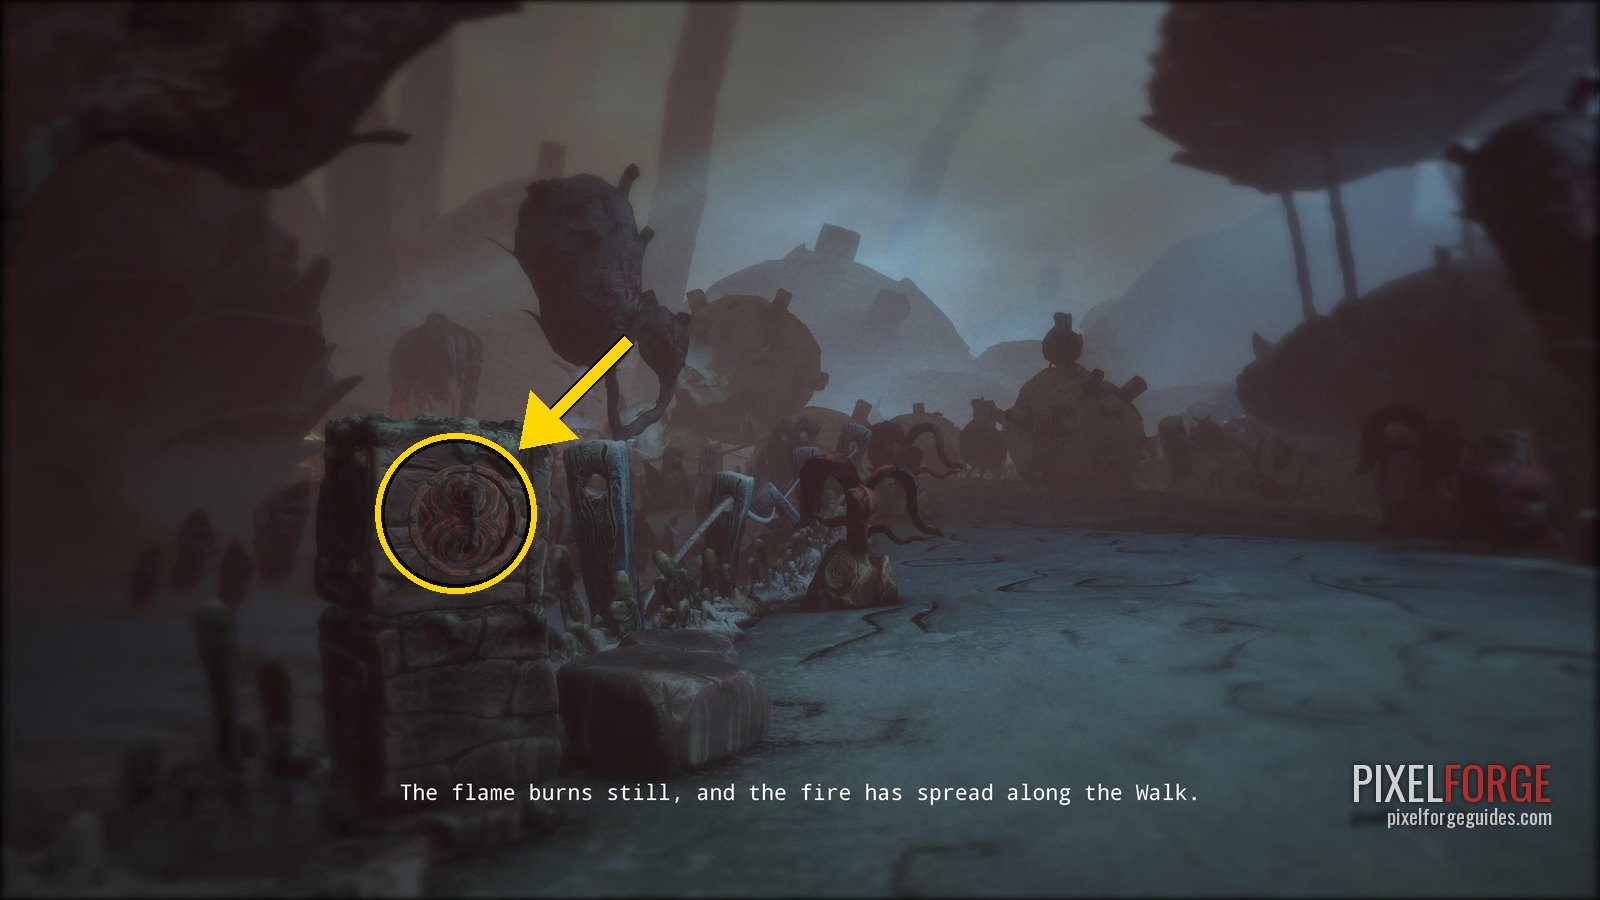 |
| Story Page 12/15 Chapter 4: The Tale of the Craftsman's Heart | The town square with the Moonbird, a few villagers and the giant in the background: a hatch on the left side. | 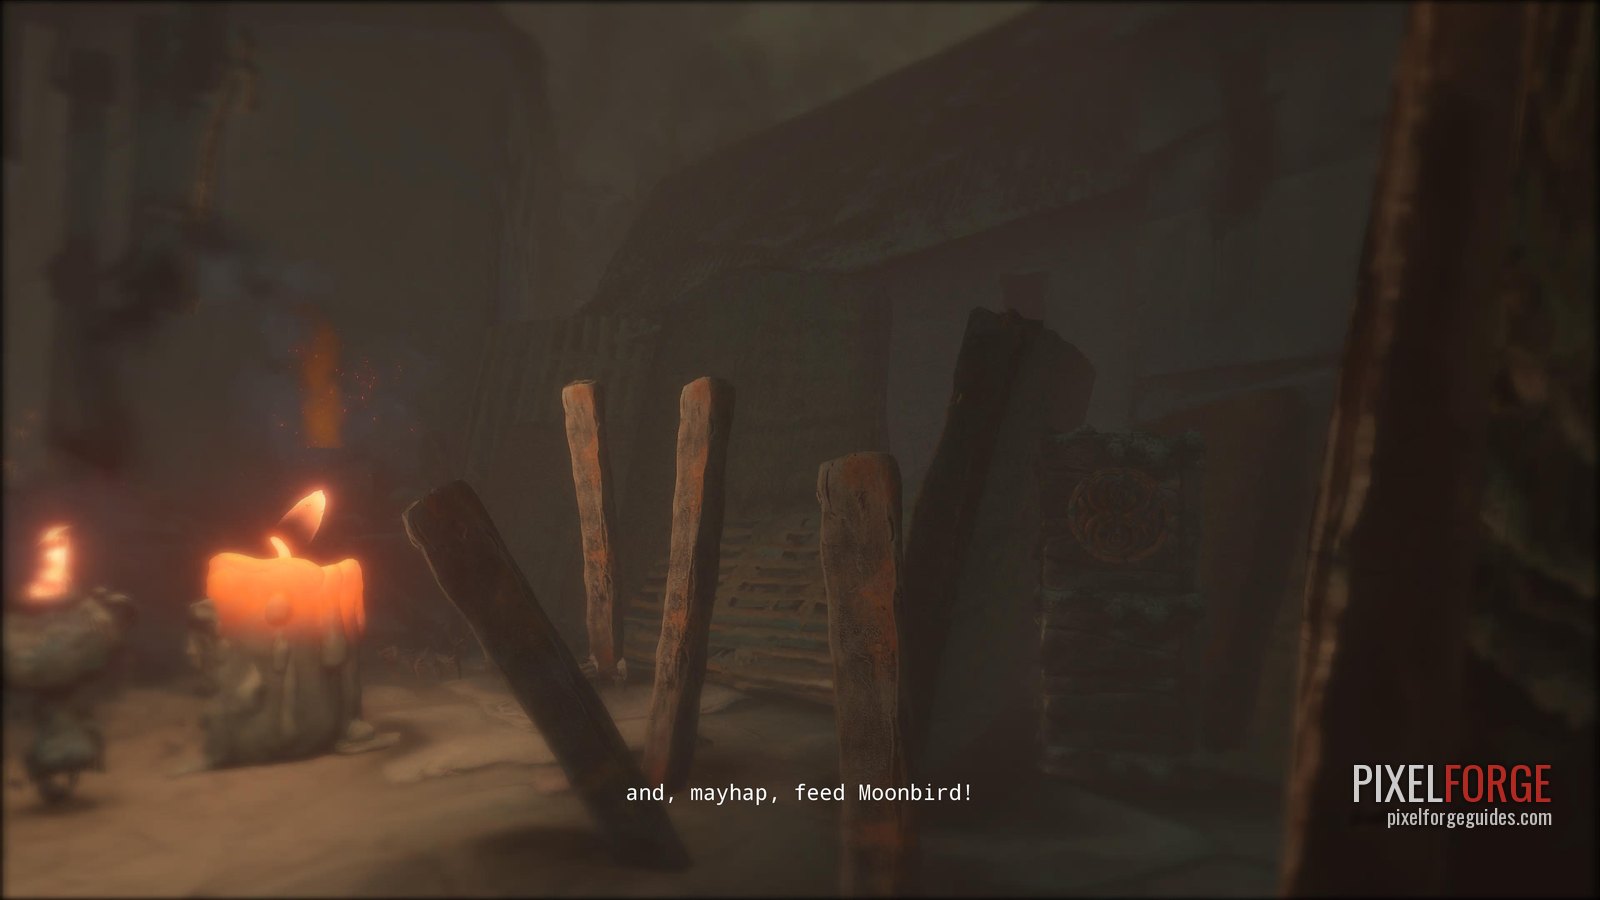 |
| Story Page 13/15 Chapter 4: The Tale of the Craftsman's Heart | In the area with the second projector. | 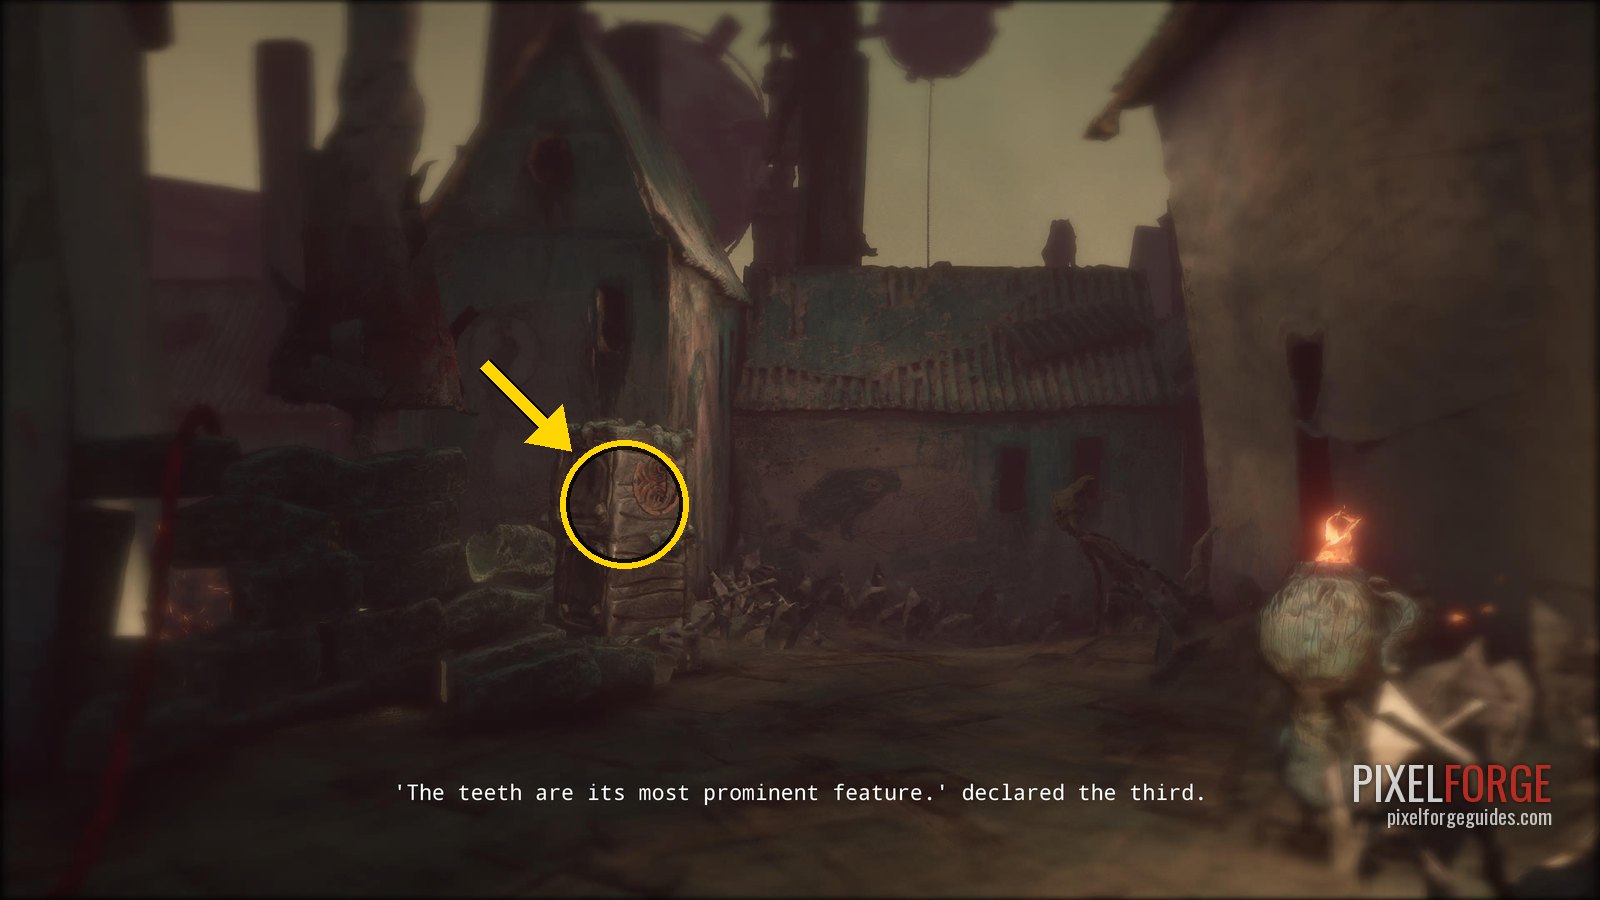 |
| Story Page 14/15 Chapter 5: The Tale of the Dark | Just after the chapter title, on the left of the path. | 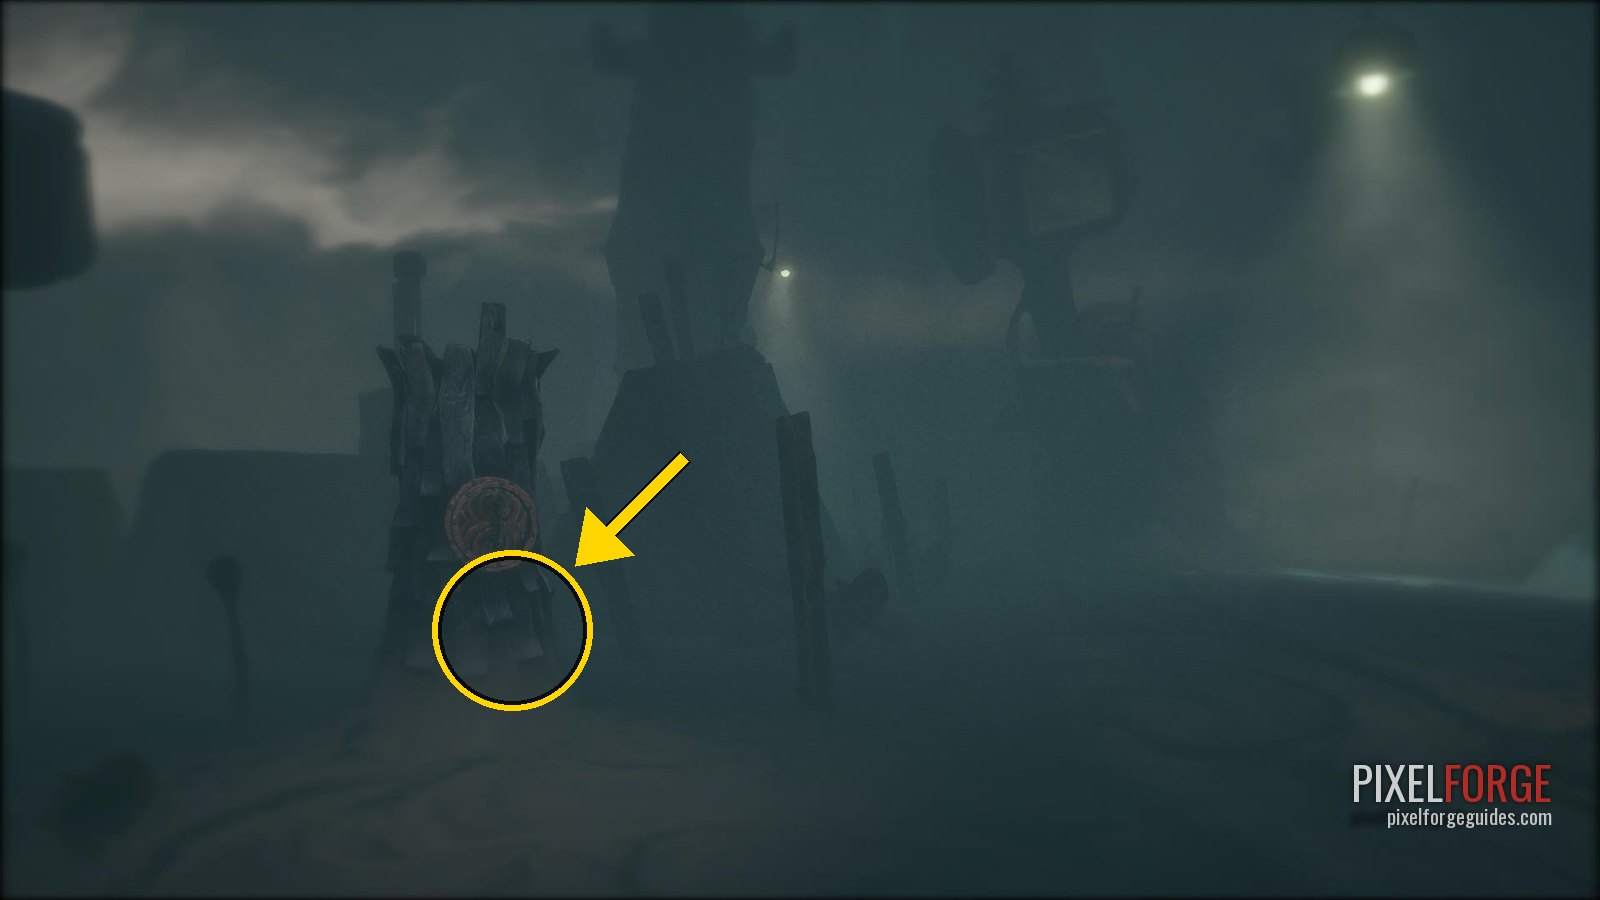 |
| Story Page 15/15 Chapter 5: The Tale of the Dark | Follow the sandy path with the boats and the three lights in the distance. Stay on the path: a hatch on some boxes on your left. Last page: Who Took The Sun Away? | 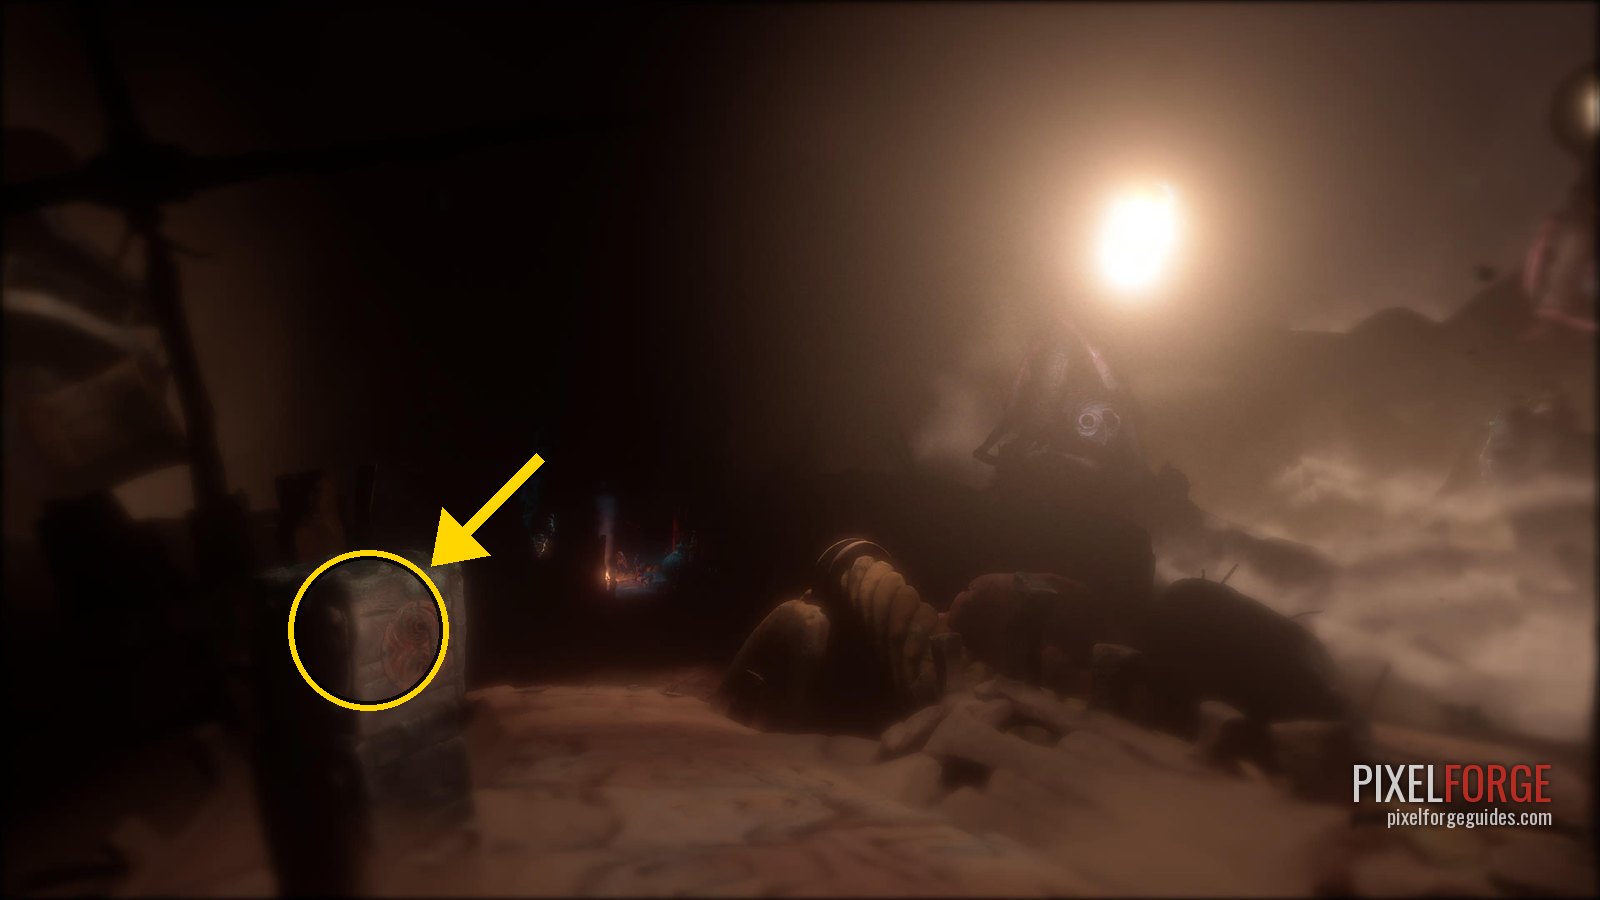 |